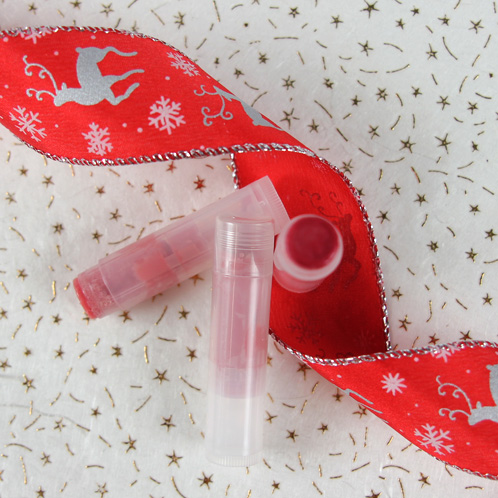
Perfect for holiday dinner party or sophisticated evening out to see The Nut Cracker, this Holiday Crimson Lip Stain is as pretty as it is lip loving. It’s made with our Nourish Lip Balm Base, which contains a luscious blend of coconut, sweet almond and avocado oils. Make it to enjoy yourself or give away as a fun stocking stuffer! This lip stain is part of our Givember 2013 ensemble of gifts.
Search Results for: nail polish
Give the Gift of Givember
The season of gift-giving, present wrapping and stocking stuffing has arrived. This season, we’re taking the frantic trips to the mall, weaving through department store crowds and standing in never ending lines out of the holiday gift-giving equation. Instead why not give gifts that are not only fun to give, but fun to make too?
This is just a taste of the kinds of projects we’ll show you how to create for Givember 2013. From left to right: Surprise Embed Melt and Pour, Sugar Plum Nail Polish, Jelly Roll Melt and Pour, Copper Sparkle Eye Shadow, Loofah Massage Melt and Pour, Candied Gingerbread Man Melt and Pour, Santa’s Sugar Cubes and Sweet Winter Clementine Lip Balm
From November 4 through 15, we’ll show you 25 fantastically festive projects that make great gifts and stocking stuffers as part of Givember 2013. We’ll show you several tutorials per day through our various social media outlets, so check in often for the latest tutorial.
We’ve included a wide range of goodies, from how to make mineral make-up to lip balms and of course, lots of fun soaps! Along with the tutorials, look out for special Mid-Week Mayhem coupons with exclusive offers and deals. These coupons are good for just 24 hours, so keep a close eye on our Facebook, Instagram, Vine, Tumblr, Twitter, and Pinterest accounts, the Bramble Berry homepage, and of course, the Soap Queen Blog.
Our newsletter subscribers will receive bonus tutorials and be the first to know about all the deals and coupons, so if you aren’t signed up already, head over to Bramble Berry and enter your email address on the right hand side. Don’t forget to click through the confirmation email to activate your subscription, and be sure to check your spam filter for emails from info(at)brambleberry(dot)com.
We’ve also chosen two very special fragrances that will be used throughout all 25 projects. The first is Santa’s Spruce Fragrance Oil, which is an intriguing twist on the traditional pine tree scent. It has complex sweet notes which softens this otherwise earthy scent, and it performs wonderfully in cold process soap and other bath & body products. The second fragrance, Cranberry Chutney Fragrance Oil, is sweet and fruity with base notes of warm vanilla spice. It performs well in bath and body products, and discolors to a light golden yellow in cold process.
All this fun starts on November 4. Are you ready to give the gift of Givember?
Gardening and/or Workout Advice, Anyone?
Ah, Jamisen loves his little sister. He wants to hold her, make her laugh and mimic what his Mommy and Daddy do. He even tried to play peek a boo with her tonight! (video above of him trying to hold her; must click through to blog to see it as it does not embed in email).
Notice the sweet car carpet? I can’t wait to start bribing … er, I mean, rewarding (!) him with Hot Wheel cars for potty training to drive around that carpet. He still shows absolutely no sign of wanting to potty train. But really, could you blame him? He would have to quit playing to go to the bathroom in the toilet. This week, funny story, I was feeding Lily (so, completely occupied) and I hear a little voice from Lily’s crib. It’s Jamisen and he says, “Mommy, I am washing my hands with nail polish.” And, yes, yes he was ‘washing’ his hands with nail polish. What a funny little guy. =)
Baby Lily continues to delight and amaze at all times. She is growing extremely slowly (and because of that, eats 3X per night, every night). She is in the bottom 5th percentile for height and weight. She is only 9 pounds, 14 ounces – and is over 3 months old. She is 22″ long and is perfectly proportionate for all of her measurements. Her Grandpa assures me that there’s a reason my name was ‘Shrimpette’ growing up so she must take after her Mama. At this point, I realize I should have moved to California and camped out at all the movie studios, offering Lily for day rates to be the token ‘newborn’ in all the hospital drama shows given that she is STILL smaller than a percentage of babies born every year in the United States. Hindsight. 20/20.
Lily is coming to work less and less – only 8 hours this week – and I miss her dreadfully during the day. Thankfully, I get to see her most days since instead of working out at lunch, I’m usually found at home reading a toddler book to Jamisen to help get him to nap and feeding Lily. This is a short time period in our family life. I’m trying to take advantage of it and get my work outs in other ways (dance parties at work, impromptu work outs with Jamisen and quick runs around the neighborhood). I’m staying so non-working-out-y active that I’ve hit 365 days (a year!) of goals yesterday on NikeFuel (photo proof here). My goal is 3000 ‘fuel points’ per day (though I did decrease that goal for baby delivery and the foggy haze of weeks after that). If you have any other genius ideas for getting real-deal workouts in and juggling newborns, family, work and everything else, I’m open to mostly anything (just don’t make me strap on a night light and go running in the dark like my CEO buddy Patrice from Net Solutions).
Jamisen gets more and more energy with each passing day. He literally radiates energy from his every pore and sometimes, he gets so excited that his entire body shakes – almost like those teensy dogs that can’t keep it together when someone throws the ball to them multiple times. Here he is (above), pushing me to get back into shape after Lily and helping me fit in my workout.
Jamisen loves this geodesic dome that his Grandpa Faiola spent hours (FIVE!) putting together for him. He has conquered it (!) and happily climbs to the top all the time now – a full 2 years before he’s supposedly ready for it. If he falls, he just tries again. I love that persistence!
If there was one thing that Grandpa Faiola (AKA: my Dad) taught me …. well, one of ten gazillion great lessons … it was that it’s fine to introduce kids (within reason) to things that are supposedly above their age group according to the ‘experts’ or in this case, the toy designers. We let him explore and when he’s ready, he goes for it and we’re right there to catch him if it doesn’t work. Granted, that may jump back to bite us at some point in the future, but right now? We’re going with that theory and Jamisen is thriving with it.
I just got done dealing with our strawberries for Fall/Winter (cutting them down, getting rid of old plants, fertilizer, new soil) and planting for Fall harvest. I put in some new kale plants, cauliflower, beets, lemon cucumbers and broccoli. I want to get in some Fall carrots but might be too late. Our tomatoes are going crazy and I need to go harvest them this weekend so they don’t all go to the birds or languish on the ground. Upcoming projects are cutting back the blackberries and raspberries and building a trellis system that will withstand their weight. This year’s failed miserably. If you have any favorite blackberry/raspberry hanging systems that you use/build, please let me know. This is my very first year with a garden and I’ve learned a lot so far thanks to a friendly local Bellingham gardening store and the help of Dr. Google but would love your advice too.
My life in a nutshell is a joyful blur of kids, cooking, gardening, husband, soaping, working (but not so much working out!) and reading. I remain tired but happy and am buoyed by all of your successes. I read your blogs, Facebook posts, Teach Soap Forum posts and now, Soapcrafting Club posts with awe and amazement. Your soapy creations inspire and delight me every day.
Upcycled Fabric Bins
Waste not, want not! Since I started Bramble Berry on the proverbial shoestring budget, some habits die hard and I’ve stayed as true to this mantra as much as possible. I don’t like throwing anything away (as my horrified team discovered during a recent office remodel). In the spirit of renewal and the need for a bit more organization, I decided to reclaim a few office boxes that had previously held reams of paper. The result was these cute and functional storage bins, large enough to handle bulk accumulation but perfectly sized to fit under my desk. Read on to learn how to turn any plain box into a fabric-covered storage bin. No sewing required – just glue and scissors!
What you’ll need:
Fabric: I used home decor weight fabric. It’s heavier than quilting cottons and most apparel weight fabrics and is often used to cover furniture. The fabric I picked was also sateen, which means it had a natural sheen and slick feel.
Cardboard box(es): find something that will fit where you would like to use the storage bin(s).
Scissors or Rotary Cutter, Ruler and Cutting Mat
Spray adhesive
Craft Glue
Optional:
Cotton, Polyester or Nylon cording
Grommet and Grommet Tool
ONE: Measure your box to determine how to cut your fabric. Here are the measurements you need:
- The length + width of the box (the base).
- The height of the box.
Cut one piece of fabric using the length + width measurement, adding 1 inch to each measurement. This will fit into the base of the inside of the box.
Cut two pieces of fabric that are the height of the box wide by the sum of the length and width of the box plus one inch long. These will fit the interior walls of the box.
Cut two pieces that are the height of the box wide plus two inches wide by the sum of the length and the width of the box plus one inch long. These will fit the exterior walls of the box.
Tip: Label each of your cut pieces of fabric with masking tape. It helps keep the fabric pieces organized.
TWO: Measure 1/2″ in on each of the corners of the base fabric. Cut in toward the point created by the measurement on all four corners. With the right side of the fabric facing up, roll the fabric piece up like a newspaper.
THREE: Layout a sheet of plastic to protect your work surface and put on gloves if desired (you desire … you desire … the glue is very sticky and absolutely will take off your nail polish when you’re trying to remove the glue from your fingers). Spray the inside base of the cardboard box with a thin layer of spray adhesive. Spray only about 1/3 of the base, starting on the left side. Align the edge of the base fabric along the wall of the box, so that the snipped corners fall against each other to create a clean corner. There will be about 1/2″ of fabric that runs up the side of the box. Press the fabric into the glue on the base, unrolling as you go. Spray a bit more and unroll, and continue until the fabric is unrolled and covers the bottom. Use the craft glue to touch up the sides.
FOUR: With the right side of the fabric facing up, roll the interior pieces up like a newspaper. Lay the box on it’s side. Spray the inside of the box on one side with spray adhesive, leaving about 5″ unsprayed on the right. Line up the edge of one of the interior pieces perfectly with the corner on the right hand side, and unroll until you reach the other corner. Once you are unrolling over glue, press the fabric into the glue. Once you reach the first corner, turn the box again so that your working surface is flat on the table. Spray the cardboard and continue to unroll the fabric until you reach another corner. At this point, you should have about 1″ of fabric left. Adhere this to the third wall. Shift the box so that this third wall is flat on your work surface and the 1″ of overlap from the first piece of fabric is on the right. Repeat the process the second piece of fabric, butting up the edge to the corner, except do not leave 5″ of space unglued. Work your way around the last two interior walls of the box until you reach the corner you started with. Affix the 1″ overlap to the wall that you started with.
FIVE: You should have a 5″ flap of fabric that is unglued still. Pull this unglued flap back (hold in place with a binder clip if it’s helpful) and spray adhesive onto the exposed cardboard and over the 1″ fabric overlap. Press the fabric into the glue. Trim any excess fabric from the top so that the fabric is flush with the top of the cardboard.
SIX: The process to cover the outside of the box is similar, except the width of the fabric will extend about 1″ past each side of the edges of the box. Center the fabric over the outside of the box and follow the same procedure for covering the interior walls.
SEVEN: At the corners of the excess fabric at both the top and the base of the box, make a slit that is perpendicular to the edge of the box.
EIGHT: Using the craft glue, affix the 1″ fabric overlap at the top and base of the box by wrapping the fabric around the edges and toward the center of the box. At this point, there should be no visible exposed edges of cardboard!
OPTIONAL FINISH: Cut two holes in either side of the box and affix grommets using a grommet tool. Thread knotted cording through the grommets to create handles. Use Scotch tape to finish the edge of the cording if it’s cotton or polyester, or melt the tips with heat if the cording is nylon.
This is my kid-friendly-healthy-snacks-disguised-as-treats arsenal for when Jamisen visits the office: my dear friend Erin Baker’s wholesome snacks, fruit puree in on-the-go pouches, Greek yogurt snacks, and organic agave sweetened lollipops.
Soapy Social Media Roundup
Another week has come to a close, and we started to catch the first glimpses of autumn (it rained for what felt like the first time in months). We rounded out our Soap Crafting-inspired tutorials this week with a citric-acid Shampoo Bar recipe. If you missed the other tutorials, you can check them out here, here and here. Speaking of Soap Crafting, we’re planning something exciting at the end of this month (I may or may not be signing the book at a local bookshop in Bellingham *winkwink*). As usual, we had plenty of activity on planet Soapy Social Media, so take a look at a few of my favorite things from the past two weeks.
Pins:
Top left: This is a great little primer on how to frost beautiful cupcakes. Bonus points: these tips apply to frosting soap cupcakes too!
Center left: This sandwich is so pretty that I would almost feel bad eating it. I love the idea of incorporating edible flowers into simple meals, and lately I’ve been trying my hand at growing some of my own.
Bottom left: You might have to do a double-take with this one — it’s not just a glass, it’s an edible glass! Better yet, it’s made with ingredients that complement the drink itself.
Center: Some excellent advice to keep in mind each day. If I’ve learned one thing from being in business for 15+ years, it’s that things don’t happen if you sit around and wait for them.
Top right: I am so in love with this awesome rainbow soap by Amathia Soapworks. The soap in the front left was made with a cool leopard spot technique, and I tried my hand at it for week four of the Great Cakes Soapworks Challenge.
Center right: So letting a two year old go wild with finger paints may not be the best idea, but this touch painting project still looks like so much fun. It could be something fun to try on a sunny weekend afternoon (out in the garage, with plenty of newspaper down, as far away from the kitchen as possible, of course!).
Bottom right: Who doesn’t love a bit of gold glitter to spice things up? I love mixing a bit of gold glitter with a clear nail polish base for a little pop of color.
Instagram:
Believe it or not, we’re already thinking about Halloween. We worked on a very spooky eyeball-inspired soap this week.
More Soap Crafting awesome-ness! This is the Neon Swirl.
Even though it was sad to realize Fall is approaching, we got some much need rain in the Pacific Northwest this week. Jamisen couldn’t wait to play outside in it!
Tweets:
- I’m a sucker for fun fonts, and this font by ElliotSix is adorable. The catch? According to the font description, it was created by a boy named Elliot, who is (you guessed it) only six years old.
- I typically stay as far away from Taco Bells as possible, but this caught my attention: they’re adding waffles to their menu. And by that I don’t mean they’re serving breakfast; I mean they’re creating some kind of taco-waffle-monster hybrid! Is this the best marketing decision of all time, or the worst? Only time (and a lot of waffles) will tell.
- You may have heard the adage that smoke is attracted to beauty, but does the same hold true for mosquitoes? A new study aims to find out.
- I’ve been thinking a lot about this quote lately. With patience and perseverance you can do anything.
New at Bramble Berry ~ Back to School Edition
It’s only August, but back to school season is just around the corner. New backpacks for the kids, stocking up on cozy sweaters for fall and of course, gearing up for holiday soapmaking and crafting! Jamisen starts pre-school this next month and he has the cutest little dinosaur backpack to take to school.
It’s been a busy month with lots of new products added, from cute soap molds to fancy new essential oils and finally, a much anticipated aluminum-free deodorant base. We’d love to see photos of your creations on our Facebook page, and you can always check the What’s New section on Bramble Berry’s website to be the first to know when we add new items. Happy soaping!
Melt & Pour Soap Fundraiser Kit
Looking to spice up a fundraiser? Ditch the wrapping paper and chocolates in favor of adorable, handcrafted soaps. This kit includes 100 pounds of melt & pour soap, eight different fragrances, various embeddable toys, an assortment of colorants and all the soaping tools you’d need to make 400 bars of soap. The total value of these items individually be more than $460, and so you save almost $100 when you buy them bundled in this kit. You also get extra downloads to help your student sell (like an order sheet).
You’ve been asking and we’ve finally perfected the recipe. Try out this new aluminum free-deodorant base in our push-tubes for easy use. No additives are necessary, simply melt down and pour into containers. You can add up to .1 oz. of your favorite fragrance or essential oil to make this deodorant your own.
Bio-Mulsion wax is a naturally-derived, plant-based emulsifying wax that provides superior skin absorption and a nice spreadable consistency. Use this wax in lotions, creams and liquid serums.
Soothing and skin-loving, Colloidal Oatmeal makes an excellent addition to face masks, milk baths, soaps and creams. Its finely ground texture and nourishing properties make it a fantastic additive for those with dry skin.
Isopropyl Alcohol is the ultimate soapmakers clean-up companion and soda ash fighter. Coconut Milk Powder is an excellent additive and Liquid Crothix helps thicken liquid soaps or shampoos.
Isopropyl Alcohol, Coconut Milk Powder & Liquid Crothix
It’s glitter galore! We’ve introduced four new glitters for your nail polish creations. For inspiration, check out the tutorial we did using the Peacock Nail Polish Glitter.
Gold Nail Polish Glitter, Silver Nail Polish Glitter, Peacock Nail Polish Glitter, & Firebrand Nail Polish Glitter
So many cute molds, so little time!
First Row: Guest Pea Pods, Cow & Calf Tray & Guest Fruit Tray
Second Row: Art Deco Fauna Tray, Bicycle Mold & Iris
Lemon Eucalyptus Essential Oil
We’ve added a fresh and bright essential oil to our fragrance family. As an added bonus, this essential oil is also effective in bug sprays!
Spiced Amber Ale and Cucumber & Kiwi
Get ready for fall with the sweet, aromatic Spiced Amber Ale Fragrance Oil. But if you’re not quite ready for fall, the fruity and fun Cucumber & Kiwi Fragrance Oil can liven up any lingering summer projects.
Soapy Social Media Roundup
I hope everyone had a fantastic Fourth of July with lots of friends, food and of course, fireworks. We just wrapped up our 4th of July Make It challenge, and we received a number of fantastic entries. The variety was incredible! We saw lip balms, bath fizzies, all kinds of soaps and even some patriotic nail polish. You can check out the winners here.
We’ve also added a new social media outlet to our quickly growing roster. Bramble Berry is now on Wanelo (which is a combination of “want,” “need,” love,” — cute!) You can search for products, stores and even key words, and Wanelo aggregates results from all across the web. It’s a great place for one stop shopping.
Here is the Soapy Social Media Roundup for this week.
Pins:
Top left: How awesome do these Curry Vegan Kale Chips look? They’re the perfect alternative to regular potato chips at summer backyard barbecues.
Center: It’s here it’s here, it’s finally here! If you couldn’t tell, I am elated about the arrival of the advance copy of Soap Crafting. The book won’t ship out until August, but you can pre-order a copy here. Our international friends can email sma(at)brambleberry(dot)com to request their copy. Each pre-order comes with some awesome extras (two exclusive videos, two never-before-seen recipes and a complete guide to colorants — hint hint!), so don’t miss out.
Bottom: This elegant penny ball serves two purposes — it looks great in your garden, and it also (supposedly, at least according to Pinterest) keeps slugs away. Whereas salt only dehydrates slugs, the tiny amounts of copper in pennies repels them completely. It’s a great way to keep those summer strawberries safe and sound.
Right: Something to keep in mind each and every day!
Vines and Instagrams:
Making the Mantra Swirl for the Great Cakes Soapworks Challenge club. We decided to go with high contrasting colors — black oxide, titanium dioxide and Fizzy Lemonade! The best part? It’s scented with our brand new Cucumber Oak Fragrance Oil =)
And then everyone’s favorite part, the reveal! I love the way this turned out.
This is one we’re calling the “Hawaiian Shirt” soap. Even if you can’t take a Hawaiian summer vacation this year, you can still dream about a tropical paradise. Keep your eyes peeled for a tutorial on this one coming up soon. (Tip: this video doesn’t play automatically, so be sure to click the start arrow!)
Looking for more Bramble Berry videos? Check out Vine and Instagram online. If you have the apps on your phone, my username is @BrambleBerry!
- This is a thought-provoking blog post on how the age-old phrase “boys will be boys,” can be problematic. Sometimes it takes a group of preschoolers to teach us all a valuable lesson about respect and compassion.
- We all know exercise is important, but this article emphasizes how the type of exercise you do should be tailored to your health goals. Looking to control your weight? Go for a run. Trying to stave off heart disease? Walking reduces the risk of heart disease by nearly 9 percent!
- If you have to give a big presentation at work, consider these tips to help hammer home your message. How you frame a topic can make it or break it.
- With temperatures pushing 90 in Washington this week, these adorable ice eggs were just the thing to cool off and have a little fun.
Our warehouse was closed yesterday and we have a skeleton staff today, but we’ll be back running at full capacity catching up and fulfilling orders on Monday. I hope everyone enjoys the rest of the holiday weekend!
Fourth of July Challenge Winners!
A Happy Fourth of July weekend to all! I hope that you are enjoyed a day full of beautiful sunshine, healthy food and lots of fun with your family and friends. We had so much fun in the sun on the Fourth but alas, Jamisen did not see any of the fireworks since our tired little toddler was asleep by 8 p.m. (unlike his sister who stayed up until 1 a.m. crying). In the spirit of Independence Day, it is time to announce the winners of our Fourth of July Challenge. To see all the entries in this challenge, take a look at Bramble Berry’s Make It: #4thofJuly Facebook album. Are you ready to find out who won? Let’s have a soapy drum roll of excitement…
Top Row: Jill Cooper, Catherine Witt, Tanya from Baby Duck Soap Co.
Middle Row: Timmy from Ivy Coreen, Ada from SoapMuchLove, Wendy LaJoy
Bottom Row: Holly from Missouri River Soap, Tina from TrueSkin, Janet Schreiner
Many thanks to all the incredible soapers who joined in on the Fourth of July Challenge. It was so inspiring to see all your entries (from nail polish to bath fizzies, soap and more!) and to see the creativity that you put into your creations. Be sure to keep your eyes on the Soap Queen blog for new and exciting challenges. Do you have a full tutorial (+ pictures) to go with your entry? Submit your recipe to teachsoap(at)brambleberry(dot)com for a chance to win a $10 Bramble Berry Gift Certificate, click here for more details!
HSCG Conference Guest Post: Single Cavity Silicone Molds
Saturday was a day full of interesting sessions, one of which was a session by Amanda Griffin on how to make single cavity silicone molds. Amanda lives in Dallas, Texas and teaches soapmaking classes that include the basics of formulation as well as more advanced soapmaking techniques that include working with color, swirling and she’ll even teach you how to make your very own silicone molds.
Have you ever found a little ornament you thought would be the cutest soap, or wished you could make your soap into something more personal? Learning to make your own single cavity silicone molds offers you a wide range of new and interesting shapes for your soaps. Think about unique shapes such as Buddhas, pine cones, cupcakes, fake food, grandma’s figurines, thrift store finds, and holiday themed items. The possibilities are endless!
Within the session Amanda explained the types of materials that were best suited for the use of making silicone molds. Pretty much anything goes, however your surface needs to be non-porous, if you find the item you’ve selected is porous be sure to seal it before making your mold.
You will also need to give thought as to how pliable you would want your mold to be for example; if you are making a slab or log mold you might want the walls to be more sturdy to hold in the larger amount of soap. Small single cavity molds will need to be more pliable to release your small irregular shaped item.
Amanda gave several examples of household items that can be used to make a mold box-the mold box holds the item you want to cast (and will ultimately become your mold); such as a pine cone, fake food item, nail polish, etc. She also explained that in order to make the proper amount of silicone you need to figure up the cubic inches within your mold box minus the space your item will take away. Don’t be afraid; there’s a calculator for that.
Getting set up for the mold.
Pouring the silicone.
One great option for pourable silicone is the DIY Pourable Silicone Kit and E-Book from Bramble Berry that includes Part A and Part B with complete instructions written by Amanda Griffin. This kit is perfect for making fun single cavity molds. (Pssst, another tip! For those more experienced with making silicone molds, Bramble Berry also sells the pourable silicone on its own!)
Silicone slab/log molds make soapmaking so much easier as they solve the huge problem of getting your soap to release without the headache of all that pushing, tugging and destruction of your soap-saving you time and money. Making your own mold is a great solution to the costly expense of purchasing a ready made mold and if you want a very specific size it is the best option. Amanda showed us how she made her very own slab mold from just a few pieces of melamine (as her mold box) from the local hardware store and pourable silicone. Yes, a new slab/log mold is really just a DIY project away.
What are Water White Fragrance Oils?
Welcome to another Q&A session about everything soapy and soap related. Check out our previous information product posts all about Nail Polish, Lip Balm, All Things Lotion, Preservatives, Melt and Pour Soap or Colorants. This week’s post comes to us from a few questions we’ve received from customers about maintaining clarity in Clear Melt and Pour Soap. Read on to learn more about these awesome scents that you can use in your bath and body products.
Facebook Photo of the Week (March 1 ~ March 8)
Last week was super busy on the SoapQueen blog. Two new contests were introduced: a new Make It Month (all about the sample of the month, Oatmeal Milk and Honey Cybilla) and a call to arms by subscription service Fair Ivy. We also blogged three new tutorials: a super cute Red Apple Cold Process Soap Recipe, an anti-pinch nail polish tutorial for St. Patrick’s Day, a DIY tutorial on how to make a traveler bag for toddlers and my favorite, the shortbread recipe that I used to announce the gender of Bramble Girl to my family. Miss out on any of the daily happenings? Join us on Bramble Berry’s Facebook page to keep up-to-date and learn about the newest products, tutorials and deals. Best of all the sun is finally shining in the Pacific Northwest (well, intermittently) and all of Team Bramble Berry is soaking up as much of it as they can. Are you ready for last weeks Facebook Photo of the Week? Let’s go!
Sparkle Power Bath Bomb Tutorial
Here’s a kid-friendly bath bomb tutorial guaranteed to make bath time tons of fun. It’s a spin off of the recent Hidden Color Bath Bomb tutorial, where a secret stash of super concentrated color appears once the bath bomb is activated in water. This time around, instead of color the secret stash is full of glitter! What a fun and unexpected treat for bath time adventures.
Recipe:
1 Cup Sodium Bicarbonate (Baking Soda)
1/2 Cup Citric Acid
1/2 Cup Corn Starch
1/2 Cup Epsom Salt
1.5 Tablespoons Avocado Oil
Click here to add everything you need for this project to your Bramble Berry shopping cart! [Read more…]
What’s New for the Winter Season
We’ve got so many new goodies that will make your winter soaping a blast! Everything from adorable new kudos silicone molds to our S.O.A.P. 2012 fragrances and a brand new e-book by Jeanee of Dirty Laundry. Check it all out!
#Halloween Challenge Eye Candy
Is it just me or does it feel like Halloween was yesterday? Sheesh, time is flying. It’s already almost December, people! Anyway, I thought I’d share with you all of the great entries from the Make it Monday #Halloween challenge. You can see the winners of the challenger here, and also check out the #Halloween Facebook album which is chock-full of pictures from this and all the previous Make it Monday challenges. Itching to compete? There’s still time to enter the #Nail Polish challenge! And, pssst…our next challenge coming up this Monday will be another holiday themed challenge. Because if I didn’t mention it before, it’s already almost DECEMBER.