• December 8, 2016

Rose Quartz Cold Process Soap Tutorial

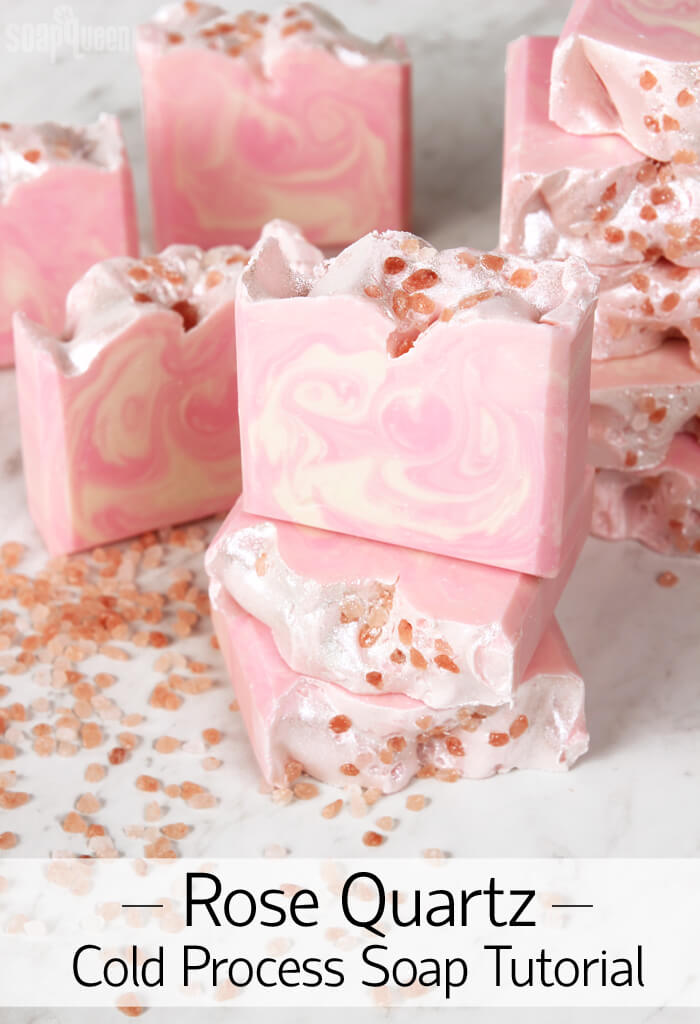
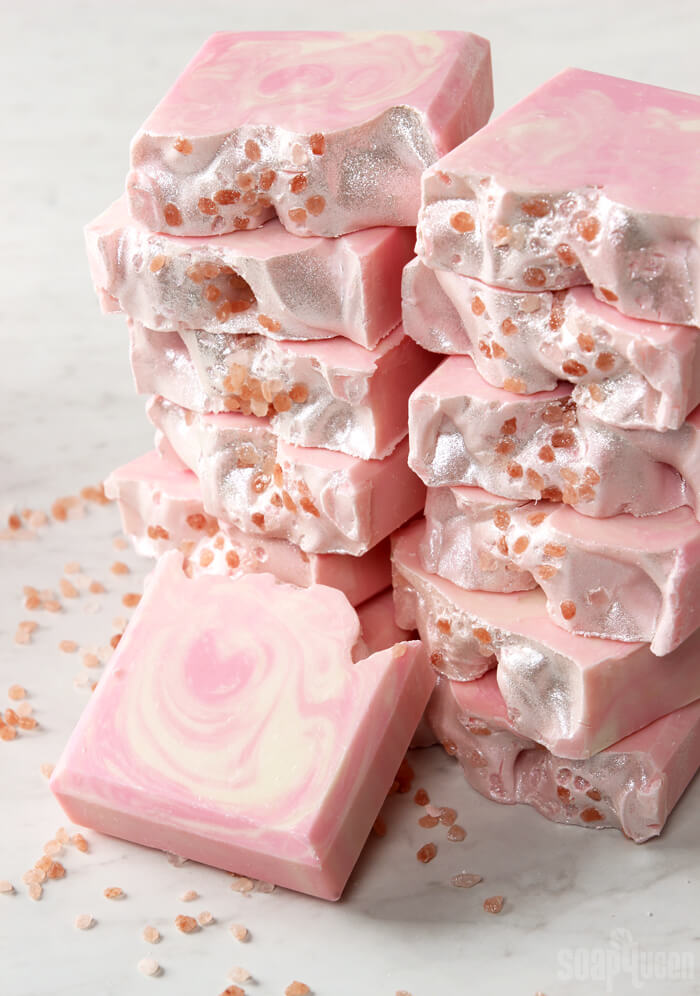
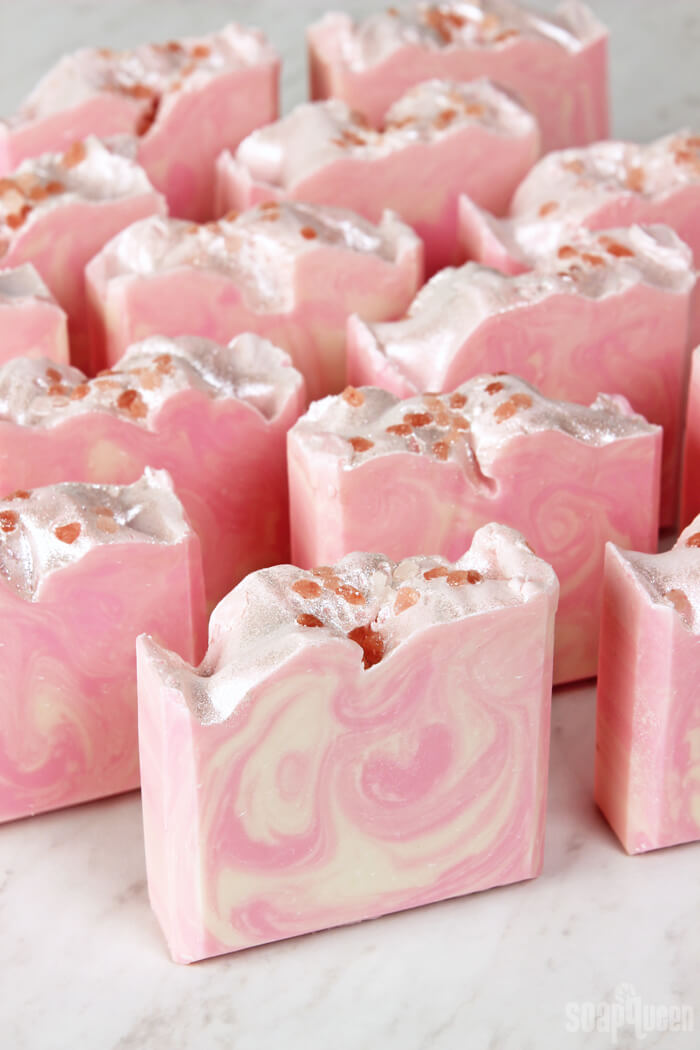
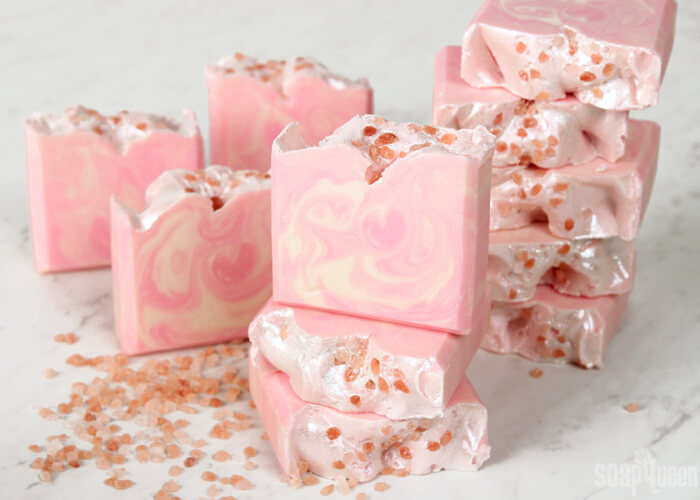
Rose quartz is such a lovely stone. It’s sometimes referred to as the heart stone, love stone, and the “Crystal of Unconditional Love.” With its beautiful rose pink color, it’s easy to see why it has garnered such adored titles. Rose quartz was the inspiration for this rosy and sparkly soap.

Rose Quartz Cold Process Soap Tutorial

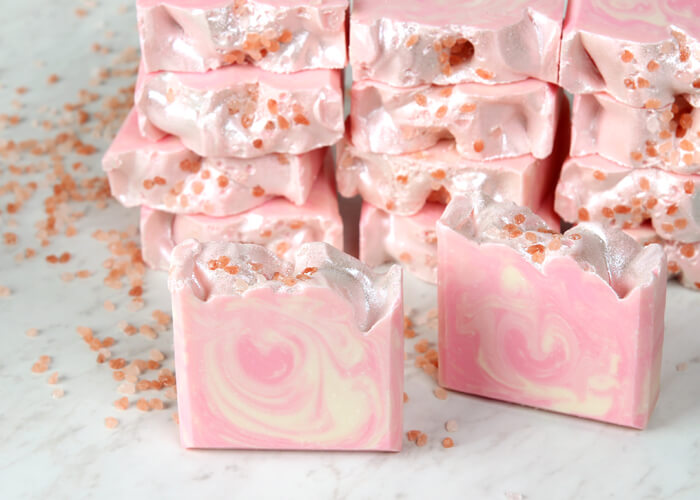
This project is scented with the new Rose Quartz Fragrance Oil, which is a fresh take on a rose scent. Notes of orange zest, jasmine and soft sandalwood make the Rose Quartz Fragrance Oil a modern spin on traditional rose fragrances. An In-The-Pot Swirl technique using shades of white and light pink emulate the natural pattern in the gem. Snowflake Sparkle Mica is dusted on top for a pearl effect, and pink sea salt gives texture. This project is perfect for the crystal lover in your life, or for a Valentine’s Day gift.

Rose Quartz Cold Process Soap Tutorial

What You’ll Need:
5 Pound Mold with Sliding Bottom
Silicone Liner for 5 lb. Wood Mold
13.5 oz. Coconut Oil (25%)
14.6 oz. Palm Oil (27%)
18.9 oz. Olive Oil (35%)
5.4 oz. Green Tea Seed Oil (10%)
1.6 oz. Castor Oil (3%)
7.6 oz. Sodium Hydroxide Lye
17.8 oz. Distilled Water
3.5 oz. Rose Quartz Fragrance Oil
Titanium Dioxide
Electric Bubble Gum
Snowflake Sparkle Mica
Pink Sea Salt, Medium
Optional: Powder Duster


Click here
 
to add everything you need for this project to your Bramble Berry shopping cart!

Rose Quartz Cold Process Soap Tutorial

If you’ve never made Cold Process soap before, stop here! I highly recommend checking out our FREE four part SoapQueen.tv series on Cold Process Soapmaking, especially the episode on lye safety. And if you’d rather do some reading, Bramble Berry carries a wide range of books on the topic, including my newest book, Pure Soapmaking. You can also checkout the digital downloads for that instant gratification factor.

SAFETY FIRST: Suit up for safe handling practices! That means goggles, gloves and long sleeves. Make sure kids, pets, and other distractions and tripping hazards are out of the house or don’t have access to your soaping space. Always soap in a well-ventilated area.

COLOR PREP: To ensure that the Titanium Dioxide blends smoothly into the soap batter, we recommend micronizing it before dispersing it in oil. Please note this is an optional tip but it does help with the titanium dioxide clumping in the soap. To micronize colorant, simply use a coffee grinder to blend the colorant to break up any clumps of color and prevent streaks of white from showing in the final soap. We like to use a coffee grinder that has a removable, stainless steel mixing area for easy cleaning. Then, disperse 3 teaspoons of the colorant into 3 tablespoons of sunflower or sweet almond oil (or any other liquid oil). Then in a separate container, disperse 1/2 teaspoon Electric Bubble Gum Colorant into 1/2 tablespoon lightweight liquid oil. Finally, disperse 2 teaspoons Snowflake Sparkle Mica into 2 tablespoons lightweight liquid oil. Use a mini mixer to help get rid of any clumps. Have extra Snowflake Sparkle Mica nearby to dust on top.

FRAGRANCE PREP: Measure 3.5 ounces of Rose Quartz Fragrance Oil into a glass, fragrance oil safe container. Set aside.

ONE: Slowly and carefully add the lye to the water and gently stir until the lye has fully dissolved and the liquid is clear. Set aside to cool.

one

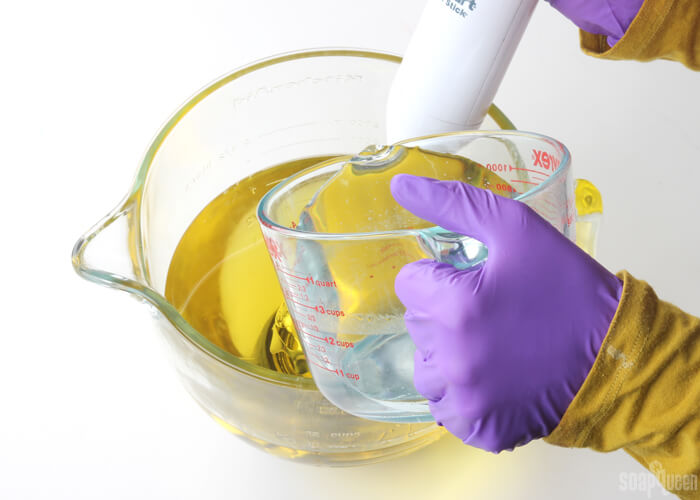
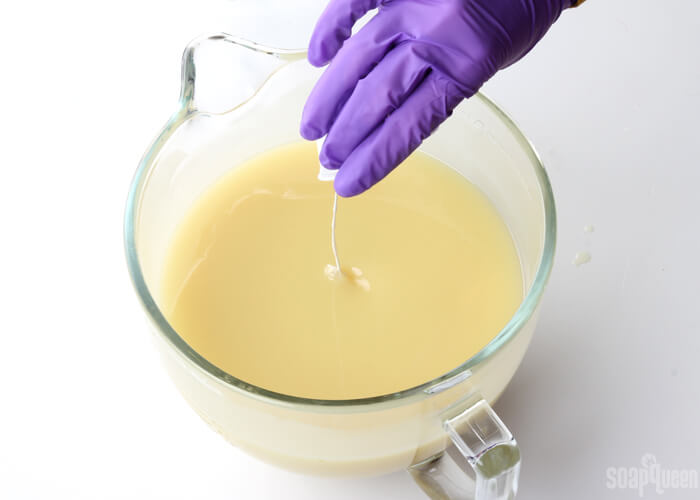
TWO: Fully melt and combine the coconut oil, palm oil, olive oil, green tea seed oil and castor oil (remember to fully melt then mix your entire container of palm oil before portioning). Once the lye water and the oils have cooled to 130 degrees or below (and are ideally within 10 degrees of each other), add the lye water to the oils and stick blend until thin trace. If you’d like a harder bar of soap that releases faster from the mold, you can add sodium lactate to the cooled lye water. Use 1 teaspoon of sodium lactate per pound of oils in the recipe. For this recipe, you’d add 3.5 teaspoons sodium lactate. Stick blend the soap until it’s at a thin trace.

two

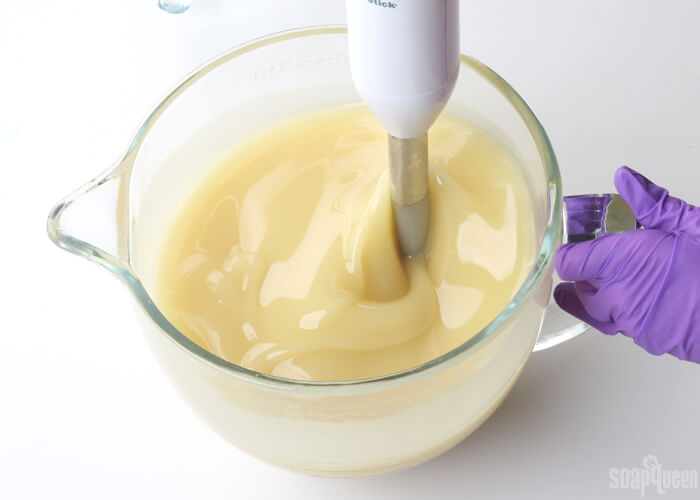
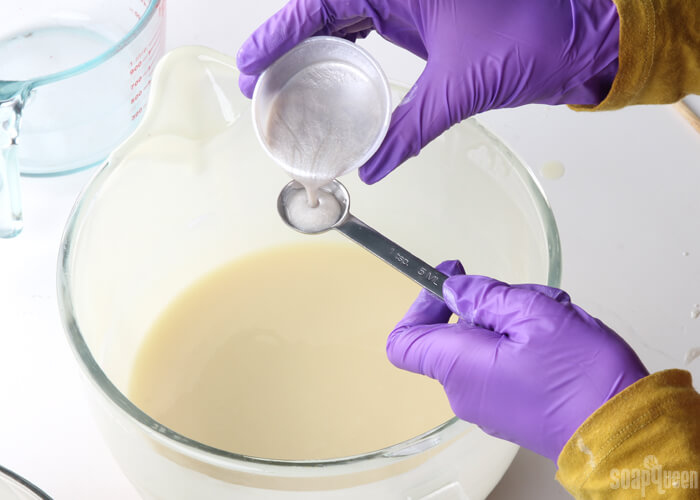
THREE: Add all the titanium dioxide to the soap and whisk to fully incorporate.

three

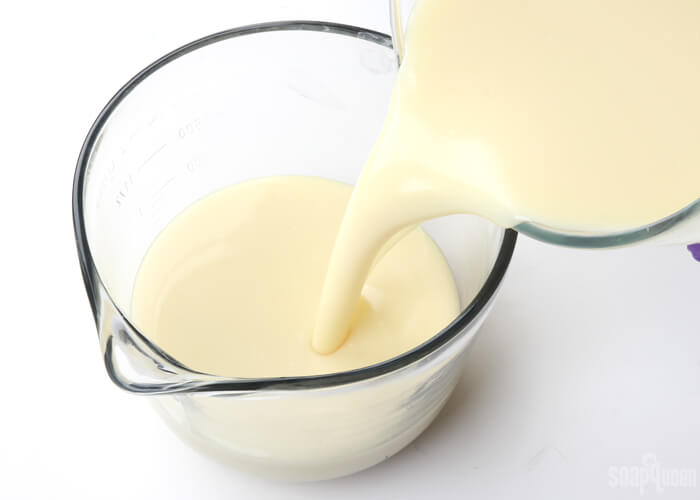
FOUR: Split off half the soap into a separate container.

four

FIVE: To the white soap, add all of the dispersed Snowflake Sparkle Mica and use a whisk to mix in fully.

five

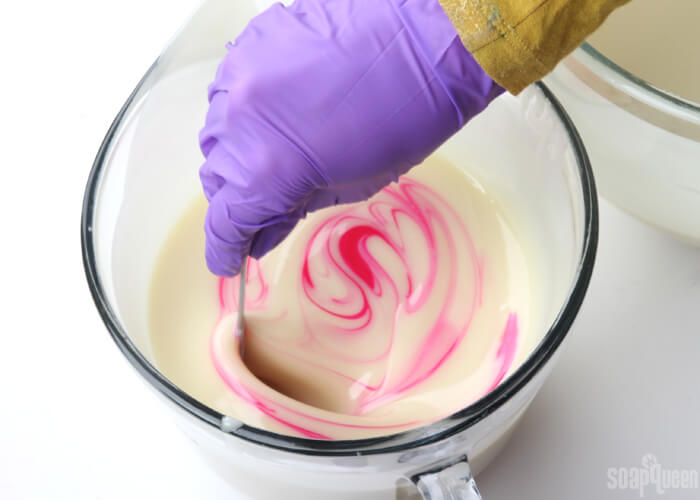
SIX: To the other container, add a heaping teaspoon of Electric Bubble Gum and stir in with a whisk or spoon.

six

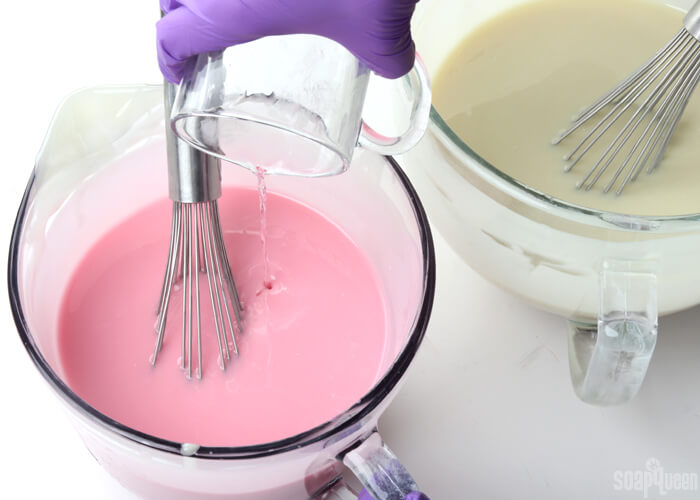
SEVEN: Add half the fragrance to each container. It’s okay to eyeball it. Use a whisk to incorporate the fragrance.

seven

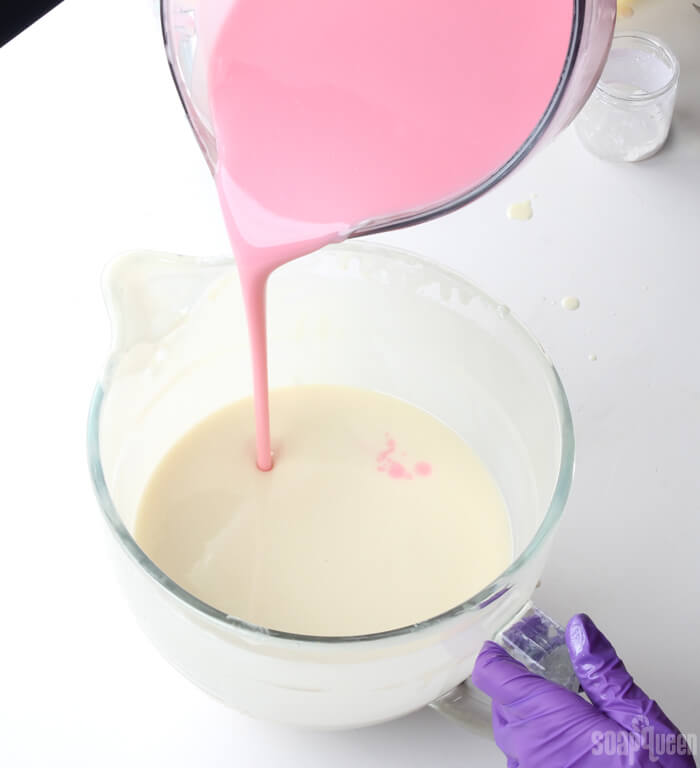
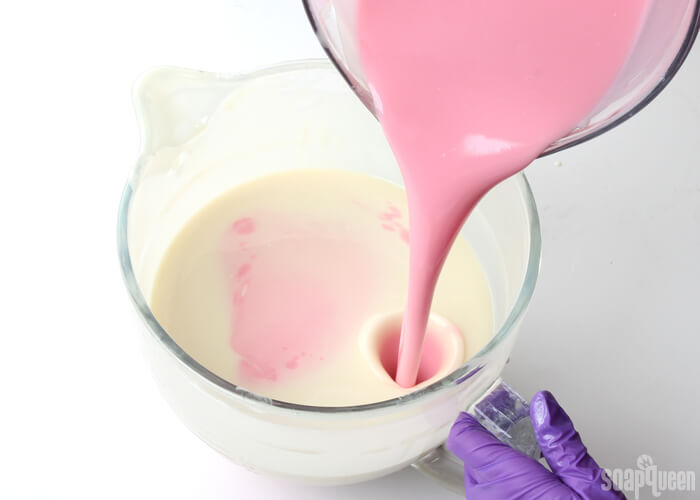
EIGHT: Now it’s time to make an in-the-pot swirl! Pour the pink soap in various areas of the pot. Pour steadily from a high point to get the color all the way to the bottom of the container.

eight

nine

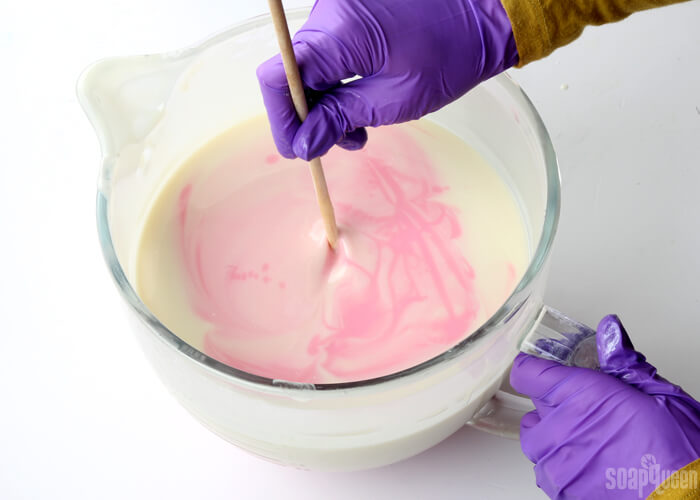
NINE: Use a chopstick or dowel twice through the soap, hitting each entry point. Only run the chopstick through twice! Too many swirls in the pot can muddle the colors.

ten

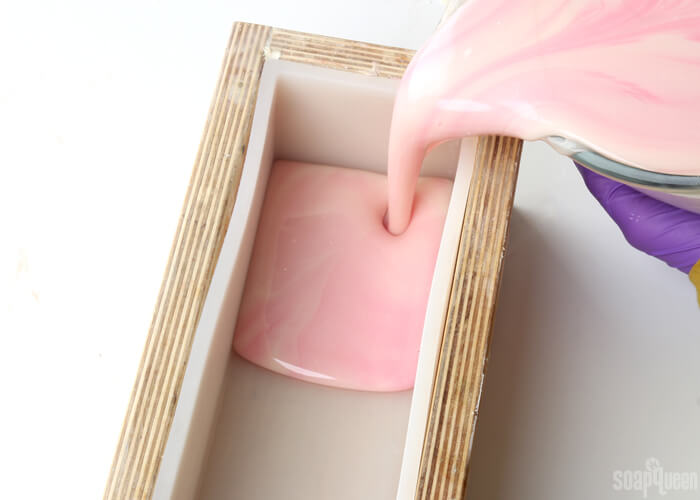
TEN: Slowly and carefully pour the soap into one side of the mold. This will allow the soap to swirl as it pours.

eleven

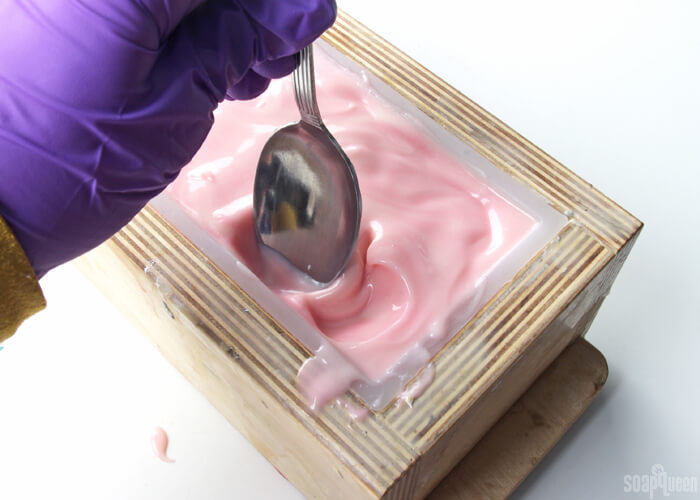
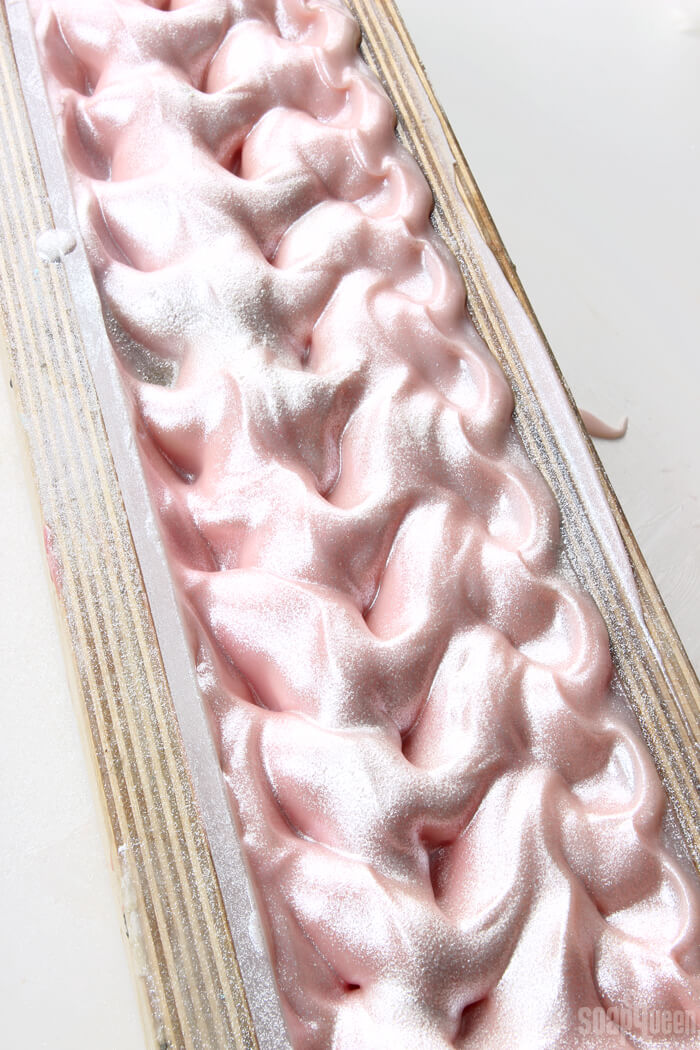
ELEVEN: When the soap is thick enough, use a spoon to build the soap towards the center of the mold, and create peaks and divots. There is no right or wrong way to create texture on top of soap, so just have fun with it. We found our soap was still fairly thin when poured, so we waited about 30 minutes for it to thicken enough to hold the shape.

twelve

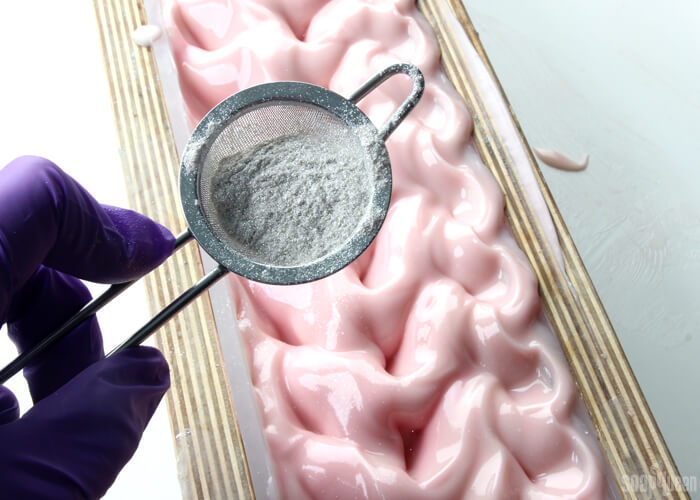
TWELVE: Once you’re happy with the texture, pour Snowflake Sparkle Mica into a powder duster and sprinkle on a thin layer.

thirteen

Rose Quartz Cold Process Soap Tutorial

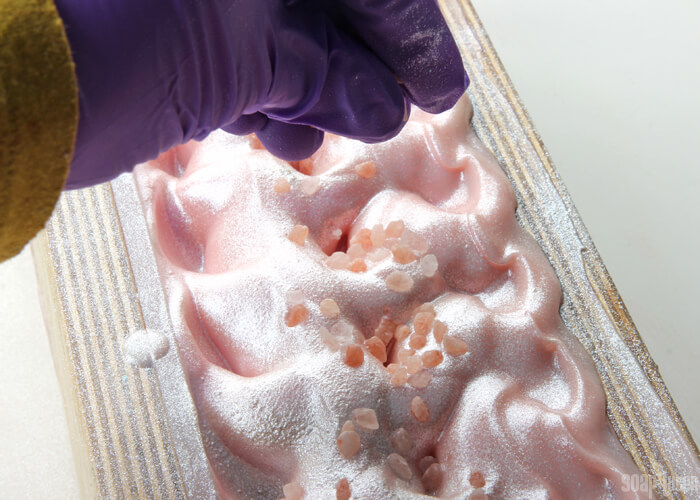
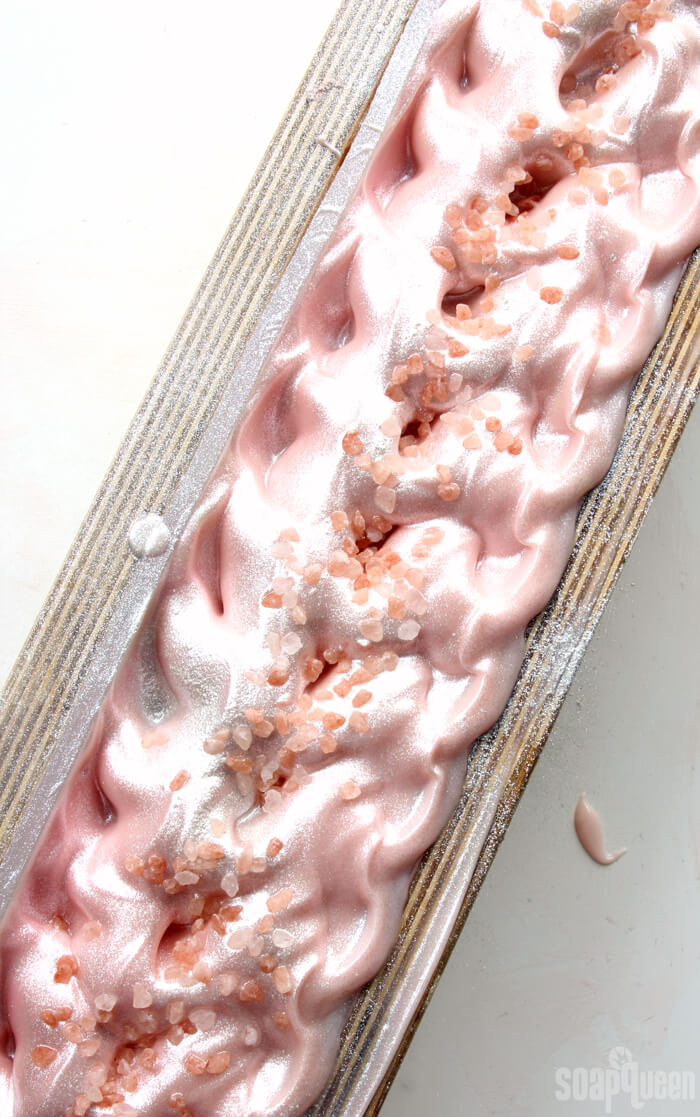
THIRTEEN: Sprinkle on the pink sea salt, concentrating it toward the center. Gently press the salt into the soap with gloves hands to help it stick to the soap a little better. Add a little more than you want, as some will fall off when cut.

fifteen

FOURTEEN: Spritz the soap with 99% isopropyl alcohol to help avoid soda ash. Allow the soap to stay in the mold for 3-5 days. Unmold and cut into bars. Allow the bars to cure for 4-6 weeks. Enjoy!

Rose Quartz Cold Process Soap Tutorial

Rose Quartz Cold Process Soap Tutorial

Rose Quartz Cold Process Soap Tutorial

Soap Queen
This Rose Quartz Cold Process Soap features a soft pink swirl and a fresh and floral fragrance!
Cook Time 2 hours
Total Time 2 hours
Recipe type Cold process soap

Ingredients
  

  • 5 Pound Mold with Sliding Bottom
  • Silicone Liner for 5 lb. Wood Mold
  • 13.5 oz. Coconut Oil 25%
  • 14.6 oz. Palm Oil 27%
  • 18.9 oz. Olive Oil 35%
  • 5.4 oz. Green Tea Seed Oil 10%
  • 1.6 oz. Castor Oil 3%
  • 7.6 oz. Sodium Hydroxide Lye
  • 17.8 oz. Distilled Water
  • 3.5 oz. Rose Quartz Fragrance Oil
  • Titanium Dioxide
  • Electric Bubble Gum
  • Sparkle Snowflake Mica
  • Pink Sea Salt Medium

Instructions
 

Suit up for safe handling practices! That means goggles, gloves and long sleeves. Make sure kids, pets, and other distractions and tripping hazards are out of the house or don’t have access to your soaping space. Always soap in a well-ventilated area.

    To ensure that the Titanium Dioxide blends smoothly into the soap batter, we recommend micronizing it before dispersing it in oil. Please note this is an optional tip but it does help with the titanium dioxide clumping in the soap. To micronize colorant, simply use a coffee grinder to blend the colorant to break up any clumps of color and prevent streaks of white from showing in the final soap. We like to use a coffee grinder that has a removable, stainless steel mixing area for easy cleaning. Then, disperse 3 teaspoons of the colorant into 3 tablespoons of sunflower or sweet almond oil (or any other liquid oil). Then in a separate container, disperse 1/2 teaspoon Electric Bubble Gum Colorant into 1/2 tablespoon lightweight liquid oil. Finally, disperse 2 teaspoons Snowflake Sparkle Mica into 2 tablespoons lightweight liquid oil. Use a mini mixer to help get rid of any clumps. Have Snowflake Sparkle Mica nearby to dust on top.

      Measure 3.5 ounces of Rose Quartz Fragrance Oil into a glass, fragrance oil safe container. Set aside.

      • Slowly and carefully add the lye to the water and gently stir until the lye has fully dissolved and the liquid is clear. Set aside to cool.
      • Fully melt and combine the coconut oil, palm oil, olive oil, green tea seed oil and castor oil (remember to fully melt then mix your entire container of palm oil before portioning). Once the lye water and the oils have cooled to 130 degrees or below (and are ideally within 10 degrees of each other), add the lye water to the oils and stick blend until thin trace. If you’d like a harder bar of soap that releases faster from the mold, you can add sodium lactate to the cooled lye water. Use 1 teaspoon of sodium lactate per pound of oils in the recipe. For this recipe, you’d add 3.5 teaspoons sodium lactate. Stick blend the soap until it’s at a thin trace.
      • Add all the titanium dioxide to the soap and whisk to fully incorporate.
      • Split off half the soap into a separate container.
      • To the white soap, add all of the dispersed Snowflake Sparkle Mica and use a whisk to mix in fully.
      • To the other container, add a heaping teaspoon of Electric Bubble Gum and stir in with a whisk or spoon.
      • Add half the fragrance to each container. It’s okay to eyeball it. Use a whisk to incorporate the fragrance.
      • Now it’s time to make an in-the-pot swirl! Pour the pink soap in various areas of the pot. Pour steadily from a high point to get the color all the way to the bottom of the container.
      • Use a chopstick or dowel twice through the soap, hitting each entry point. Only run the chopstick through twice! Too many swirls in the pot can muddle the colors.
      • Slowly and carefully pour the soap into one side of the mold. This will allow the soap to swirl as it pours.
      • When the soap is thick enough, use a spoon to build the soap towards the center of the mold, and create peaks and divots. There is no right or wrong way to create texture on top of soap, so just have fun with it. We found our soap was still fairly thin, so we waited about 30 minutes for it to thicken enough to hold the shape.
      • Once you’re happy with the texture, pour Snowflake Sparkle Mica into a powder duster and sprinkle on a thin layer.
      • Sprinkle on the pink sea salt, concentrating it toward the center. Gently press the salt into the soap with gloves hands to help it stick to the soap a little better. Add a little more than you want, as some will fall off when cut.
      • Spritz the soap with 99% isopropyl alcohol to help avoid soda ash. Allow the soap to stay in the mold for 3-5 days. Unmold and cut into bars. Allow the bars to cure for 4-6 weeks. Enjoy!
      Tried this recipe?Let us know how it was!

      You may also like these

      Become an email subscriber

      Enter your email address below and you will receive all our new posts directly in your email inbox.

      1. I only have uncolored salt. Can I mix the salt with the pink colorant to make it pink ?Will that work ?

        1. It won’t stick to the salt unless you include some sort of liquid as a way to glue it to the salt and it might end up separating once it dries.

      2. Hello, please do I need preservative to make soap? Just so it does not go bad . Thank you

        1. Since soap has such a high pH, it doesn’t allow for Bacteria, Mold or Yeast growth. Since that is what a preservative does as well you don’t need to add one to your soap recipes.

      3. 5 stars
        Hi I’m a new soaper and I’ve been working with lard I try to keep my ingredients and utensils to a minimum so it leaves less room for error or spills and I’m more comfortable…I’m also only doing 2lb batches right now..:will lye and lard only, work for this recipe along with fragrances and colors of my choosing? Also if I use one wisk or mixing tool how would I go about rinsing it before using it to mix the next color safely?

        Thanks ????????
        ❤️Milissa

        1. You can use all lard for this recipe. It may affect the color and how quickly the soap thickens, so keep that in mind.

          As for the mixing tool, we definitely recommend a stick blender. It emulsifies the soap in just a minute or so, while whisking can take two hours or more. Once the soap is emulsified you can use one whisk to add color and fragrance – just go from the white to the pink so there isn’t too much color transfer.

          Stick blender: https://www.brambleberry.com/Black-Stick-Blender-P5245.aspx

          Whisk: https://www.brambleberry.com/Large-Silicone-Whisk-P5867.aspx

      4. Hi there! I love this soap and would like to make it for Valentine’s Day. The green tea seed oil is out of stock and I wondered if there was a comparable oil ? I would LOVE to use rosehip oil for the great skin nourishing properties and also to amp up the “Rose” factor. Thank you so much for all the tips and recipes. I’m learning so much from this site!

      5. Do you think this recipe would work with goat milk? I often find that when I try to substitute goat milk for distilled water – it turns out differently. My goat milk does not turn brown, as I melt the cubes using an ice bath but colors do change a bit. Sometimes works out, sometimes not. I would really love more goat milk recipes as I feel like I’m trying to reinvent the wheel overtime I try something new and I hate wasting product nor do I want to give away soap that is not pretty. I have been successful with making the swirl in pot goat milk cubes but I’m getting bored with that…. Thank you !

        1. Absolutely, you can definitely use goat milk for this recipe. The main difference is that it will feel a bit softer because of the added milk fat and the colors may be slightly different. Milk soap can be a bit whiter so you may need less color, or you may need more if it turns more yellowish.

          I would recommend preparing extra color just in case. If you have some leftover, store it in an airtight container in a cool, dry place for later use. It will last as long as the oil shelf life: https://soapqueen.com/bath-and-body-tutorials/tips-and-tricks/free-beginners-guide-to-soapmaking-common-soapmaking-oils/

          You can also use a water discount for the recipe, that helps account for the extra milk fat so you can unmold your bars more quickly. Learn more about water (liquid) discounting here: https://soapqueen.com/bath-and-body-tutorials/tips-and-tricks/water-discounting-cold-process-soap-how-why/

      6. გამარჯობა 🙂

        I’m your real fan. I began soap making and generally, dreaming and planning my soap business after your YouTube videos. I have a question and I hope you will help me. So, I am from Georgia and can’t buy all of these products from Bramble Berry, because of shipping company. So, I am interested where I can buy titanium dioxide. I know, that titanium dioxide here is sold in the shops of paintings or building materials. Can I use this kind of TD or we use other kind one in soap making?

        1. I’m not sure where you can find titanium dioxide in Georgia. You may see if someone on teachsoap.com/forum knows more. If the kind you’re finding is pure titanium dioxide and the manufacturer says it works in soap, that should be fine. You can also look for any white colorant that’s used for soap.

      7. Hello I would like to adjust this to fit in the 10″ Brambelberry silicone mold but as a new soaper I do not know how and do not quite understand how to use the lye calculator properly, any suggestions?
        Thanks

      8. 1 star
        It kind of angers me that something so pure and clean and limited as Himalayan salt is being use for fancy soap.

        1. In addition to decorating the soap, the salt also exfoliates the skin. You can definitely skip it in this recipe if you like. Being able to choose what ingredients are used in your bars is one of the advantages of making them from scratch.

      9. 5 stars
        Can I make this with melt and pour soap using the 10″ mold? And if so, how long would I have to let it sit before unmolding it, cutting it, and wrapping? Thanks!!

        1. You can definitely get a nice pink and white swirl with melt and pour, but you won’t be able to get the texture on top. This post talks more about recreating cold process recipes with melt and pour soap: https://soapqueen.com/bath-and-body-tutorials/tips-and-tricks/re-creating-cold-process-melt-pour-soap-designs/

          Once the soap is in the mold, it will need to cool and harden. That takes about 4 hours or up to overnight. Once it’s cool and hard, it’s ready to cut, use, or package.

          -Kelsey with Bramble Berry

          1. Thanks Kelsey! I noticed the electric bubble gum colorant is out of stock. Do you recommend any other substitutes I could use? I do like that top you get with the CP soap btw! I might need to invest in the equipment and give it a try one of these days! 😉

      10. When running this recipe through the lye calculator, is the 5.5 tbsp of oil that the color is dispersed into taken into account? If not, why? Thank u

        1. The oil added with the color is an additive, so we don’t factor it into the main batch of oils. The extra oil helps the color mix in smoothly and also adds more moisturizing oils to the bars. If you prefer harder bars, you can mix the color with oil from the main batch (just use a tablespoon to measure out), or drop the superfat to 3-4%. That will help account for the extra oil.

          Learn more about superfat here: https://soapqueen.com/bath-and-body-tutorials/cold-process-soap/superfatting-soap-an-explanation-2/

          -Kelsey with Bramble Berry

        1. I saw in another post that Hazelnut, apricot kernel and hemp seed oil all have similar textures and make a good substitute for green tea seed oil. ???? Be sure to run it through the lye calculator again.

      11. 5 stars
        I am so excited to try this recipe this weekend. I have two questions.
        1) On step #6, when it says to add a heaping tsp of electric bubblegum, is that a tsp from the dispersed colorant or a dry tsp?
        2) this may be a stupid question but I am a new soaper. I’m learning about water discounting. Can u tell me what the water discount is on this?
        Thank u

      12. Can I swap distilled water on rose water for lye solution? It won’t scorche?

        1. You can use rose water if you like. The lye will change the color of the rose water slightly yellowish, so it helps to refrigerate it beforehand. That will prevent some of the discoloration.

          -Kelsey with Bramble Berry

      13. Beautiful soap! Though I myself have a problem when using pink salt in my recipes. I like to sprinkle them on top of my soap, just like in this recipe, but it is always falling off once the soap is dry – even if I try to push it a bit in the soap while making it (which works with flowers for example to prevent them from falling off). I suppose it is because of the chemical formula of salt. Do you have any advice? Have a nice day!

        1. We have found the salt does fall off very quickly, usually within the first couple uses. It definitely helps to press the salt in with a gloved hand, that will keep some of it on. We usually spend a few minutes trying to press the crystals in as much as possible. You can also add less salt so less falls off. A small amount in a line down the middle like the one pictured here looks really lovely. 🙂

          -Kelsey with Bramble Berry

        1. There is! Hazelnut, apricot kernel and hemp seed oil all have similar textures and make a good substitute for green tea seed oil. 🙂

          Remember to run your recipe through the Lye Calculator after any substitutions: https://www.brambleberry.com/Pages/Lye-Calculator.aspx

          This post has more information on substituting oils: https://soapqueen.com/bath-and-body-tutorials/tips-and-tricks/how-to-substitute-oil-in-cold-process-recipes/

          -Kelsey with Bramble Berry

          Hazelnut oil: https://www.brambleberry.com/Hazelnut-Fixed-Oil-P3197.aspx

          Apricot kernel oil: https://www.brambleberry.com/Apricot-Kernel-Oil-P3206.aspx

          Hemp seed oil: https://www.brambleberry.com/Natural-Hemp-Seed-Oil-P3211.aspx

        1. Absolutely! That will give the soap a bit of extra luxury and will make it a bit softer. 🙂

          -Kelsey with Bramble Berry

      14. This is my first time resizing a batch of soap wondering if you could tell me if I did it right. I want it to fit in a 10 inch silicone mold. I have 7.03 for lye- distilled water 16.50- 1.48 castor oil- coconut oil 12.50- green tea seed oil 5.00- olive oil 17.50- palm oil- 13.52. Those are all ounce measments. And fragrance oil for medium strength at 2.13 oz. Thanks

        1. Hi Lisa! Those amounts add up to 73.53 oz., which will be a bit too much for the 10″ Silicone Loaf Mold. It only holds 50 oz. You can resize that recipe to 50 oz. with our Lye Calculator! This post shows you how: https://soapqueen.com/bath-and-body-tutorials/tips-and-tricks/how-to-resize-cold-process-soap-recipes/

          That post was made when we had our old website, so the Lye Calculator does look a bit different. However, it still works the same! Then, once you have that 50 oz., you can use that to find the scent recommendation. 🙂

          Fragrance Calculator: https://www.brambleberry.com/Pages/Fragrance-Calculator.aspx

          -Kelsey with Bramble Berry

          1. 5 stars
            How much Titanium Dioxide and Electric Bubble Gum Colorant would you use for the 10″ Silicone Loaf Mold? Can’t wait to make this!

            1. I’m not entirely sure how much you would need for a smaller recipe, so I would recommend preparing the same amount to make sure you have enough! Then, add half as much as this recipe calls for to start. If you need more, you can add from there. If you have any leftovers, you can store them in an airtight container in a cool, dry place. Make sure to mix well before use as the colorants will settle. The color and oil mixture will last as long as the oil shelf life. 🙂

              Find a list of oil shelf lives here: https://soapqueen.com/bath-and-body-tutorials/tips-and-tricks/free-beginners-guide-to-soapmaking-common-soapmaking-oils/

              -Kelsey with Bramble Berry

      15. Kelsey,
        I made this BEAUtiful cp soap, one with rose quartz/electric bubblegum and the other with cherry almond/red; they are both sitting in Brambleberry’s 5lb molds w/freezer paper.
        I used the Sodium Lactate in both; the recipe says 3-5 days in mold.
        My question is, it’s been 3 days, when do I know I can remove it, 3 or 5 days?
        I know patience, patience, PATIENCE, just want to know if there is some indication that I can be sure that yes, I can remove it now.

        1. It is so hard to wait! But, it’s definitely worth it. I would recommend lightly tapping the top of the soap. If it feels firm to the touch, take it out of the mold and start to peel back the liner. If you notice any soap sticking to it, or if you see any dents, let it sit a few more days. You’ll know it’s ready when you can remove the soap cleanly and cut with no drag marks. It gives you a cleaner looking bar of soap that’s worth the extra couple days. 🙂

          -Kelsey with Bramble Berry

      16. This recipe does not mention incubating/insulating afterwards. Should I cover it with a box and towel afterwards for 24 hours? Or just leave it be at room temp?

        Thanks, Nicole

        1. We chose not to insulate this soap. We left it at room temperature. When the soap gets really hot and gels, the texture on top may get soft and fall a bit. The salt can then sink into that softer soap rather than sitting on top. That being said, you can gel the soap if you like. I would recommend bending a piece of cardboard and placing it over the top. That will help insulate it and also prevent anything from bumping the top. Just watch it carefully to ensure the top isn’t getting too soft. 🙂

          Read more about when to insulate soap here: https://soapqueen.com/bath-and-body-tutorials/tips-and-tricks/when-to-insulate-handmade-soap/

          -Kelsey with Bramble Berry

          1. 5 stars
            Hi, I tried to add some of the ingredients including the soap mold to the cart but it has tripled the amount. I am spending forever trying to correct this. Once I correct the amount and delete the items the amounts come back to triple. Is there anything I can do?
            Thanks
            SAFFFA

            1. Oh I’m sorry about that Safffa! I’m not quite sure why that’s happening. Once you change the amount to 0 in your cart it should remove it. Is it still giving you trouble?

              -Kelsey with Bramble Berry

            2. Saffa/Kelsey,
              Not to jump in on this, however I was having the same problem. Be sure to scroll to the bottom of your cart and click “update cart.” That was my problem, hope it helps!

              Happy soaping;
              Connie

      17. 5 stars
        I just ordered the Rose Quartz FO to test in my soap. I can’t wait to add this soap to my Valentines Day Line.

        1. I think you’ll really love it Tessie! The citrus and sandalwood notes give it a fresh, complex scent. 🙂

          -Kelsey with Bramble Berry

        1. Cold process soap is a lot of fun, I think you’ll enjoy it! We don’t sell the soap you see here, but you can find lots of great handmade soap on Etsy.com. 🙂

          -Kelsey with Bramble Berry

        1. A lightweight oil like grapeseed, sweet almond or avocado would be a good substitute! Just make sure to run this recipe through the Lye Calculator again after any substitutions. 🙂

          Lye Calculator: https://www.brambleberry.com/Pages/Lye-Calculator.aspx

          Learn more about substituting oils here: https://soapqueen.com/bath-and-body-tutorials/tips-and-tricks/how-to-substitute-oil-in-cold-process-recipes/

          -Kelsey with Bramble Berry

          Grapeseed oil: https://www.brambleberry.com/Grapeseed-Oil-P6029.aspx

          Sweet almond oil: https://www.brambleberry.com/Sweet-Almond-Oil-P3205.aspx

          Avocado oil: https://www.brambleberry.com/Avocado-Oil-P3198.aspx

      Comments are closed.

      {"email":"Email address invalid","url":"Website address invalid","required":"Required field missing"}

      The Latest from Soap Queen TV

      Inspired by Gems & Crystals

      All About Essential Oils

      The Power of Charcoal

      Create Your Own Clay Face Mask

      DIY Bath Bombs

      Cold Process Soap Tips & Tricks

      Learn the Basics of Cold Process Soapmaking

      Learn the Basics of Melt & Pour Soapmaking

      Want to Start Your Own Soap Business?

      Soap Business Success Stories

      Soap Queen TV Favorites

      Ingredient Spotlight

      Disclosure

      Unless stated otherwise, all images are original material and are copyrighted. If you'd like to use an image, please be a friend and credit the photo and link back to Soap Queen. Feel free to share, tweet and pin to your hearts content.