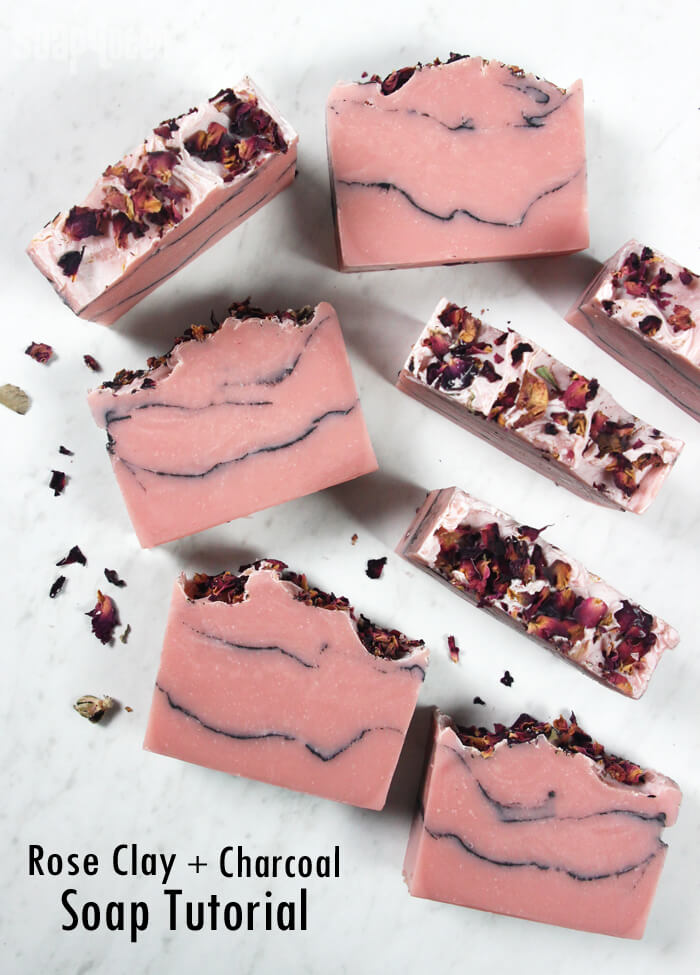
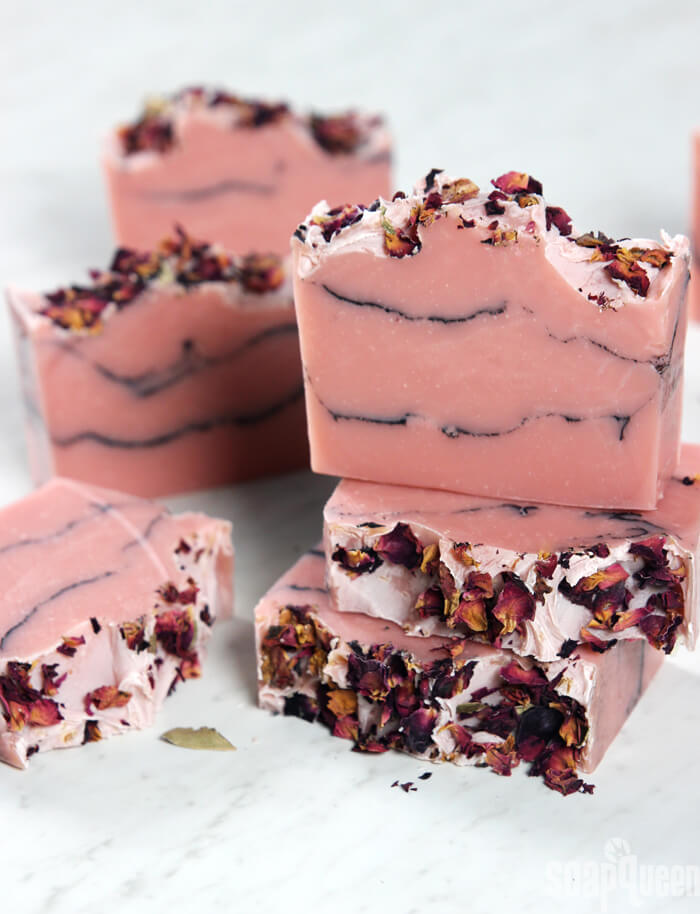
After the holidays, I always feel the need for a bit of detoxing and rejuvenation. That desire to hit the reset button inspired this soap recipe, which contains rose clay and charcoal. Both are known for their oil-absorbing properties. Charcoal in particular binds to dirt and oil in the skin, bringing them to the surface. In these bars, charcoal is sprinkled in between layers to create rustic-looking stripes.

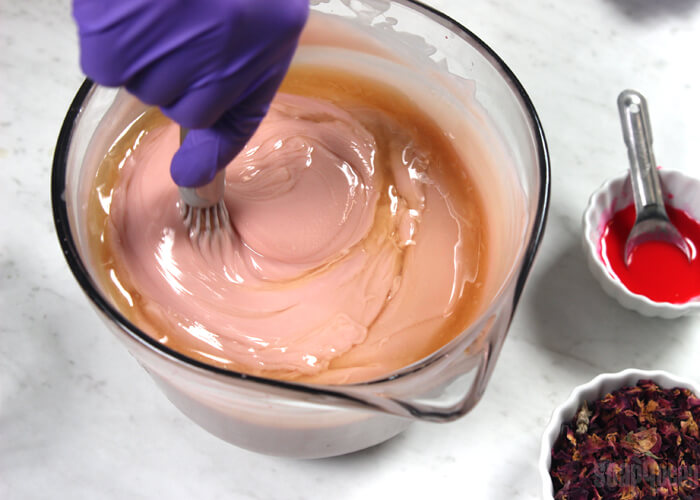
The rose clay in this recipe is dispersed in distilled water rather than oil to help compensate for the absorption properties. Learn more about working with clays in your products. The clay, along with Rosehip Jasmine Fragrance Oil, will cause the trace to become thick rather quickly. For this design that’s totally okay. These bars are meant to have a natural and rustic look to them, so you don’t need to worry about the layers being straight or the top being smooth. These bars really play up the thick texture!

After a few washes, the rose petals will fall off. But, I think they are totally worth it – they really are the cherry on top! Of course if you want to skip them, feel free. When it’s time to cut the bars, the rose petals can get caught under the knife and create drag marks. I threw caution to the wind and used the Multi-Bar Cutter. That created drag marks on about half the bars. But, I think they actually contribute to the “natural” look and feel. Depending on your preference, cut the bars on the side to avoid the drag marks, or embrace them by cutting straight down.
What You’ll Need:
10″ Silicone Loaf Mold
36 oz. Lots of Lather Quick Mix
11.8 oz. Distilled Water
5.2 oz. Sodium Hydroxide Lye
2 tsp. Rose Clay + 2 Tbs. Distilled Water
1/2 tsp. Fired Up Fuchsia Colorant
Activated Charcoal
2 oz. Rosehip Jasmine Fragrance Oil
Rose Petals
Optional: Powder Duster

Click here to add everything you need for this project to your Bramble Berry shopping cart!
[sq_products]
If you’ve never made Cold Process soap before, stop here! I highly recommend checking out our FREE four part SoapQueen.tv series on Cold Process Soapmaking, especially the episode on lye safety. And if you’d rather do some reading, Bramble Berry carries a wide range of books on the topic, including my newest book, Pure Soapmaking. You can also checkout the digital downloads for that instant gratification factor.
SAFETY FIRST: Suit up for safe handling practices! That means goggles, gloves and long sleeves. Make sure kids, pets, and other distractions and tripping hazards are out of the house or don’t have access to your soaping space. Always soap in a well-ventilated area.
COLOR PREP: Disperse 2 teaspoons of rose clay into 2 tablespoons of distilled water. Stir until there are no chunks. Dispersing the clay in water helps compensate for the water it absorbs. Then, disperse 1/2 teaspoon of Fired Up Fuchsia into 1/2 tablespoons of sunflower or sweet almond oil (or any other liquid oil). Use a mini mixer to help get rid of any clumps. Have a couple teaspoons of activated charcoal nearby to sprinkle in between layers, and rose petals nearby to place on top.
FRAGRANCE PREP: Measure 2 ounces of Rosehip Jasmine Fragrance Oil into a glass, fragrance oil safe container. Set aside.
ONE: Slowly and carefully add the lye to the water and gently stir until the lye has fully dissolved and the liquid is clear. Set aside to cool.

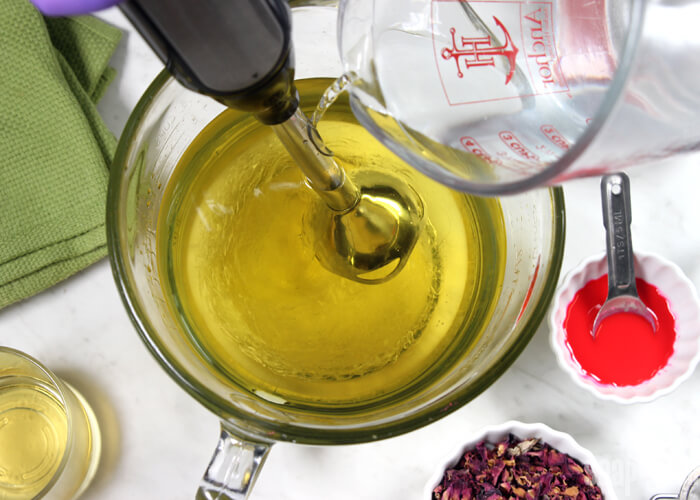
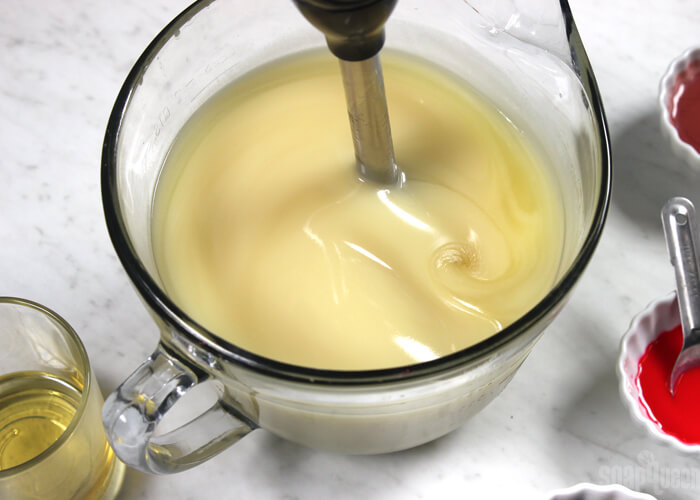
TWO: Fully melt the bag of Lots of Lather Quick Mix until there is no cloudiness. Give the bag a good shake to mix the oils, and measure 36 ounces of the oil into your soaping bowl. Slowly add the lye water to the oils and stick blend until thin trace. If you’d like a harder bar of soap that releases faster from the mold, you can add sodium lactate to the cooled lye water. Use 1 teaspoon of sodium lactate per pound of oils in the recipe. For this recipe, you’d add 2 teaspoons sodium lactate. Stick blend the soap until it’s at a thin trace.
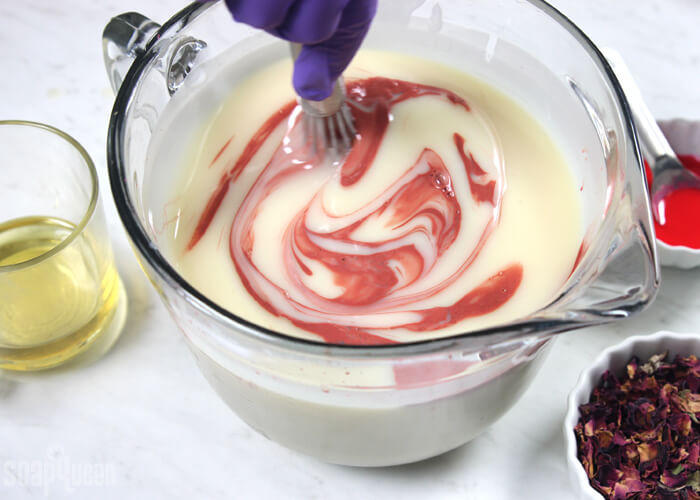
THREE: Add all the dispersed rose clay and one teaspoon of the dispersed Fired Up Fuchsia Colorant. Use a whisk to fully mix in both colorants.
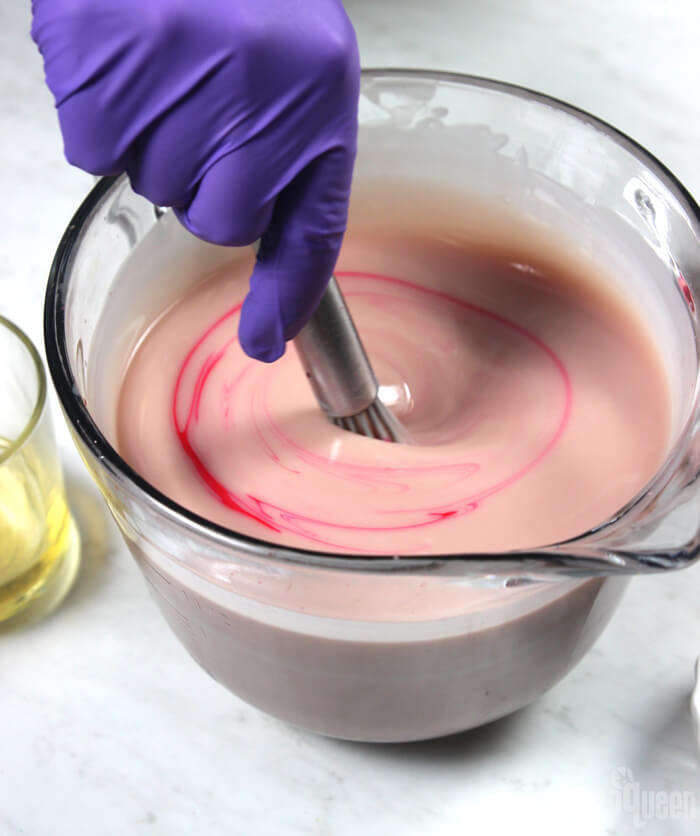
FOUR: Add the Rosehip Jasmine Fragrance Oil, and whisk until completely blended in. Now it’s time to create layers!
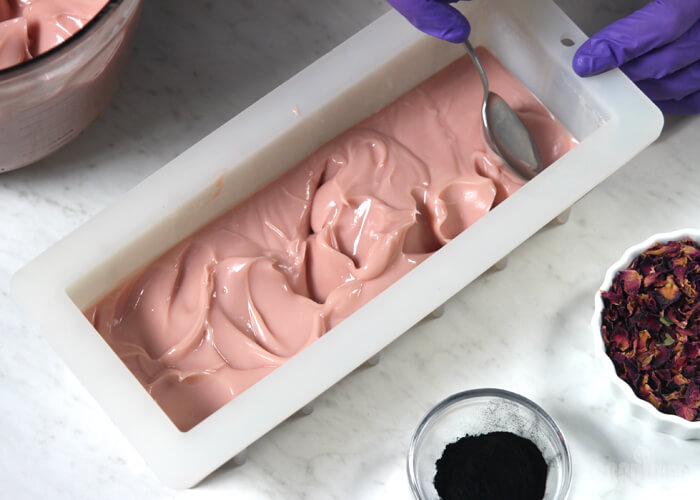
FIVE: Use a spoon or spatula to add about 1/3 of the soap mixture into the mold. Tap the mold firmly on the counter to help get rid of bubbles. Use a spoon to spread it in the bottom of the mold. Then, use the spoon to create texture. We aren’t going for perfectly straight lines, so just have fun with the shape!
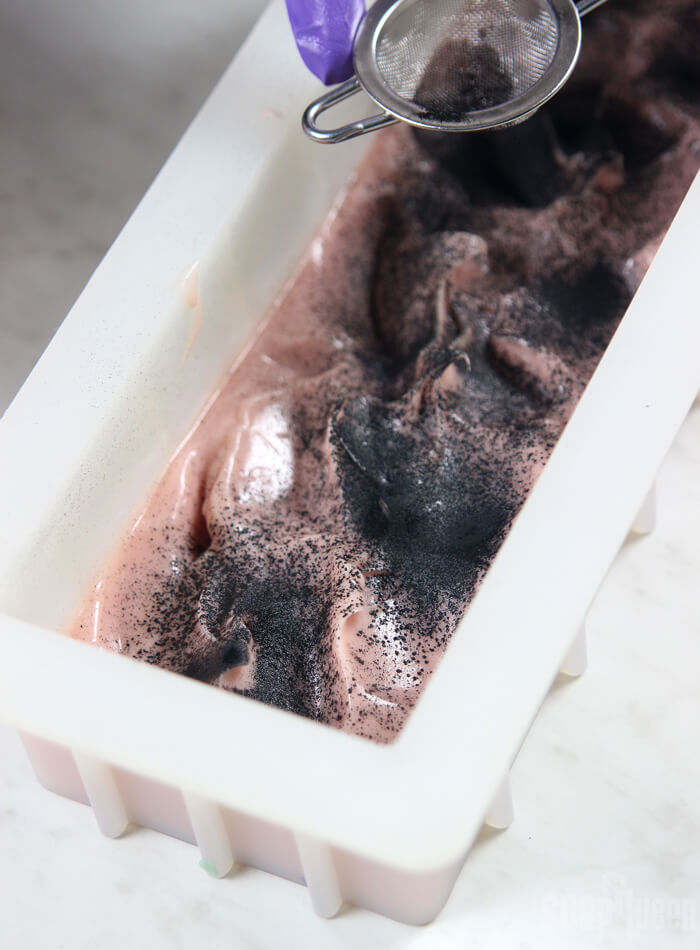
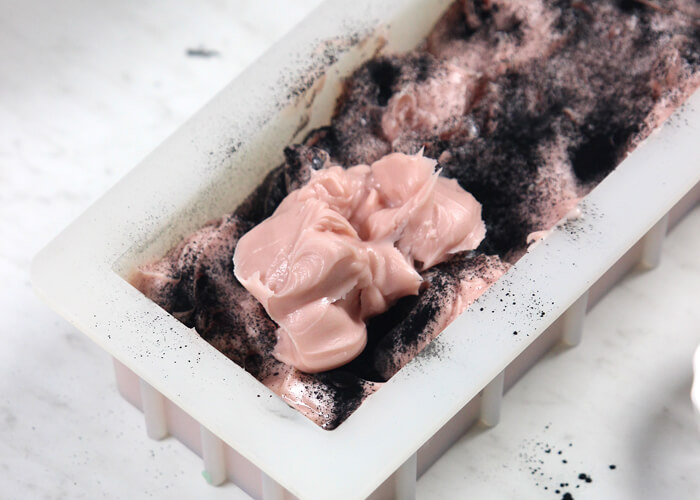
SIX: Add a small amount of the activated charcoal into the powder duster, and lightly dust the charcoal over the top of the soap. Do your best to only apply a thin layer. If too much charcoal is applied, the soap layers may not stick together.
SEVEN: Use a spoon to add about 1/3 of the soap batter on top of the first layer, and spread it evenly on top. Then, create texture with the spoon.
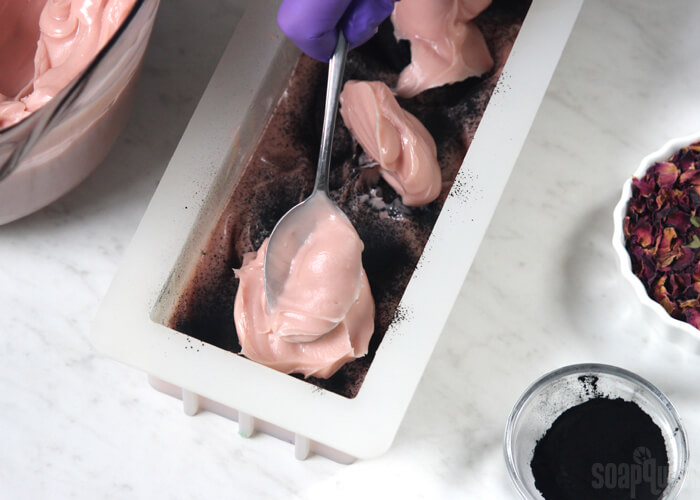
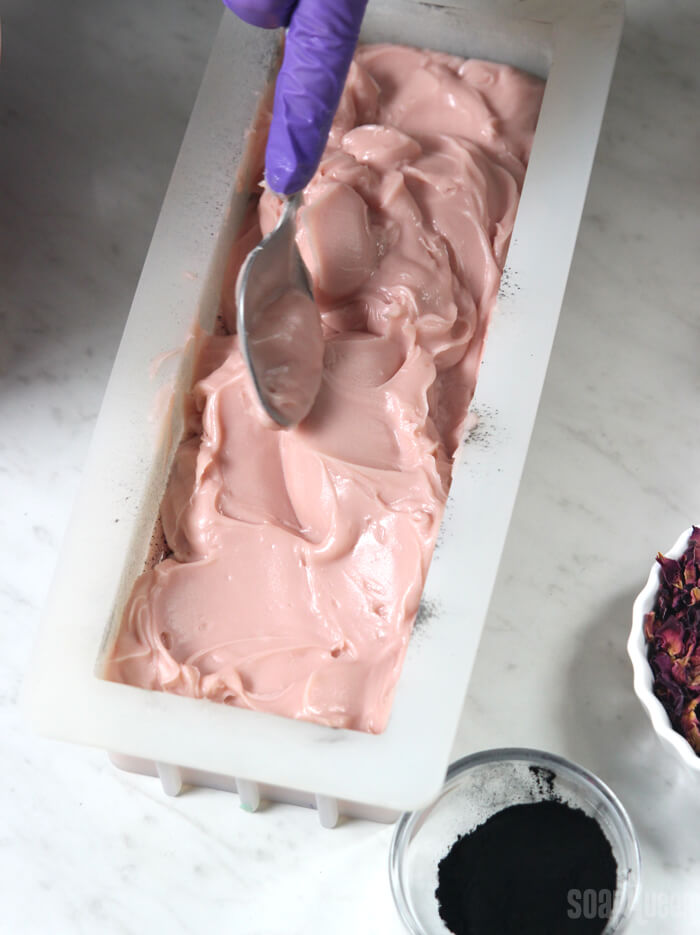
EIGHT: Tap the mold firmly on the counter to help get rid of bubbles. Dust another thin and even layer of charcoal onto the second layer. Spoon the remaining soap into the mold, and spread the soap with the spoon to evenly cover the charcoal. Use the spoon to create a textured top. There is no right or wrong way to create a textured top, but don’t be afraid to create some dramatic peaks. The soap will be quite thick, so you may need to be more heavy-handed with the pressure you apply to the soap than usual.
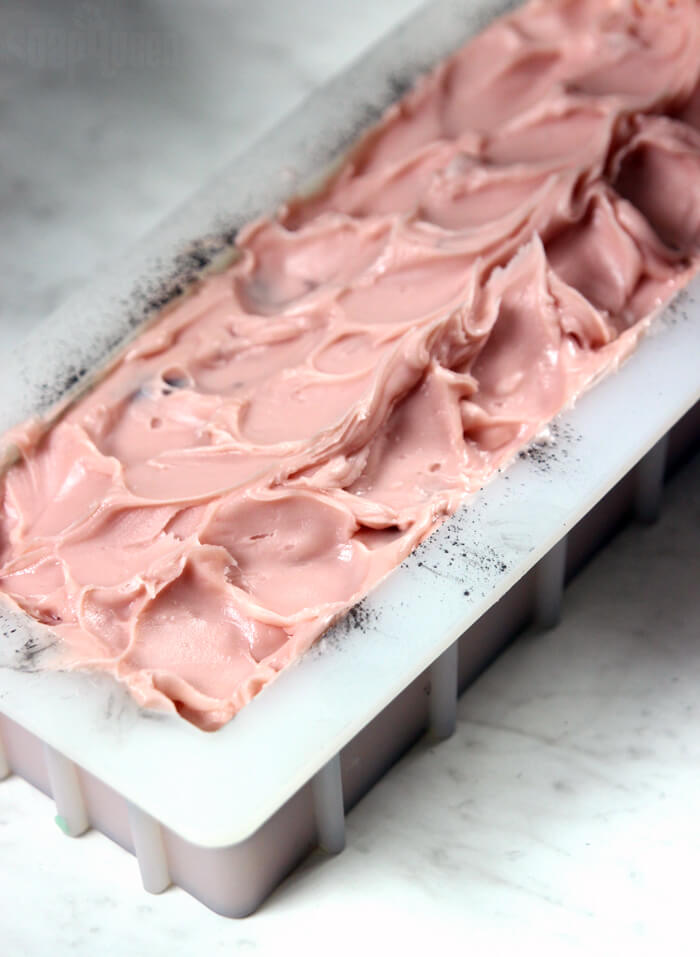
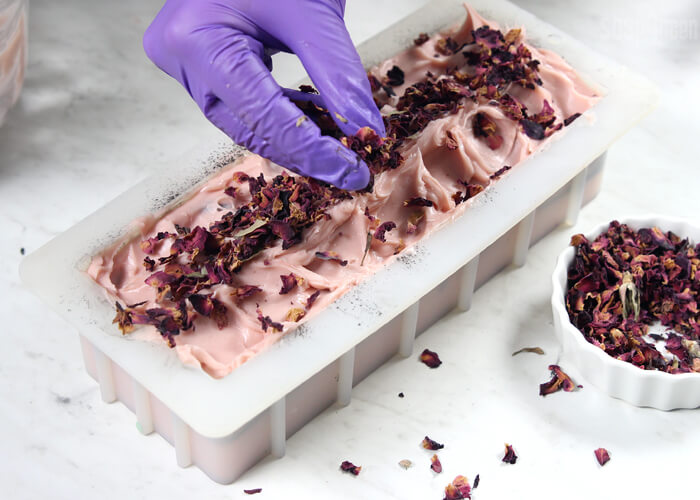
NINE: Once you’re happy with the look of the top, sprinkle rose petals on top of the entire loaf, concentrating the petals in the center. Gently press the petals into the soap to help them stick. Spritz with 99% alcohol to help prevent soda ash. Allow the soap to stay in the mold for about 1-3 days. Unmold and cut into bars. If you would like to prevent drag marks from the petals, lay the loaf on its side and cut from the side. I cut the soap regularly and embraced the rustic look of a few drag marks on some of the bars.

Rose Clay & Charcoal Soap Tutorial
Ingredients
- 10 ″ Silicone Loaf Mold
- 36 oz. Lots of Lather Quick Mix
- 11.8 oz. Distilled Water
- 5.2 oz. Sodium Hydroxide Lye
- 2 tsp. Rose Clay + 2 Tbs. Distilled Water
- 1/2 tsp. Fired Up Fuchsia Colorant
- Activated Charcoal
- 2 oz. Rosehip Jasmine Fragrance Oil
- Rose Petals
- Optional: Powder Duster
Instructions
SAFETY FIRST: Suit up for safe handling practices! That means goggles, gloves and long sleeves. Make sure kids, pets, and other distractions and tripping hazards are out of the house or don’t have access to your soaping space. Always soap in a well-ventilated area.
COLOR PREP: Disperse 2 teaspoons of rose clay into 2 tablespoons of distilled water. Stir until there are no chunks. Dispersing the clay in water helps compensate for the water is absorbs. Then, disperse 1/2 teaspoon of Fired Up Fuchsia into 1/2 tablespoons of sunflower or sweet almond oil (or any other liquid oil). Use a mini mixer to help get rid of any clumps. Have a couple teaspoons of activated charcoal nearby to sprinkle in between layers, and rose petals nearby to dust on top.
FRAGRANCE PREP: Measure 2 ounces of Rosehip Jasmine Fragrance Oil into a glass, fragrance oil safe container. Set aside.
- Slowly and carefully add the lye to the water and gently stir until the lye has fully dissolved and the liquid is clear. Set aside to cool.
- Fully melt the bag of Lots of Lather Quick Mix until there is no cloudiness. Give the bag a good shake to mix the oils, and measure 36 ounces of the oil into your soaping bowl. Slowly add the lye water to the oils and stick blend until thin trace. If you’d like a harder bar of soap that releases faster from the mold, you can add sodium lactate to the cooled lye water. Use 1 teaspoon of sodium lactate per pound of oils in the recipe. For this recipe, you’d add 2 teaspoons sodium lactate. Stick blend the soap until it’s at a thin trace.
- Add all the dispersed rose clay and one teaspoon of the dispersed Fired Up Fuchsia Colorant. Use a whisk to fully mix in both colorants.
- Add the Rosehip Jasmine Fragrance Oil, and whisk until completely blended in. Now it’s time to create layers!
- Use a spoon or spatula to add about 1/3 of the soap mixture into the mold. Tap the mold firmly on the counter to help get rid of bubbles. Use a spoon to spread it in the bottom of the mold. Then, use the spoon to create texture. We aren’t going for perfectly straight lines, so just have fun with the shape!
- Add a small amount of the activated charcoal into the powder duster, and lightly dust the charcoal over the top of the soap. Do your best to only apply a thin and even layer. If too much charcoal is applied, the soap layers may not stick together.
- Use a spoon to add about 1/3 of the soap batter on top of the first layer, and spread it evenly on top. Then, create texture with the spoon.
- Tap the mold firmly on the counter to help get rid of bubbles. Dust another thin and even layer of charcoal onto the second layer. Spoon the remaining soap into the mold, and spread the soap with the spoon to evenly cover the charcoal. Use the spoon to create a textured top. There is no right or wrong way to create a textured top, but don’t be afraid to create some dramatic peaks. The soap will be quite thick, so you may need to be more heavy-handed with the pressure you apply to the soap than usual.
- Once you’re happy with the look of the top, sprinkle rose petals on top of the entire loaf, concentrating the petals in the center. Gently press the petals into the soap to help them stick. Spritz with 99% alcohol to help prevent soda ash. Allow the soap to stay in the mold for about 1-3 days. Unmold, and cut into bars. If you would like to prevent drag marks from the petals, lay the loaf on its side and cut from the side. I cut the soap regularly and embraced the rustic look of a few drag marks on some of the bars.