When was the last time you soaped with Tamanu Oil? Tamanu Oil comes from the nut of the Tamanu Tree, found inside the inedible fruit that is only produced once a year. Melanesian and Polynesian communities have been using the oil for years to heal a wide variety of skin issues including acne, rash, warts, and bug bites. Its anti-fungal properties alleviate itch and are wonderful for athletes foot and helping to tame body odor. Tamanu Oil has a very earthy smell and slightly grainy texture. It smells sort of like nutty, musky dirt. It’s not unpleasant but it is surprising if you’ve never smelled it before. Check out this eye serum we created featuring Tamanu!
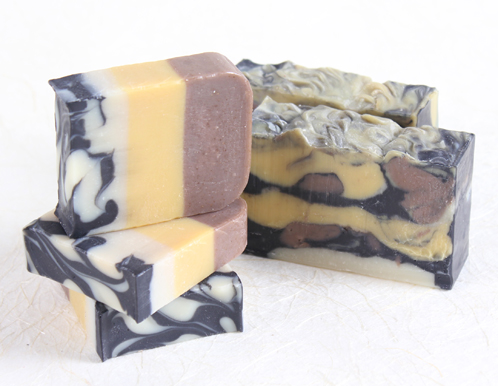
Not only is it great for pampering your face, but we decided it was the perfect ingredient for our Man Soaps too. We paired it with Leather fragrance oil for some extra masculine flair, and added some light exfoliant with a bit of Orange Peel Powder. When we started to make the recipe in our 2 pound wood log mold, we realized that we had over-estimated our soap yield and wound up having enough soap left over for a second technique! I love happy accidents!
If you have never made cold process soap before, I strongly suggest getting a couple of basic recipes under your belt before diving in. Check out Soap Queen TV on Cold Process if you want to get started with cold process. It’s a 4 part series that will take you through the basics (and be sure to watch the episode on Lye Safety). If you’re a book worm, Bramble Berry also has some helpful reading on the cold process technique.
Recipe
11.0 oz Coconut Oil
17.6 oz Olive Oil
11.0 oz Palm Oil
4.4 oz Palm Kernel Flakes
6.4 oz Lye
14.5 oz Water
3 oz. Meadowfoam Oil
1 oz Tamanu Oil
1 tsp. Cappuccino Mica
1 tsp. Yellow Oxide
.5 tsp. Activated Charcoal
.5 tsp. Super Pearly White Mica
3 tsp. Orange Peel Powder
3.5 oz. Leather Fragrance Oil
2 pound Wood Log Mold
Get everything you need in the click of a button! ![]()
PREP: Line your 2 pound wood log mold with freezer paper (shiny side up!). Have a second mold ready for the bonus round (we used a flexible loaf mold). Mix 1 tsp Yellow Oxide with .5 oz Meadowfoam oil, 1 tsp Super Pearly White with .5 oz Meadowfoam Oil, 1 tsp Cappuccino Mica with .5 oz Meadowfoam and .5 tsp Activated Charcoal with .25 oz Meadowfoam oil. Use your mini-mixer to make sure there are no clumps.
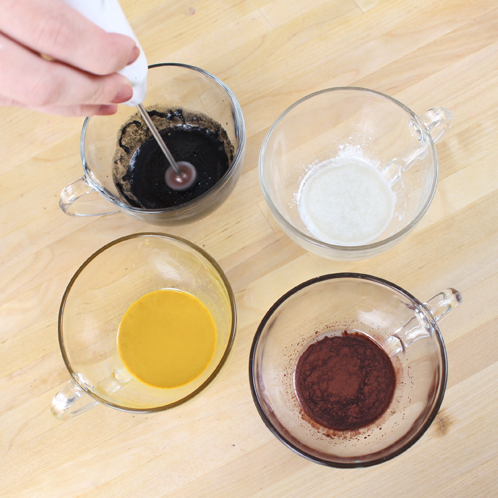
ONE: Suit Up! Safety gear on: that means long sleeves, rubber gloves, and goggles. Carefully mix your lye water by adding the lye to the water (never the other way around). Mix until the lye is fully incorporated into the water and the water is clear, then set aside.
TWO: Melt your Coconut Oil, Palm Oil, and Palm Kernel Flakes then mix in your Olive Oil and stir the oils well.
THREE: Carefully add the lye water to the oils, stick blending until you reach light trace. Add 1 oz Meadowfoam Oil, 1 oz Tamanu Oil, and 3.5 oz Leather Fragrance Oil and mix until just blended, taking care to not allow the soap to get to thick trace.
TIP: Does your Tamanu appear to have little specs floating around in it? No worries! That’s normal for the oil. Just pop it in the microwave on 10 second bursts with the lid off, and they should go away after one or two rounds.
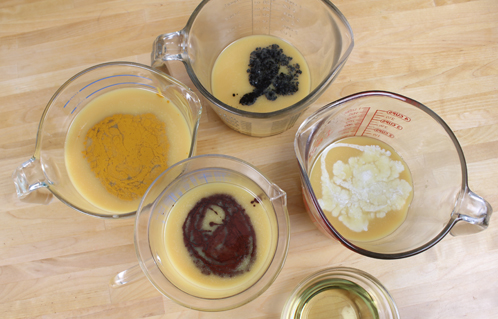
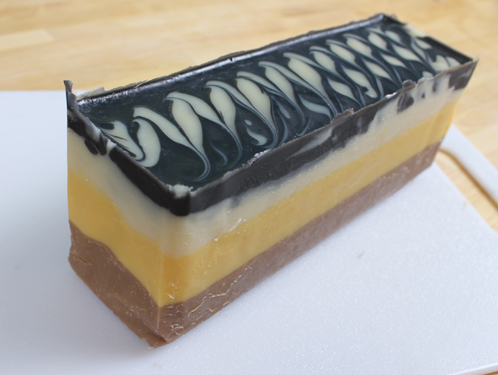
FOUR: Divide your batch into four parts. Two of those parts are going to be 2.5 cups, and the other two parts are 1.25 cups. You can eyeball it, as long as you have two parts that are about twice as big as the other two parts.
FIVE: Switch to a whisk as your blending tool to inhibit accelerating trace. Color one of your 2.5 cup parts with Yellow Oxide and the other with Cappuccino Mica and three tsp. Orange Peel Powder. Color on of the 1.5 cup parts with Activated Charcoal and the other with Super Pearly White Mica.
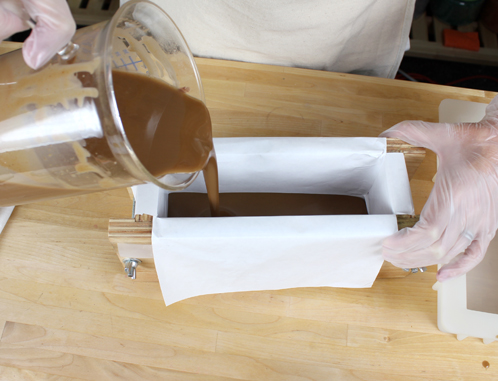
SIX: Fill your wood log mold about 1/3 full with the Cappuccino and Orange Peel Powder Soap. Using the back of a spoon or spatula, pour the second layer with the Yellow colorant. Remember that you’re going to have some soap left over! We’ll take care of that in a moment.
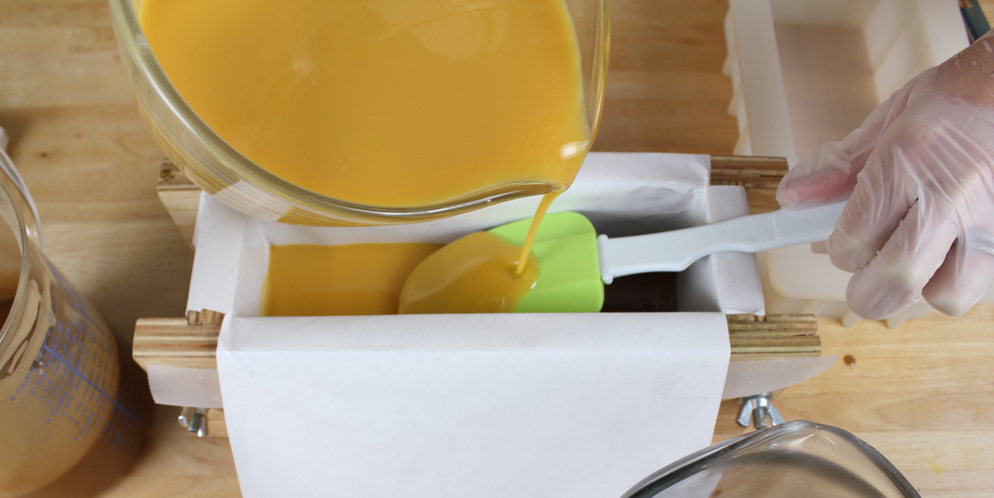
SEVEN: Following the yellow layer, we are going to do a black and white swirly top layer! Pour a layer of Super Pearly White colored soap. Fill about half to three quarters of the space left in the mold after the first two layers. Then, take the black soap and with a slow but steady pour, create a thread of soap length wise in the mold. Keep in mind that the further your container is away from the soap, the deeper the black soap will penetrate the white; we don’t want the black soap so deep that it mixes with the yellow, so vary your pouring height a bit but not too much.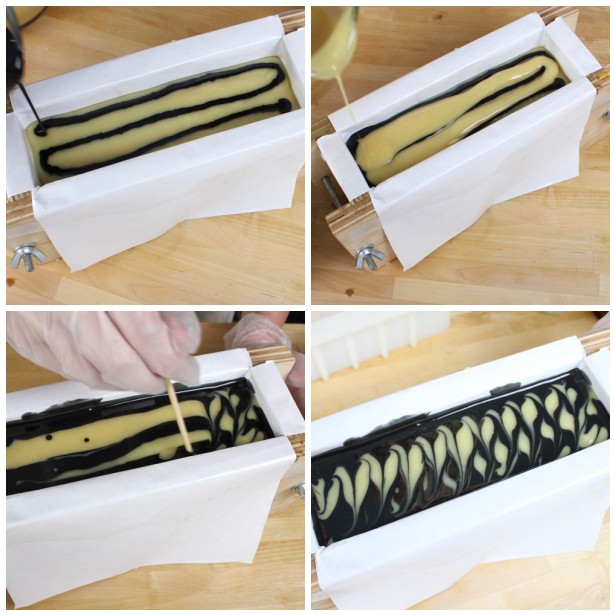
EIGHT: Once you have what looks like a striped top layer, take skewer, toothpick, or other tool and swirl the soap perpendicular to the stripes you just created. Make sure that your swirling tool isn’t going too deep, we don’t want to swirl the layer underneath the white and black!
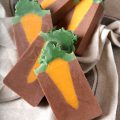
NINE (BONUS SOAP!): I bet you’re going crazy wanting to know what to do with your leftover soap, huh? Well, here we go! At this point, the extra soap has had time to come to a nice, thick trace (it might need a quick mix with the whisk). Grab enough spoons so that each color has its own, then start plopping the soap by the spoonful into your loaf mold. That’s right, I said plop! This technique is nothing precise; just plop, plop, plop with the different colors. Plop some yellow here, black there, white on the side, just go with your gut until that mold is full. Ta-da! Bonus soap!
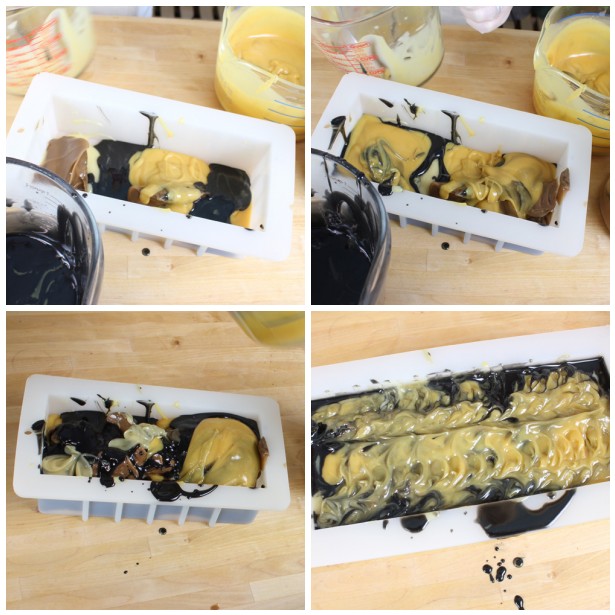 TIP: You might have enough time to use your swirling tool in your spoon plop soap, but we didn’t do anything after the last plop and we think ours turned out great!
TEN: Let the soap sit in the molds for 24-48 hours. Unmold and cut! The three layered soap will look pretty uniform throughout, but your spoon plop (swirl) soap should look different with each cut! Let cure for 4-6 weeks, and admire your hard work. Two soaps in one, how cool is that?
Do you have anything similar to this in Melt and pour? I’m new to soap making and I’m not quite read to take on cold process.
Thank you!
Good morning, Tyna!
While we don’t have an exact similar recipe in melt & pour, we do have a couple of layered melt & pour recipes that you can use to get a similar-type of look. Here are some links to check out:
Violet Glitter Gradient (Tutorial): http://www.soapqueen.com/bath-and-body-tutorials/melt-and-pour-soap/violet-glitter-gradient-tutorial/
Birthday Cake Soap: http://www.soapqueen.com/bath-and-body-tutorials/melt-and-pour-soap/birthday-cake-soap/
How to Make Petit Four Soap: http://www.soapqueen.com/bath-and-body-tutorials/melt-and-pour-soap/how-to-make-petit-four-soap-video/
Licorice Candy Soap: http://www.soapqueen.com/bath-and-body-tutorials/melt-and-pour-soap/licorice-candy-soap/
I hope that this helps! 🙂
-Becky with Bramble Berry
What to you put over the plop loaf for the 24 hour cure? And does that mold need to be insulated too?
Hi Celena!
You can just cover the plop loaf with a piece of cardboard to cover it up. If you want your soap to go through gel phase you can insulate it but it isn’t a necessity for the soap to turn out. =)
-Becky with Bramble Berry
I’m very excited to try this soap and have all the ingredients. Just double checking about the amount of Leather Fragrance Oil. It calls for 3.5oz. That is by weigh, correct? All of the soap recipes I’ve encountered weigh everything, but I just wanted to double check before jumping into this recipe.
We like our fragrances strong at Bramble Berry. If you’d like, you can use as little as 2.5 ounces for a more subtle fragrance. But, if you are looking for a stronger fragrance, 3.5 ounces is what we would suggest!
-Becky with Bramble Berry
Just curious if there is a typo on the supply list or in the recipe. on the supply list it asks for .75 oz of meadowfoam oil in the recipe it tells you to add .5 oz to the yellow oxide and .25 to the charcoal. then on step three has you add another 1oz of meadowfoam along with the tamanu oil and fragrance. That brings it to 1.75 oz of meadowfoam oil. Also if you click the buy it now button it places two 1 oz bottles of tamanu oil in your cart.
sorry I forgot to ask what the supper peary white and the cappuccino mica are mixed with in the first pic under prep. water?
Whoops, looks like there was a little typo in the recipe. Should be a total of 3 ounces of Meadowfoam oil, and you disperse all of your colorants in .5 ounces of Meadowfoam oil. We just updated the post. Thanks for the heads up! =)
i had looked over the recipe several times and something felt wrong each time it wasnt till yesterday that i actually saw what it could be. cant wait to try it out in a few days.
Just wondering if you need to use the palm oil and kernel flakes – I have previously used ricebran oil with my olive oil and coconut oil?
Secondly just wondering how gentle all the colours are for sensitive skin?
Thanks – loved your swirly duck soaps.
Jantie
The colors are oxides, so considered natural, and very gentle. They are all cosmetic grade, with the exception of the charcoal which is food grade.
You can totally switch up the recipe – this is just what I used – but if you do, just run it through a new lye calculator to make sure you’re using the right amount of lye:
https://www.brambleberry.com/Pages/Lye-Calculator.aspx
Looks like Boston Creme Pie! Ooooo that would be a yummy foody soap to make 🙂
Would cut pictures of the plop plop soap be available? Nice looking soap! Using meadowfoam oil to mix some of the colors is a new thought!
The pictures of the “plop plop soap” are at the very top on the right hand side =)
-Courtney from Bramble Berry
Here’s another picture http://images.soapqueen.com/IMG_3733.JPG
Courtney from Bramble Berry
Wow! beautiful!!!
BEAUTIFUL!
I haven’t tried too much of Cold Process (just a bit of re-batch base) but these look fantastic!!
Gonna keep my fingers crossed and my eyes peeled for them on the Soap Queen Labs Etsy site. (Hint Hint!)
🙂
WOW! I really like how the two turned out. I am eager to try both! Especially the spoon ploping one. This one will come in handy when you have a soap batch that turned on you and got thick too quick! How inspiring. Thank you Anne Marie! ♥
Both soaps turned out great! Love both techniques. I’ve never tried tamanu oil – I may have to check it out someday!