I am obsessed with licorice. I’ve heard rumors that chocolate is also delicious but when forced to choose, give me the acquired taste of licorice. For the record, my favorite kind is Panda (though RJ‘s or Darrell Lea’s are never turned down) or the ultra-acquired taste of Salted Licorice (available at fine mail order stores or specialty candy stores). Even though I love straight-up licorice most of all, I’ll still eat delicious Licorice Allsorts. And, I think that this project would make such a fun gift or a since it ’tis the season, a stocking stuffer. This project is easy and suitable for a beginner (just watch those temperatures!).

Recipe:
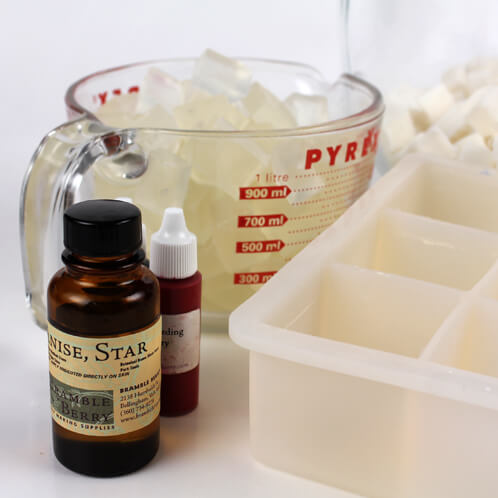
33.6 oz. White Melt and Pour Soap
22.4 oz. Clear Melt and Pour Soap
1.2 oz. Star Anise Essential Oil

Click here to add everything you need for this project to your Bramble Berry shopping cart!
ONE: Cut White Melt and Pour Soap Base into 1 inch cubes. Melt in the microwave in 30 second bursts until melted, stirring between bursts. Add 0.7 oz of Anise Essential Oil and mix well.
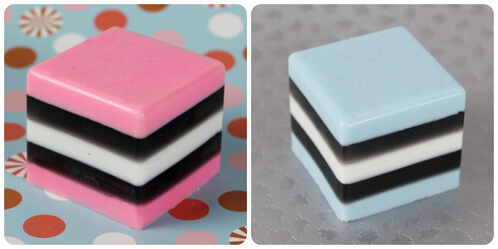
TWO: Split the White Soap Base into three parts. One should measure 11.2 oz, one should measure 12.4 oz, and one should measure 10 oz. Color the 12.4 oz portion with 6 drops of Non-Bleeding Cherry Colorant, the 10 oz portion with 6 drops of Non-Bleeding Teal Colorant, and leave the 11.2 oz portion white.
THREE: Cut Clear Melt and Pour Soap Base into 1 inch cubes. Melt in the microwave in 30 second bursts until melted, stirring between bursts.
FOUR: Shave off a bit of the Black Oxide Color Block and stir into the Clear Soap Base. The amount of color block to add is up to you. Remember WYSIWYG (what you see is what you get) when working with the color block, and stop when you like the hue of Black you’ve achieved. Add 0.5 oz of Anise Essential Oil and mix well. Split the black colored soap in half, each portion weighing 11.2 oz.

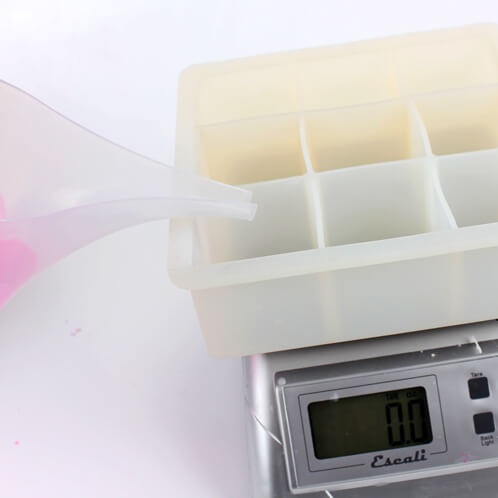
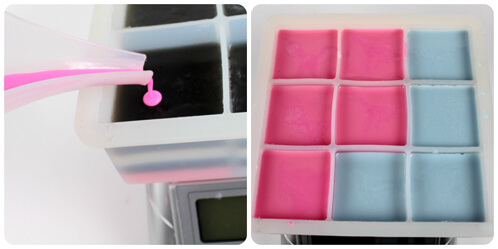
FIVE: Whew! Now that all of the weighing and portioning is out of the way, set your 9 Cube Silicone Mold on the scale. The first layer will be the pastel color layers. Pour five cavities of the Cherry colored soap at 1.2 oz per cavitiy, taring the scale between each pour. Do the same for the final four cavities using the Teal colored soap. Spray the soap with Rubbing Alcohol to pop any bubbles.
SIX: Once the pastel layers have hardened, spray the soap again with Rubbing Alcohol. Check your temperatures and ensure they’re at 130 or below. Pour the next layer using the black colored soap, each cavity weighing 1.2 oz. Spray again with Rubbing Alcohol.
SEVEN: After the black layer has hardened, spray again with Rubbing Alcohol and pour the next layer using the white soap, as long as the white soap is at 130 or below in temperature. Each cavity will weigh – you guessed it! – 1.2 oz. Spray again with Rubbing Alcohol.
EIGHT: Once the white layer has hardened, repeat the layering process following the white with more black soap, and make the final layer with the pastel colors (remember: 5 Cherry and 4 Teal!). Keep those temperatures in mind.
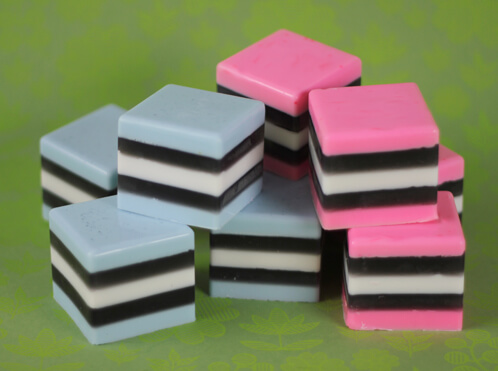
NINE: Allow the soaps to fully harden (maybe even overnight) and remove from the mold. These are some great last minute holiday gifts!
TIP: Loving this tutorial but not a fan of the intensity of Anise? Try blending it with something sweet, fruity or herbal! Here are some of our favorite blends:
2 Parts Orange 10X, 1 Part Star Anise
1 Part Vanilla Select, 1 Part Star Anise
1 Part Clove, 1 Part Star Anise, 2 Parts Litsea
1 Part Lavender 40/42, 1 Part Star Anise
1 Part Spearmint, 1 Part Star Anise
1 Part Patchouli, 1 Part Star Anise
1 Part Dark Rich Chocolate, 1 Part Star Anise
Need a night time blend? Try 4 Part Orange 10X, 3 Parts Star Anise, 3 Parts Cedarwood, 3 Parts Neroli and 2 Parts Chamomile.
Click here for a printable PDF of this tutorial.