The soap geniuses at Otion made this plate of kiwi and cream soap. It looks edible and smells delicious. Melt and pour is a wonderful medium to work with; it gives great artistic freedom and creative options for crafting with.
Tutorials on soapmaking, bath fizzies, lotions and more
The soap geniuses at Otion made this plate of kiwi and cream soap. It looks edible and smells delicious. Melt and pour is a wonderful medium to work with; it gives great artistic freedom and creative options for crafting with.
I have the privilege of speaking at CraveParty in Seattle next weekend. If you’re in the area, please stop by! ![]() The scoop: CRAVE Show ’07 is Seattle’s premier indulgence and style event for women. CRAVE Show ’07 showcases nine themes for smart, urban-minded women. To empower and inspire CRAVE Show ’07 features lifestyle experts, a fashion stage, fitness studio, décor design stations, spa services, cosmetics counters, travel desks, culinary delights, a connection café for friendship and networking, and much, much more. Above all CRAVE means enjoyment, enlightenment, indulgence, health, fashion and above all sophisticated, feminine fun!
The scoop: CRAVE Show ’07 is Seattle’s premier indulgence and style event for women. CRAVE Show ’07 showcases nine themes for smart, urban-minded women. To empower and inspire CRAVE Show ’07 features lifestyle experts, a fashion stage, fitness studio, décor design stations, spa services, cosmetics counters, travel desks, culinary delights, a connection café for friendship and networking, and much, much more. Above all CRAVE means enjoyment, enlightenment, indulgence, health, fashion and above all sophisticated, feminine fun!
Click HERE to see the calender for the show on November 3rd and 4th. The panels I’m participating in are at 12 noon on Saturday and Sunday and 4 p.m. both days.
So, if you’re in the Seattle area and want to meet hip, smart and connected women, stop by!
For Candlemaking Set Up, click here.
For information on wick and fragrancing, click here.
For wax spill cleaning, click here.
Once the wicks are anchored and centered, fragrance added and your wax is colored. You are ready to pour. Pouring has been briefly discussed here already. Most cotton core wicks will stand up straight when exposed to the hot wax. If you happened to purchase a wick that is drooping, consider using a CD series wick. They are specially designed for high melt point wax and will stay firm under the deluge of hot wax.

Here is another photo of pouring from the melting container to the pour container. Notice that we’ve finally covered the table with newspaper! There is approximately 3 pounds of melted wax in the double boiler pot. That much weight requires a steady hand (no caffeine before the pour!) and a strong wrist. Always work within your limits for weight; if you have a weak wrist, melt smaller amounts.

When the wicks get warm, they do tend to droop just a bit. Here we have propped up chopsticks to help keep the wicks standing up straight. It takes approximately 30 minutes for the beeswax candles to harden and be safe to move. Tip: If you try to move the wax while it is still congealing, it will ripple on the surface of the candle. Your candle will not have a smooth even look if you try to move the container too quickly.
 Check back tomorrow for final touches for your candles and some general tips and tricks for making your candle crafting as fun and easy as possible.
There were over 80 entries to the Soap Contest that the American Dairy Goats Association sponsored. The Handcrafted Soap Guild designed the contest rules about what makes a “good” bar of soap. Some of the criteria included:
Fragrance
Color
Even Texture
Lather
Residue
Feel when soaping
Density and Stability of Lather
Creativity
Water Absorption Test
To read more about the Water Absorption Test, click here.
 After lathering up with more than 80 bars of soap, Harriet Schieb (a small soapmaker from Denver, Colorado) and I independently filled out review forms. Each criteria had different points associated with it. The entire judging process was done over two days. Our hands are a testament to how nourishing goatsmilk soap is. Even after lathering with 80 bars of soap and using no lotion, our hands were fine! There was no excessive dryness or cracking!
The best soap in entire show was (drumroll please!) a soapmake r from Texas!
The winning soap was made in a Mini Mold using AppleJack Peel fragrance.
Congratulations Caroline Lawson from Franklin, Texas!

From their site: cheerful, colorful avians, two by two. freehanded on felt, so every bird is one-of-a-kind, like you. two-line saying in lovebird cursive (neat, carefree handwriting).
The cards are $42 for a box of 12 which seems pricey but when the work to cut out the felt birds and the custom printing is taken into account, it seems like a fair price to pay for all that labor!
Cake and Milk Paperie has lots of other card options if you’re looking for personalized cards. Check out their site here.

Thanks to Carrie Gigi From Mud Puddle Girl for the shout-out and the “You Make Me Smile” award.
Look for another candle making installment later today or tonight!
Crafting with soap and candles is a wonderful family activity. For this Container Candle experiment, my Dad and I took the opportunity to spend the morning crafting and laughing together.
I’ve mentioned my propensity to ruin the kitchen (here and here), much to my husband’s bemused chagrin. This time, it was my Father that betrayed the sanctity of our otherwise clean kitchen.
As I was chattering away, wick centering and placing, my Dad helpfully pulled the hot wax off the stove and gingerly walked over to the table to gently pour the wax into the metal pouring pot. It was a particularly graceful arc of wax that flowed right over the cannister and directly onto the table, where it slowly started splattering on the floor.

Silence filled the room as we both looked at the wax, congealing on the hand-installed cherry wood floors. We both looked at each other sheepishly as the error of our ego and hubris set in; why hadn’t we covered the table with newspaper?
My Dad is a doctor. He’s been stitching people up for over 30 years now. One would assume that he would be able to easily pour with a steady hand. I pointed this out, in a gentle, loving respectful manner (of course). He sputtered back that the viscosity of melted beeswax is different than urine and blood, the two things he most commonly pours. There’s really no rebuttal to that statement so I let him work in silence as I thought up funny ways to tell my husband of this latest mishap.
To clean your wax spill: Freeze the wax to make it easier to scrape.

Find a flat knife, such as putty knife or a baker’s scraper cutter. This is my Dad, scraping away at the wax with one of my best cheese knives.
 I have a video to post later tonight of my Dad scraping away at my table. The clean up was slow and tedious. It took approximately 30 minutes until the table was wax free (albeit with nice divots and holes where Dad gouged the wood).
To hide the dark wax stain, we decided to buff and wax the table with a commercial furniture polish. It comes in a yellow can and looks remarkably like Pam, the vegetable oil. After Dad and I finished buffing the table to a shine, we both looked at the bottle in my hands and realized one of us (finger pointed squarely at him!) grabbed the Pam bottle rather than the furniture wax bottle. So, we repeated the entire process – only this time with real furniture wax! My table has never been so moisturized!
We then covered the table with newspaper and started our container candle production line all over again.
Check back tomorrow for pouring and wick straightening tips!
Click here for Day One of Container Candle Making – set up and melting instructions.
Step Three: This is where you will center and place your wick. You can purchase specialty glue dots to hold your wick in place and buy wick centering devices (such as the EZ Wick Setter here). If you’re not making candles for a business production line, you do not need a special glue to hold the wick down or a wick centering device. Use our cost-effective method below for setting your wick.
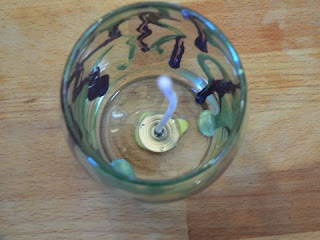
To glue down the wick, draw up some warm wax into a disposable plastic dropper. Use this hot wax as your glue to place and hold your wick. You can eyeball the wick into the center of your container without too much trouble. Work quickly. The wax will set up in a matter of seconds.
Fragrancing: Fragrancing is important in candlemaking. A recent survey done by the National Candle Association found that 75% of consumers purchasing candles considered fragrance to be “extremely important.” With over 10,000 candle fragrance options and an array of fragrance companies to choose from, candlemakers are lucky to have such a wide variety of choices to ensure they get the best scent for their budget and market demographics.
Some basic caveats when choosing a fragrance for your candle:
Throw is an issue. “Throw” refers to how well a candle wafts the scent over and throughout a room. Most candle fragrances are specifically designed to throw extremely well.
Flashpoint is something to consider. “Flashpoint” is the temperature at which an undiluted fragrance will combust when exposed to a flame or spark. Since candles are 5-10% fragrance and are diluted with 90% wax, combustion is not an issue. However, the lower the flashpoint, the higher the chance of fragrance note evaporation is. For example, if the fragrance flashpoint is 130, with a normal paraffin, soy or beeswax candle, evaporation or flash-off is a factor.
One important safety note is that if you are making gel candles, you must not use a fragrance with a flashpoint of 180 or below. Gel candles make large oil based pools. The entire pool of liquid could catch on fire with a sub-180 degree fragrance.
Test your fragrance. Different waxes, wicks and fragrance variables will make one fragrance smell great in a certain wax and wick combination but under perform with a different combination. A single Dixie cup with an appropriately sized wick, in a small room (bathroom anyone?) is an ideal test. It just takes two ounces of wax and .2 oz. of fragrance to test and potentially save you large batches of poorly scented candles.
The usage rate for fragrance in candles is surprisingly high. We recommend a full 1 ounce of fragrance (weight) per pound of wax. Candles scent entire rooms. To scent a such a large volume of space, 1 ounce of fragrance is a small investment.
You can the Bramble Berry candle line to scent your candles or the regular soap line. If you use the regular soap line, be sure to test the fragrance in a small test candle to ensure you’re thrilled with the throw.
Step Four: Once you have carefully transferred your hot wax to the pour container, add the candle fragrance while stirring the entire time. Since the candle fragrance will be cooler than the hot wax, the fragrance may congeal at the bottom of your pouring container. Simply stir it gently until the cooler portions are fully mixed in.

Step Five: This is where you add color. Remember to only use candle safe colorants as some colors may release toxins into the air if not approved for burning. In the photo below, I have dipped a Q-Tip into liquid candle color and painted designs on the inside of the container for a wacky, tie-dyed effect.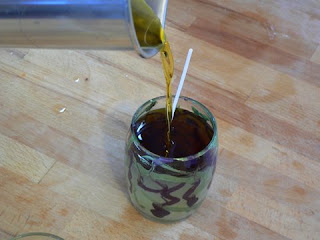
Step Six: Pour the melted, fragranced and colored wax into your heat safe container with a steady hand and evenly flowing pour.
Check back tomorrow for Day Three of container candlemaking.
I am mid-way through the Wick Setting and Fragrancing instructions for our candle tutorial but the day has gotten away from me! I will work more on the post at home and (hopefully) get the 2nd part of our candle tutorial posted to the blog tonight.
Diana wrote me to share her successful first soapmaking foray. She learned how to make soap from our Cold-Process DVD! Here is a photo of Diana’s soap.
 This is what Diana had to say about her soapy creation:
I added Orange Valencia, Red Grapefruit & Plumeria fragrance. Also added was the peach tone liquid color. It went in red and came out this way. I call it Orange Passion. I am very excited and can’t wait to make more soap.
Thanks for sharing, Diana! Your initial soap batches look very advanced for a newbie; it’s inspiring to see what a great look you can achieve – even on your first batch!
 Bramble Berry has a substantial line of candle fragrances, colors, waxes, wicks and candle glass containers. I love making candles but don’t make them enough. Once you get a perfect recipe down, the outcomes are more predictable than cold-process soapmaking.
For this Beeswax Container Candle project, the set up includes:
a double boiler
cotton core wicks
candle fragrance
glass containers
beeswax
Metal pouring container
If you don’t have all these things, you can melt beeswax in the microwave. It takes 6 to 10 minutes to melt the wax. It’s not advised because Pyrex will not always withstand the sustained heat. I have personally broken (exploded is a better word) two Pyrex “heat-safe” containers and a microwave glass rotating plate attempting to melt beeswax in the microwave. Do not melt the wax in a normal pot, directly on the stove. The wax needs diffuse heat from a double-boiler to best melt.
Why cotton core wicks? Cotton wicks are all natural and do not use zinc or metals to make them stiff. For beeswax users, the cotton wicks also carry the fuel (the melted beeswax) up the wick in a more efficient manner. In normal situations, cotton wicks are smoke free. The wick needs to be large; approximately double what you would use in a paraffin candle. Beeswax is a hard, dense wax and has a high melting point, needing a larger flame for a consistent melt-down.
Why specific candle fragrance? You can use soap fragrances (the ones from Bramble Berry are great in candles!) but they tend to be more expensive than dedicated candle fragrances. Soap and skin safe fragrances have higher standards for ingredient safety and purity. Candle fragrances can use a wider variety of ingredients, often cheaper, since they don’t need to adhere to standards like on-skin irritancy or being an allergen when applied to the body. Also, dedicated candle fragrances will sometimes perform better in candles than an all-purpose fragrance. Our soap fragrances (originall line and the Cybilla line) work great in candles. We have many customer using our normal line for their candles because it’s easier to have matching soap and candle scents. But, if you’re just making candles and economics is the main factor for you, choose the candle line.
Beeswax is a precious renewable resource. To make one pound (16 oz.) of beeswax, a worker bee will eat 10 pounds of honey and visit 33 million flower blossoms over 150,000 miles! WOW! That makes the price of $4.00 per pound seem positively cheap!
Why glass containers? Because they require less work than a traditional pillar candle and you don’t need to buy any molding equipment. Make sure if you use a container for your candle that the jar is a heat safe container.
Step One: Melt the beeswax in a double boiler. 16 oz of beeswax pastilles will melt down to about 10.5 oz of volume. One container (as shown in the top photo) takes a full pound of beeswax! This explains why these candles burn for so long – there’s a lot of wax in that little glass! Tip: When the wax is melting, it will congeal into one large lump. Breaking up the lump will help the wax melt faster. Please be careful when you are breaking the lump up – too vigorously chopping might splash hot wax on you!

Step 2: Carefully transfer the hot beeswax (no children or pets should be underfoot during this step!) into your pour container. I like metal for this though you could use a heat-safe pouring container in a pinch.

Check back tomorrow for Wick Centering & Fragrance Use.
I am back from the National Dairy Goats Association trade show and excited to start working on the Beeswax Container Candlemaking tutorial this week. Also, I have the “Best in Show” winner from our soap judging to announce!

For that test, we tested each bar of soap for weight in grams. Then strung the bars up with grommets and BBQ skewers. Those bars soaked for a full 2 hours before draining for 15 minutes. Then, every bar was reweighed and a mathematical calculation was done to see the % of water each bar absorbed. If the soap absorbed too much water, it was deemed a soft bar of soap that would disappear in the shower. The Soap Guild suggests an absorption rate of 5-15% is average. Some of the bars absorbed up to 45% and still others totally disintegrated.
This process looks easy. It wasn’t. Cutting and weighing and screwing the bars took hours. Hand screwing the hooks in caused some feelings of numbness and carpal tunnel onset.


We had to tongue test every bar for lye bite. It was horrific. Eighty bars of soap tasted terrible. I almost threw up multiple times. We did this in a public restroom with the manager coming in every 25 minutes telling us to leave immediately. It was the ultimate negotiation trying to get her to let us stay in the bathroom. “Please, just another 30 minutes? Under what circumstances could we stay another 30 minutes?”
It is amazing how badly we rated some of the bars for lather and residue. Those same bars scored poorly on the water absorption test as well, absorbing much more than the suggested 5-15% rate. The fact that, scientifically from a water-absorption rate, these bars were poor coincided impressively with our subjective ratings on lather, residue and feeling when using. It showed us that science matched gut instincts, at least with goatsmilk soap.
The winners will be announced tonight. We’re excited. Harriet and I don’t know who wins. We just know what the random # is. After 12 hours of testing, we can’t wait to see who the winner is!
I am teaching soap and lotion classes at the National Dairy Goats Association annual convention. My lotion class starts in 6 hours … and I have no emulsifying wax. It will be difficult to teach without it.
If anyone reading is in the Ft. Collins area AND happens to have some e-wax, I desperately need some. I am happy to buy, trade, or beg for it.
I’m at the Ft. Collins Marriot (970-226-5200) and can send someone out to get the precious emulsifying wax from you if you’re nearby.
Update: Thanks for Theresa in Denver, I now have 6 oz. of E-Wax for the class. Thank you Theresa!!!