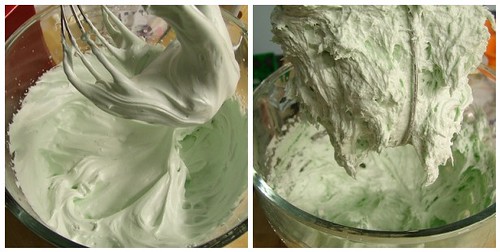
ONE: In your mixing bowl, combine 8 oz of clear soap base, 2 tbsp of natural Castile liquid soap base and your colorant of choice. Mix on high until the mixture has fluffy peaks and it looks like frosting. Ooh and ahh over how great the fluffy peaks look, then mix a little bit more until it looks grainy and less appealing. The picture to the right is a perfect consistency to work with.
TWO: Press the mixture into your play dough spaghetti maker and pull the lever down to make the “spaghetti strings” come out the other side. Let your strings sit in the open air for about 30-45 minutes; they will be easier to work with if they can cool and dry.
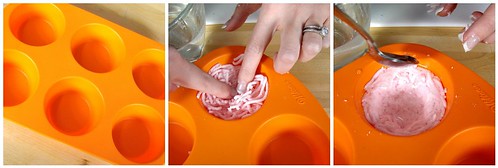
THREE: Melt 4 ounces of clear soap base and (if neccessary) cool to about 130°F. In one cavity of your cupcake mold, pour 1/4″ of clear soap and layer in a handful of your spaghetti soap. Fill up the mold about half way and press down the middle with your fingers to make room for the eggs. If necessary, drizzle some soap around the edges to ensure all of the pieces stick together.
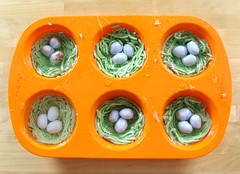
FOUR: Pour another thin layer of clear soap in the middle of your nest and place 3 eggs into the soap. Repeat this process for all 6 cavities.
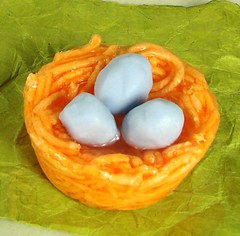
FIVE: Let the soaps cool, pop them out of the mold and smooth the edges with your finger.




![winningphoto[2]](https://www.soapqueen.com/wp-content/uploads/2014/04/winningphoto2-120x120.jpg)
I love this idea for a baby shower. How many nests will 1 batch make? How big are the molds you used for the nest? Thank you.
A batch will make about 6 nests. The molds for the nest are silicone muffin molds: https://www.brambleberry.com/Round-cupcake-Silicone-Mold-P3247.aspx You need to use silicone molds – they don’t come out of metal ones. =)
Let me know if you make the project. It really is one of my favorite Spring projects =)
Hi Marie!
This particular recipe batch will make you six adorable bird nests. We used the super easy round silicone mold (I love silicone molds!) for this project, and each individual cavity holds three ounces!
https://www.brambleberry.com/Round-cupcake-Silicone-Mold-P3247.aspx
-Becky with Bramble Berry
The soap does stay too soft if there is too much liquid soap in it. You can let it air dry for a few extra days if that’s the case. Or remelt and add more melt and pour soap too.
The string soap is like pasta al dente – a little firm but still flexible and movable. But not “really soft”.
I love this idea. I am laying awake at night thinking of all the ways to use this. One question though. Is your nest still soft when you pour the melt and pour in? I think I might have added too much liquid soap and my strings stayed really soft.
Love this idea. Just a question though. Does your string soap stay soft when you pour the melt and pour in. I think I must have added a bit too much liquid soap and it stayed really soft for a long time. Thanks
Just adorable!!!
I usually fragrance everything so these little nests are fragranced with Gardenia. =) Fragrance is totally optional to making the nests though.
Totally agree that this is a nice idea for doing instead of sugar treats but … um, I”m betting soap in place of soap won’t be popular with the kids! =))
I love the recipe – it’s so multi-dimensional. So pull out that play-doh machine and get to creating something even cooler. =) I can’t wait to see what you do with this idea. You are going to rock it!
Brilliant! I bet there are lots of play doh gadgets that would be great for soap making – thank you for sharing this super cute soap project. What a great gift in place of sugary candy this Easter!
those are adorable. A play dough machine…. never would have thought of that.
I read Debbie’s tutorial again, it all makes sense now! I want to try. I will try. I cannot wait. BTW, you didn’t fragrance those at all, did you? I wonder what nests smell like? Kentish Rain? hmm, that might work!… Thanks so much again!!!
Hi France,
Yes, you do melt the soap. I highly recommend reading Debbie’s original tutorial on how to make the soap frosting. She goes into greater detail about the best way to make and handle the soap frosting, the only difference is that I whipped it a little longer to get it to that grainy stage. I put the link in the first tutorial – but I’ll revise this one to have it too!
that’s so cute and gorgeous….. question: in Step 1, you do melt the “clear soap base” don’t you? I’ve never whipped soap before, so I wasn’t sure (and I’m thinking others might be fuzzy on that detail too?) and if you melt it do you wait for it to cool before adding the liquid soap?
These are SOOO cute, just wonder if I have the time and patience required, I do have the Play Dough tool though 😉 (would make great treats for the Easter Raffle at our school!)
Now that Debbie is aware of that technique she’ll probably come up with new funky ideas! I have a few myself using the star attachment to the Play Dough tool! Very very neat! Thanks!!!
What a creative idea using a play-doh machine! That really makes me look at my childrens toys in a new light! Thanks for sharing this fun project!
oh my gosh! now i know what i’m gonna do with my little tweenie boppers during spring break! this is the cutest project EVER!
i have been watching myriads of tiny little birds in my back yard
and even splashing around some days. now i have a positively
incurable case of spring fever! happens every year….
Wow! I had no idea the frosting could be put through a play-doh machine. That’s awesome!
These nest are super adorable, not the mention the sweet little eggs. Great project!