Advanced Swirling Part 5: Linear Swirling
Guest post by Kat from Otion (Bramble Berry’s retail store)
This is the grand finale of my advanced swirling tutorials. Today is linear swirling! Make sure that you check out parts 1 (Understanding Color Theory Terminology) , 2 (Getting Brave with Color), 3 (Soap Design and Color Matching) and part 4(In-the-Pot swirling) if you haven’t already. Learn the secret to a fabulous linear swirl!
Before you get started, check out my must have materials for swirling!
Step 1: At a light trace, separate half of the batch into two smaller containers; one for each color, add scent by hand before pouring.
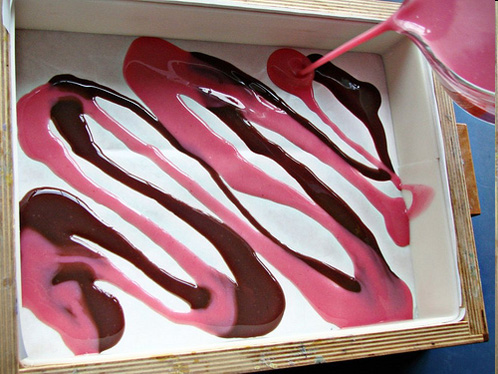
Step 2: Linear swirling is about building layers. Create a pattern using the two colors first so there is something on the bottom of the bars.
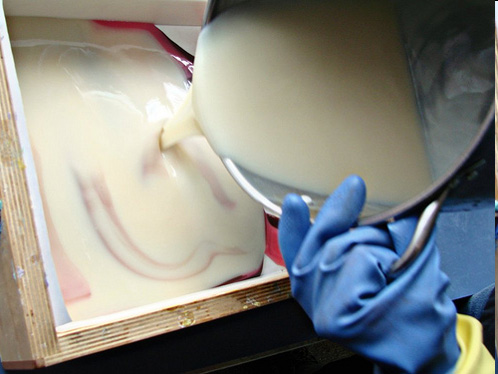
Step 3: Pour about ½ to ¾ of the white on top for the mid section which your lines will form into.
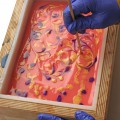
 Step 4: Pour lines lengthwise from up high with both colors to penetrate the neutral.
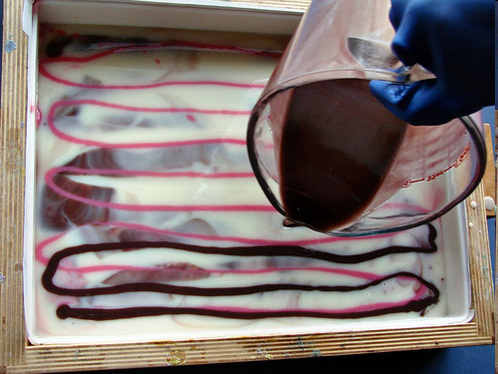
Step 5: Aim your pour so the colors sit side by side and not on top of each other. When the surface is solid color, pour more lines of neutral for contrast. As the mold fills up, pour closer to the surface for more visible lines.
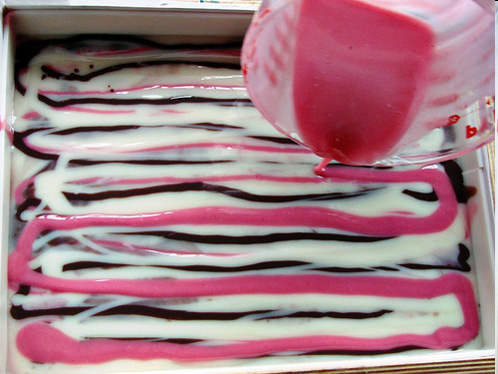
Step 6: When you have filled the mold, use a thin rubber spatula to pull colors in the opposite direction. Make sure the spatula is touching the bottom of the mold during the whole swirl process.
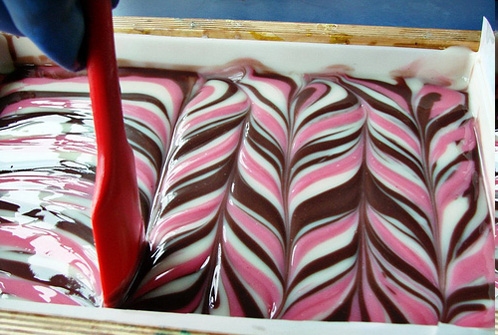
Step 7: For a more detailed swirl, use a reed or skewer to pull the colors in a figure-eight or circular pattern. Keep in mind, the more you manipulate the swirl, the more the colors will combine and reduce contrast.
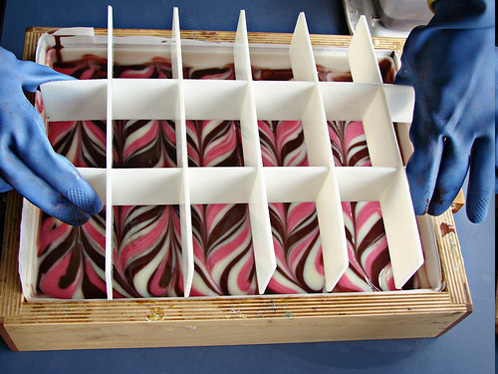
Step 8: Tap mold on the counter to pop bubbles, insert dividers, insulate and de-mold after at least 48 hours. Slide off the dividers; do not pull or it will tear the soap.
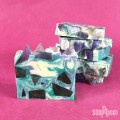
Notice how the Cellini Red mica morphs to a lovely orange color in cold process. I love it!
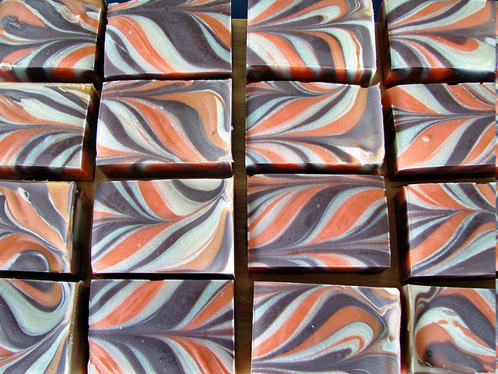
These are my two favorite methods of swirling soap. I love how simple ITP swirling is and how gratifying it feels to pull the colors through in a linear swirl. I’ve heard from so many people that they can’t swirl or that they gave up trying. Well believe me, you can do it! The best advice I can give is to keep the consistency of your soap very thin and workable, use fragrances that don’t accelerate, know your pigments and how they behave in cold process, have fun and practice, practice, practice.

Luv the soaps.. where did you get the soap bar dividers or did you make? Thanks, Kathy
Hi Kathy!
Thanks for stopping by! Those dividers actually come with our Birchwood molds, you can get them in 9-bars, 18-bars and 36-bars.
9 Bar Unfinished Birchwood Mold: https://www.brambleberry.com/9-Bar-Unfinished-Birchwood-Mold-P5169.aspx
18 Bar Unfinished Birchwood Mold: https://www.brambleberry.com/18-Bar-Unfinished-Birchwood-Mold-P5168.aspx
36 Bar Unfinished Birchwood Mold: https://www.brambleberry.com/36-Bar-Unfinished-Birchwood-Mold-P5167.aspx
I hope this helps! 🙂
-Becky with Bramble Berry
Any time I look for soap ideas I always check the Soap Queen first!
This reminds me of tri colored taffy…. Think I will have to give it a try. I will use Vanilla FO to get the brown and use a berry scent as well.
Question…. What did you use to get the gorgeous brown color?? Only way I can achieve that is with Vanilla FO and letting it do its thing and would love to know what to use when I don’t want a vanilla scent in my soap.
Thanks in advance for reading and a reply!
I never thought about it that way before, but you are right, it looks a lot like taffy! In this particular recipe, Kat used Brown Oxide (https://www.brambleberry.com/Brown-Oxide-Pigment-P4045.aspx). We’ve also used it in the following tutorials:
Fall Sweater Stripes: http://www.soapqueen.com/bath-and-body-tutorials/cold-process-soap/fall-sweater-stripes-tutorial/
Three Color Mantra Swirl: http://www.soapqueen.com/bath-and-body-tutorials/cold-process-soap/three-color-mantra-swirl/
I hope this helps! 🙂
-Becky with Bramble Berry
Do you have a pink or red you would recommend whose color would stay the same and not morph into another color?
Hi Charlene,
Try not to use the stick blender any more after reaching a light trace. Mix your colors by hand, and if you need to break down dry pigments in a little oil first, that will make it easier to incorporate. The more you stick blend, the thicker your soap gets.
I hope this helps!
Kat
Tried linear swirling for the first time last night with 3 colors. Followed your directions. Soap got thick too fast after adding the color. That always seems to be my problem when I try something fancy with several colors. I don’t have enough time to work. Did you use the stick blender when adding colors or just hand blend? I used the stick blender. Also, when adding the fragrance I added it after the color and just divided it up into all three pots. Do you mix this in by hand or with the stick blender? Just trying to figure out how to get more creative time!
Tried it a thin trace but I think the pigments thickened by pots too quick. Still turned out pretty but I have way too much soap to use only 3 colors used about a 3 pound recipe and seemed I was running out of room to layer the colors…I don’t know but sure did not come out as pretty as yours. The top did but the bottom and sides seemed blotchy rather than swirled. Will try again!
Great tutorials…especially for someone like me who would love to take one of your classes but has the entire country between me and Otion (I’m from NJ). So here’s to wishing for a visit and looking for more great tutorials! Thanks for the inspiration!
Thank you! Kat is such a talented soapmaker. We’re so lucky to have her on board. I hope you can make it over here someday =)
Courtney from Bramble Berry
Great, great, great !
I’m so happy you all found it helpful! Thanks for reading 🙂
The swirls are beautiful, thanks so much for sharing.
Excellent Series Kat, some great soap and tutorials 🙂
Thankyou sooo much for this series Kat.
I have so enjoyed your tutorials and have really looked forward to each lesson.
They have been very informative and inspiring.
You make it look so simple….Thankyou for sharing with us all. I have learnt heaps.
Regards Rona.
=)
Simple Stunning! I will be trying this tonight when I make soap! Thank you for the inspiration!
fantastic tutorial, the swirls are gorgeous. Thanks for sharing.
beau-ti-ful!
Thanks for showing how the cellini red morphs. That is a great orange for fall.
Great colours and tutorial, the finished bars look great.
I love your swirls Kat! Love how the colors came out on this one too! Very thorough instructions as usual. 🙂