• May 24, 2017

Iridescent Pearl Bath Bomb DIY

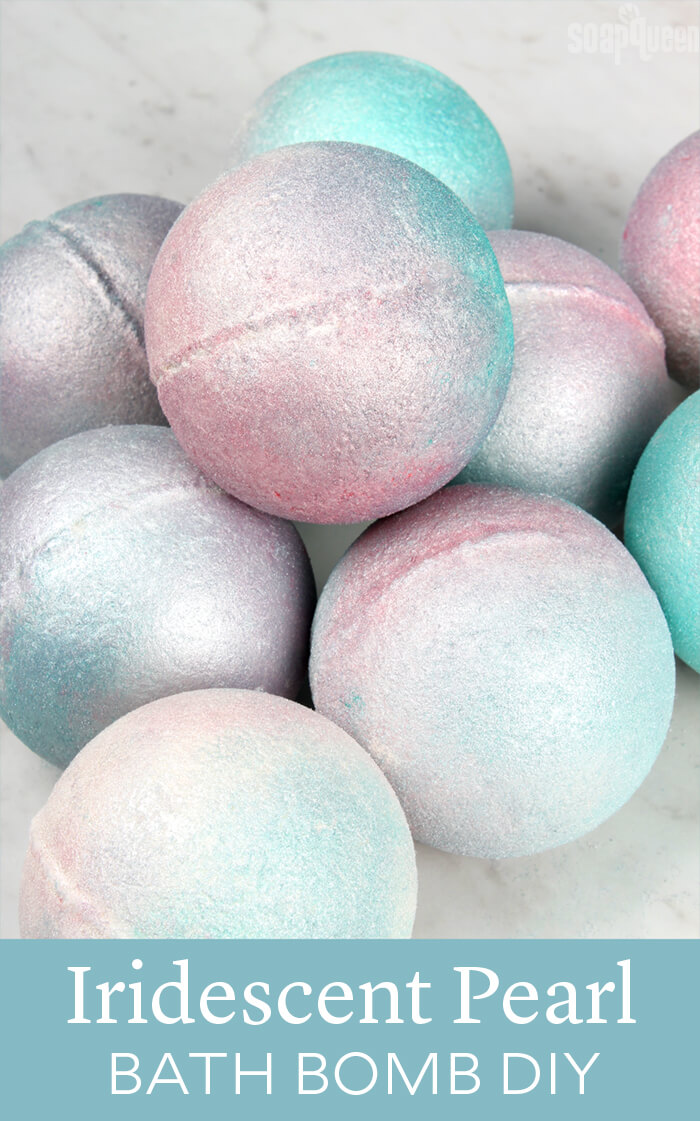
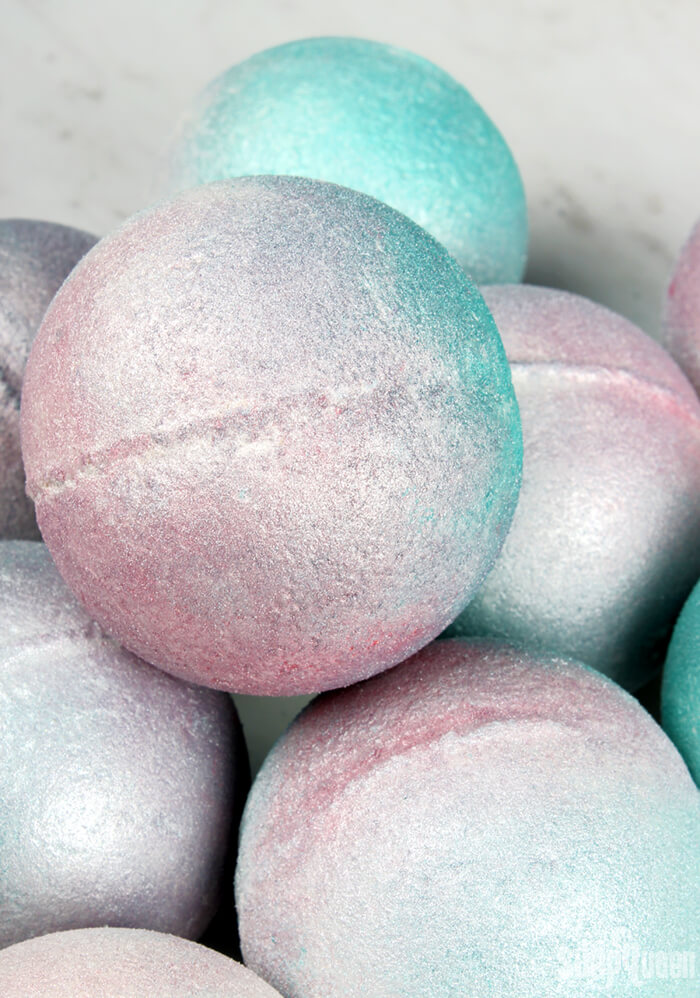
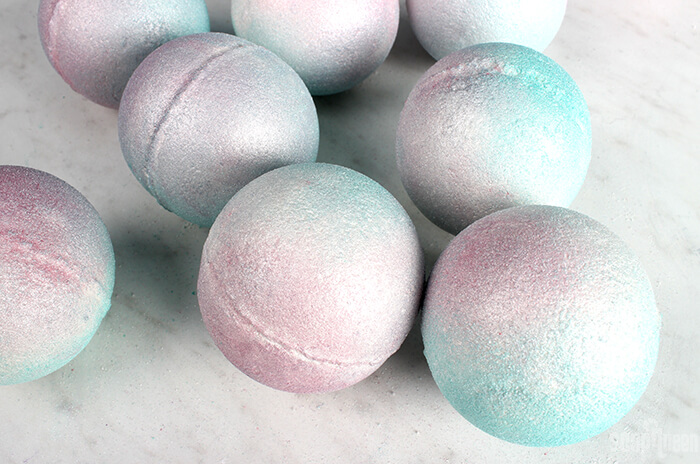
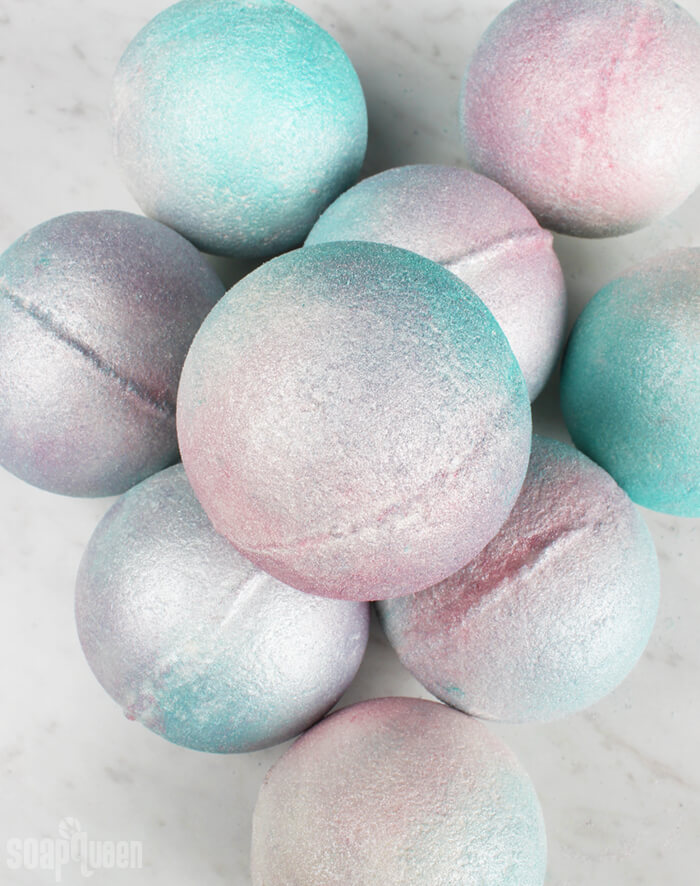
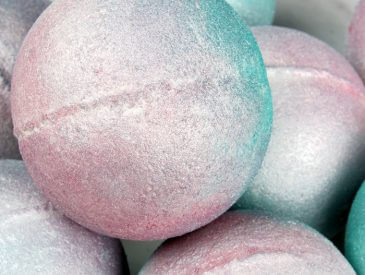
Ever since Anne-Marie dyed her hair light pink, we’ve been obsessed with hair color trends. The latest trend to catch our eye is pearlescent hair. The technique involves creating multi-colored locks with a holographic effect. Pearl hair inspired these Iridescent Bath Bombs. They are covered in Rose Gold Mica and Aqua Pearl Mica to create the subtle ombré effect.

Iridescent Pearl Bath Bombs

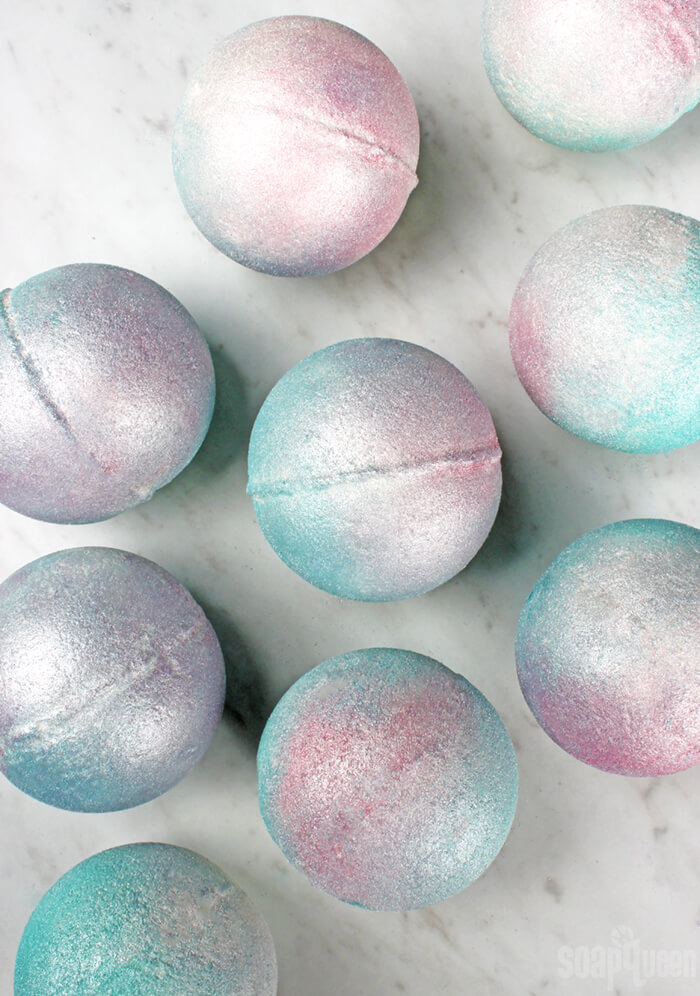
The great thing about this bath bomb technique is that it’s simple to do. Apply the mica directly to the bath bomb with your fingers and spread it around until you’re happy with the effect. There is no right or wrong way to do it. The process is a little bit messy though, so gloves and something to cover your surface is recommended.

Iridescent Pearl Bath Bomb Tutorial

What You’ll Need:
8-10 Bath Bomb Mold & Package
3 cups Baking Soda (Sodium Bicarbonate)
1.5 cups Citric Acid
3 oz. Shea Butter
0.5 oz. White Rose Fragrance Oil
0.5 oz. Polysorbate 80
Super Pearly White Mica
Rose Gold Mica
Aqua Pearl Mica
Witch Hazel in a Spray Bottle


Click here to add everything you need for this project to your Bramble Berry shopping cart!

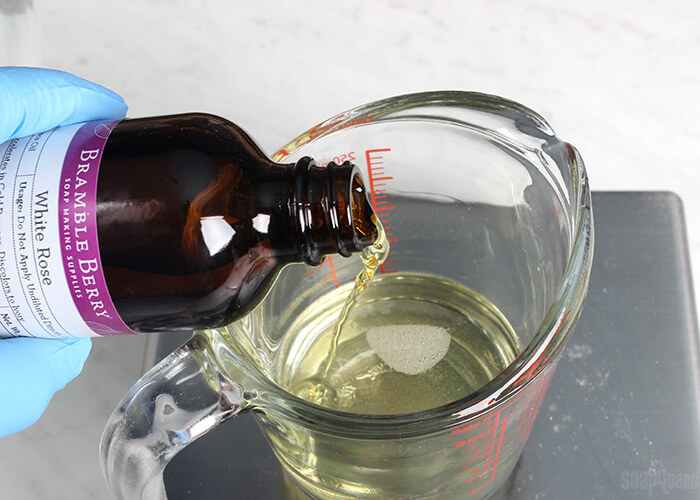
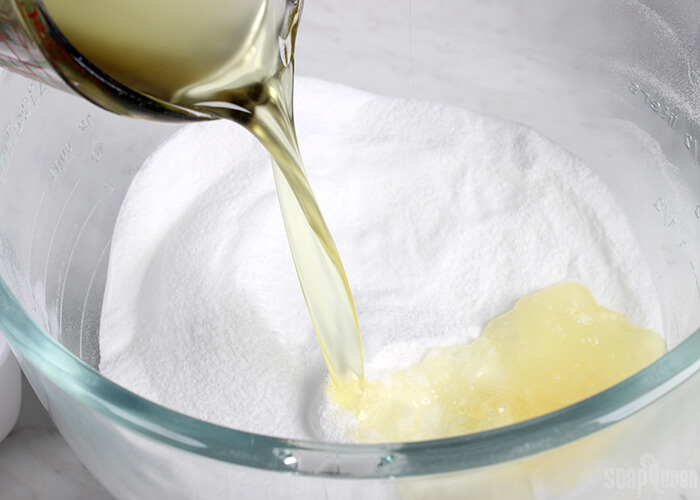
ONE: Add 3 ounces of shea butter to a small heat and fragrance oil-safe container and melt in the microwave using 30 second bursts. Add 0.5 ounces of Polysorbate 80 and 0.5 ounces of White Rose Fragrance Oil. Use a spoon to fully mix the ingredients together. The Polysorbate 80 is there to help disperse the color in the tub (less chance of color sticking to the sides of the tub).

ONE

TWO: In a large bowl, mix together the baking soda and citric acid. To get rid of clumps in the mixture, you can push the powders through a sifter or break them up with your fingers. Citric acid has a tendency to take off nail polish, so wear gloves to protect your manicure. Thoroughly stir the ingredients together.

THREE: Add the shea butter mixture to the baking soda and citric acid. Use your hands to thoroughly mix all the ingredients together.

TWO

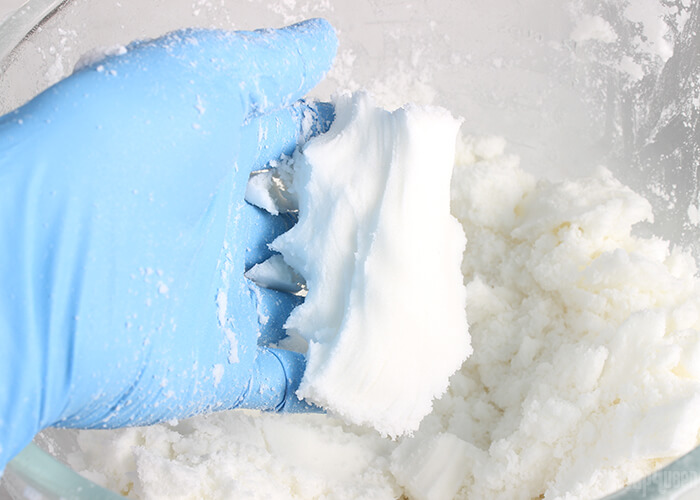
FOUR: Test the consistency of the bath bomb mixture. The perfect consistency for molding is a texture similar to damp sand that holds its shape when squeezed. If it’s too dry, use one hand to spritz the mixture with witch hazel and one to mix. Continue spritzing until the mixture holds its shape when squeezed. Below, you can see that the mixture forms a ball when squeezed. This means that the mixture will hold its shape in the mold as well.

THREE

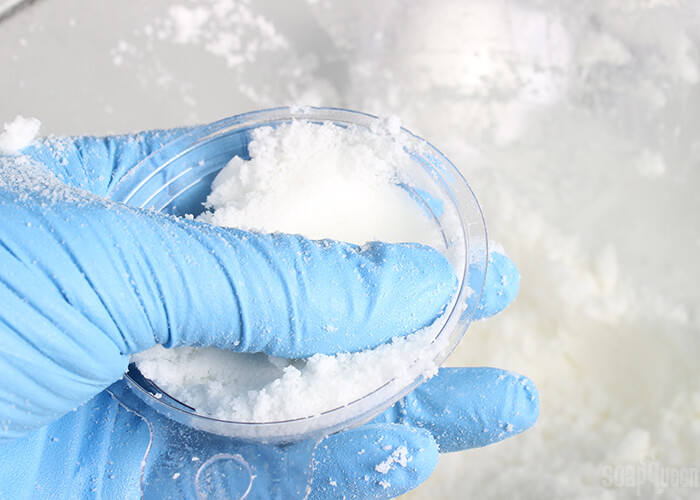
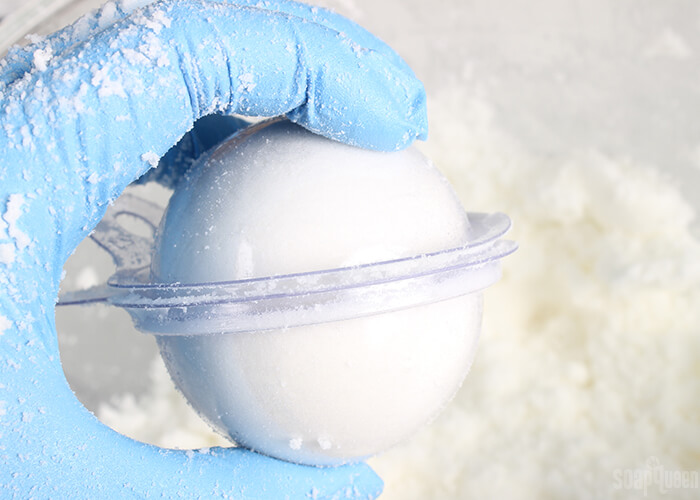
FIVE: Fill the two halves of the molds, gently pressing the bath bomb mixture in each so they hold their shape. Mound a little extra mixture in the center of each half of the molds. Wipe away any mixture that got in the seams of the mold, match the eyelets of each side up, and press together. To avoid any imperfections on your bath bomb, make sure to direct pressure to the edges of the mold rather than the center. Continue filling up the bath bomb molds until the mixture is gone.

FOURFIVE

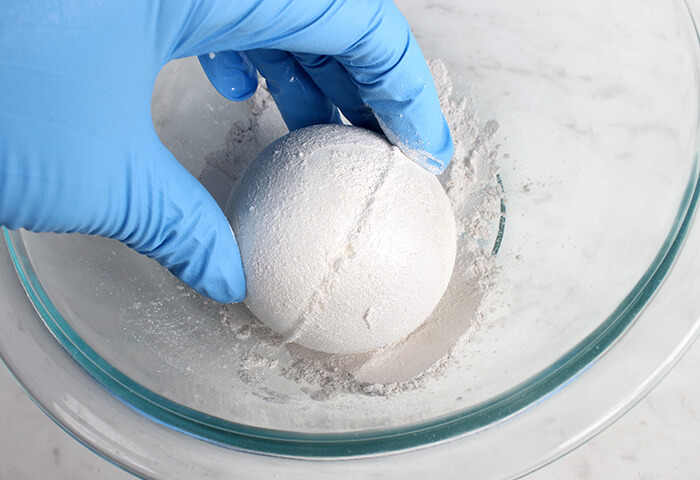
SIX: Allow the bath bombs to harden in the mold for 24 hours. Then, carefully remove them from the package. Fill a bowl with a few tablespoons of Super Pearly White Mica. The following steps can get a little messy, so you may want to lay down newspaper or another cover to aid in cleanup.

SEVEN: Spritz the outside of one bath bomb lightly with 99% isopropyl alcohol. Gently roll the bath bomb in the mica until completely covered. Use your fingers to carefully brush off any excess mica.

SIX

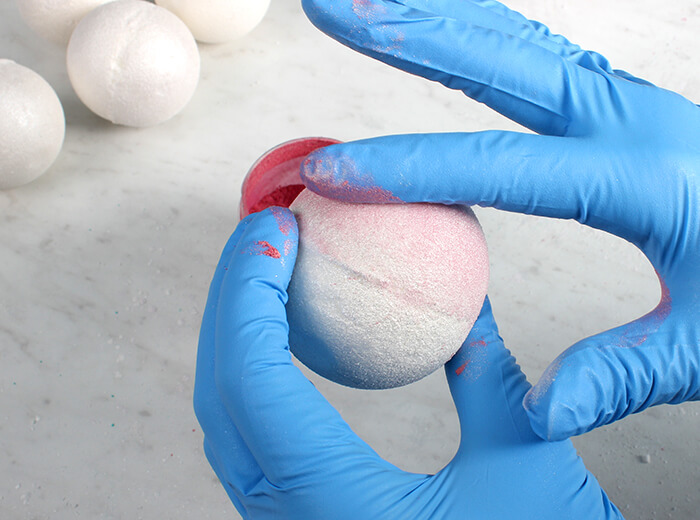
EIGHT: Once the bath bomb is coated in Super Pearly White, it’s time to play with color! Dip your finger into the Rose Gold Mica brush it onto the surface of the bath bomb. You can always add more color, so start with a light application. Spread the Rose Gold Mica around the bath bomb. There is no right or wrong way to place it, so just have fun. Once you’ve covered about 1/4 to 1/2 of the bath bomb, move on to the next color.

SEVEN

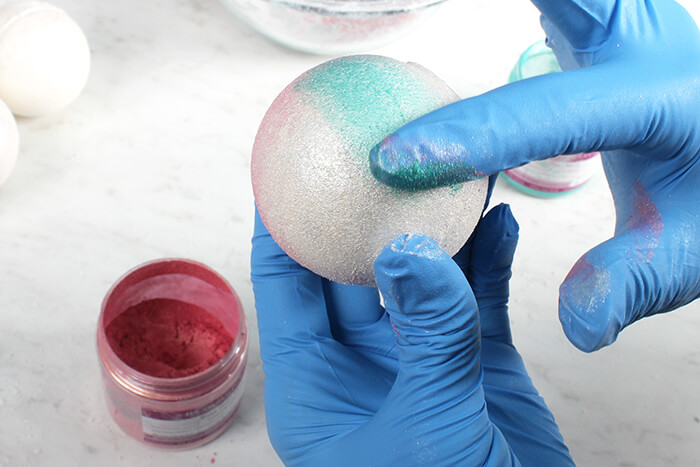
NINE: Dip your finger into the Aqua Pearl Mica and spread it onto the bath bomb in a different area. Once the colors begin to touch, blend them together with your finger. Continue blending the micas on the bath bomb in different areas until you’re happy with the effect. If necessary, sprinkle more Super Pearly White on the bath bombs to help blend the colors, add more sparkle, or lighten the colors.

EIGHTNINE

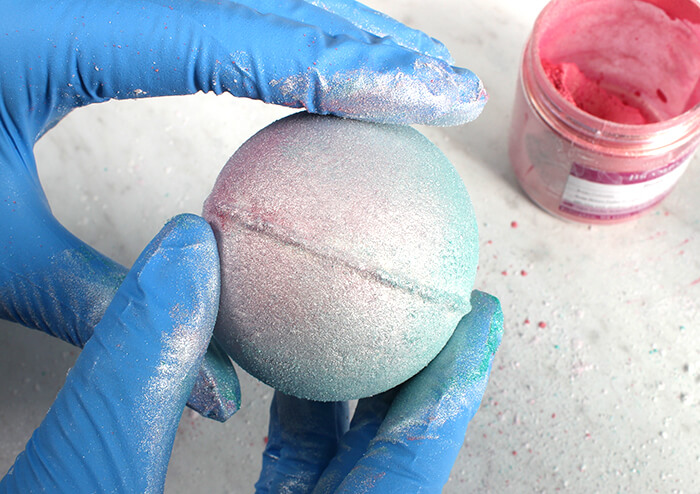
EIGHT: Repeat this process for each bath bomb until all are covered with color. Carefully place the bath bombs back into the mold and package until ready to use. Before placing them back into the package, you may want to wash the mold for a clean look. Just make sure they are completely dry before placing the fizzy back into the mold. To use, place the bath bomb into a hot bath and enjoy!

TENDIY Iridescent Pearl Bath Bomb

Pearl Bath Bomb DIY

Soap Queen
These super sparkly bath bombs look just like pearls!
Recipe type Bath Bombs
Makes 8 -10 bath bombs

Ingredients
  

  • 8-10 Bath Bomb Mold & Package
  • 3 cups Baking Soda Sodium Bicarbonate
  • 1.5 cups Citric Acid
  • 3 oz. Shea Butter
  • 0.5 oz. White Rose Fragrance Oil
  • 0.5 oz. Polysorbate 80
  • Super Pearly White Mica
  • Witch Hazel in a Spray Bottle

Instructions
 

  • Add 3 ounces of shea butter to a small heat and fragrance oil-safe container and melt in the microwave using 30 second bursts. Add 0.5 ounces of polysorbate 80 and 0.5 ounces of White Rose Fragrance Oil. Use a spoon to fully mix the ingredients together.
  • In a large bowl, mix together the baking soda and citric acid. To get rid of clumps in the mixture, you can push the powders through a sifter or break them up with your fingers. Citric acid has a tendency to take off nail polish, so wear gloves to protect your manicure. Thoroughly stir the ingredients together.
  • Add the shea butter mixture to the baking soda and citric acid. Use your hands to thoroughly mix all the ingredients together.
  • Test the consistency of the bath bomb mixture. The perfect consistency for molding is a texture similar to damp sand that holds its shape when squeezed. If it’s too dry, use one hand to spritz the mixture with witch hazel and one to mix. Continue spritzing until the mixture holds its shape when squeezed. Below, you can see that the mixture forms a ball when squeezed. This means that the mixture will hold its shape in the mold as well.
  • Fill the two halves of the molds, gently pressing the bath bomb mixture in each so they hold their shape. Mound a little extra mixture in the center of each half of the molds. Wipe away any mixture that got in the seams of the mold, match the eyelets of each side up, and press together. To avoid any imperfections on your bath bomb, make sure to direct pressure to the edges of the mold rather than the center. Continue filling up the bath bomb molds until the mixture is gone.
  • Allow the bath bombs to harden in the mold for 24 hours. Then, carefully remove them from the package. Fill a bowl with a few tablespoons of Super Pearly White Mica.
  • Spritz the outside of one bath bomb lightly with 99% isopropyl alcohol. Gently roll the bath bomb in the mica until completely covered. Use your fingers to carefully brush off any excess mica.
  • Once the bath bomb is coated in Super Pearly White, it's time to play with color! Dip your finger into the Rose Gold Mica brush it onto the surface of the bath bomb. You can always add more color, so start with a light application. Spread the Rose Gold Mica around the bath bomb. There is no right or wrong way to place it, so just have fun. Once you've covered about 1/4 to 1/2 of the bath bomb, move on to the next color.
  • Dip your finger into the Aqua Pearl Mica and spread it onto the bath bomb in a different area. Once the colors begin to touch, blend them together with your finger. Continue blending the micas on the bath bomb in different areas until you're happy with the effect. If necessary, sprinkle more Super Pearly White on the bath bombs to help blend the colors, add more sparkle, or lighten the colors.
  • Repeat this process for each bath bomb until all are covered with color. Carefully place the bath bombs back into the mold and package until ready to use. Before placing them back into the package, you may want to wash the mold for a clean look. Just make sure they are completely dry before placing the fizzy back into the mold. To use, place the bath bomb into a hot bath and enjoy!
Tried this recipe?Let us know how it was!

You may also like these

Become an email subscriber

Enter your email address below and you will receive all our new posts directly in your email inbox.

  1. 5 stars
    Love this informative blog when it comes to bath product especially bath bomb.
    Thanks and appreciate your sharing.

  2. 4 stars
    I’m finding the Polysorbate 80 has a strong smell and is overpowering my fragrance oil, is there anything I can do to fix this. I was told to use 1:1 ratio for fragrance oil to Polysorbate.
    Thanks

    1. We have not found that to be the case. Though for bath bombs we normally use a lower usage rate of the Polysorbate 80, at just 1% of the total weight of your bath bomb mixture. Maybe try using a little less and see if you like the results better.

  3. How much Super Pearly White Mica, Rose Gold Mica, Aqua Pearl Mica, & Witch Hazel will I need to make the Iridescent Pearl Bath Bomb?

    1. Everything is by weight except the Sodium Bicarbonate and Citric Acid.

  4. 5 stars
    I would love to try this! My only concern is that I live in the Florida keys and its 80-95% humid here all the time… should I lessen the amount of shea butter ? Would I be able to add any embeds to this? And would slsa if added be good for a more foam effect, and what amount for this size batch .. sorry.. so many questions… wanna learn from the best!

    1. You can keep the same amount of shea butter, but you will need to wrap the bath bombs with plastic wrap and store them in a cool, dry area. Heat and humidity can cause them to fizz early. If you have a fan or a dehumidifier, that really helps. Get more tips on storing bath bombs here: https://soapqueen.com/bath-and-body-tutorials/tips-and-tricks/how-to-store-handmade-bath-products/

      What embeds would you like to add (soap, other bath bombs)?

      You can add SLSA. For lighter bubbles, add half as much as the citric acid. For larger bubbles, add the same amount as the citric acid.

      SLSA: https://www.brambleberry.com/Sodium-Lauryl-Sulfoacetate-SLSA-P5244.aspx

  5. 5 stars
    Does the water look pearlescent after dropping bomb into tub? Do you have a video showing how these bombs (and the Midas Touch) ones look in the bath?

      1. Will the mica adhere to the skin? Like an illuminating effect? Or just stay in the tub? I’m trying to create that particular effect.

        1. Just don’t use the polysorbate and use coconut oil instead of shea butter and you’ll be dripping in gold after your bath!

          1. If you don’t use the polysorbate 80 it makes it so the oils float on the top of the water and make residue left behind on your tub. That is it’s purpose.

  6. The green and rose micas have stained my countertop and I can’t get it off. Any suggestions? These are really durable counters so I’m surprised this happens. Not even sharpies stain this. Please help.

    1. Try spraying the area liberally with 99% isopropyl alcohol and letting it sit for a few minutes. Then, scrub it with a paper towel. You may need to do this several times, and depending on the surface there may still be color.

      99% isopropyl alcohol: https://www.brambleberry.com/99-Isopropyl-Alcohol-16-oz-P5682.aspx

      For your next project, we recommend laying down newspaper or cardboard on your surface to protect against color transfer. If you do spill mica, try to brush it away lightly without adding water, then try the alcohol trick.

    1. There are a few tricks to get your bath bombs to stick together. First is the texture. You want your bath bombs to feel like wet sand and hold their shape when squeezed. That will help them stick together.

      Once they’re the right texture, you can fill the molds. You want to pack the powder in firmly but not so much that it sticks in the molds. Then, mound some of the bath bomb mixture in the center of each side of the mold. That will act like glue when they’re pressed together. You can see the texture and molding technique here: https://www.youtube.com/watch?v=8bjpsQXt6NU&t=169s

  7. Hi i made these bath bombs but found I didn’t need any witch Hazel as my mixture was fine with just the oil. I take it it’s not necessary to use it if it’s for the bath bomb to be fine

  8. could you put the pearl mica in with the bath bomb mix and have it be like a luster bath bomb?

  9. 4 stars
    What would happen if you left out the Polysorbate 80? Would you end up with a mica ring around the tub?

    1. The polysorbate 80 is an emulsifier that helps the oil and color mix into the bath water. Without it, both will pool on top and can leave transfer on the tub. Polysorbate 80 is an optional ingredient, but we recommend it for best results.

  10. 2 stars
    I made this recipe the other day even though I felt that 3 oz of Shea butter was a little much for this recipe and I was right. They fizzed very little & when I finally did get one to dissolve, it was nothing but greasy feeling. I live in a humid climate & I know that is often the culprit, but I have been making bombs/fizzies for 3 years and have never had this happen. All yes, all ingredients were fresh and from reputable suppliers. Other thoughts please?

    1. With the higher butter content these bath bombs will have a moisturizing feeling in the tub. However, in our tests we didn’t find that it affected the fizz. Did you notice the bath bombs expanding, or did they feel wet and soft? That can happen when they react to moisture in the air.

  11. I cannot wait to try this out. If I “add to cart” all of the supplies listed above, will I be able to make more than one batch of these? I’d like to create a bunch! Do you know if I should double the amount of any of these ingredients to do this more than once?

    1. You will have fragrance, butter, and color leftover. However, if you want to make a larger batch, I would recommend picking up another 1 ounce of polysorbate 80, 2 pounds of baking soda and 1 pound of citric acid. This recipe uses most of those, so extra will allow you to make more. You’ll also want to pick up more molds.

      -Kelsey with Bramble Berry

    1. We haven’t found a substitute for polysorbate 80 that helps disperse the color and butter in the bath water. You can leave it out, just know that the butter will pool on top. Make sure to be careful when exiting the tub, as it will be slippery. You can also reduce the amount of shea butter. The mixture will be more dry, so you may need more witch hazel to wet it.

      Get more tips in this post: https://soapqueen.com/bath-and-body-tutorials/bath-bomb-questions-answers/

      -Kelsey with Bramble Berry

  12. Really pretty! Do you have any pictures of what these bath bombs turn the water into? Does it also become pearlescent?

    1. When you first drop the bath bomb in, it will give off some pink/blue iridescence. It looks really lovely. After the colored layer is done, it will fizz like a normal uncolored bath bomb. So, overall the water doesn’t have a lot of color, but will have a touch of shimmer.

      -Kelsey with Bramble Berry

  13. they are beautiful! what is the difference in using micha versus oxide- I have some oxides from brambelberry and wondered if I could use that to add color to my bath Bombs?

  14. 5 stars
    Okay, I am about to cry with joy. I have been trying what feels like a million bath bomb recipes over the past few months. I am in a VERY humid area and after in-molding I watch them slightly sink or slightly activate. This recipe comes out perfectly! The only thing I did was substitute coconut oil (it was on hand). Thank you. Thank you. Thank you for providing this recipe!

    1. That’s awesome, glad these bath bombs turned out well Cyd! I had quite a few broken bath bombs when I first started. It feels awesome to get that consistency down just right. 🙂

      -Kelsey with Bramble Berry

  15. I live in a very humid climate. about 50% of the time my bombs begin reacting with the humidity in the air after a few hours and get all bumpy looking. How do you recommend preventing this? All ingredients are sifted through a sieve to remove any clumps, I add no water based products.

  16. This is SO ME!!! I’m totally excited, especially since I already have all the ingredients to make it!

  17. They are soooo pretty!!! They look like galaxy pearlsfalling from orbit!! I will be trying my first bath bombs with color and polysorbate80 this week!!!so excited. They look cosmic

    1. Oh thank you Meka, glad you like them. Let us know how your first batch of bath bombs turn out. 🙂

      -Kelsey with Bramble Berry

    1. They’re really fun to make, hope you get a chance to try them. 🙂

      -Kelsey with Bramble Berry

Comments are closed.

{"email":"Email address invalid","url":"Website address invalid","required":"Required field missing"}

The Latest from Soap Queen TV

Inspired by Gems & Crystals

All About Essential Oils

The Power of Charcoal

Create Your Own Clay Face Mask

DIY Bath Bombs

Cold Process Soap Tips & Tricks

Learn the Basics of Cold Process Soapmaking

Learn the Basics of Melt & Pour Soapmaking

Want to Start Your Own Soap Business?

Soap Business Success Stories

Soap Queen TV Favorites

Ingredient Spotlight

Disclosure

Unless stated otherwise, all images are original material and are copyrighted. If you'd like to use an image, please be a friend and credit the photo and link back to Soap Queen. Feel free to share, tweet and pin to your hearts content.