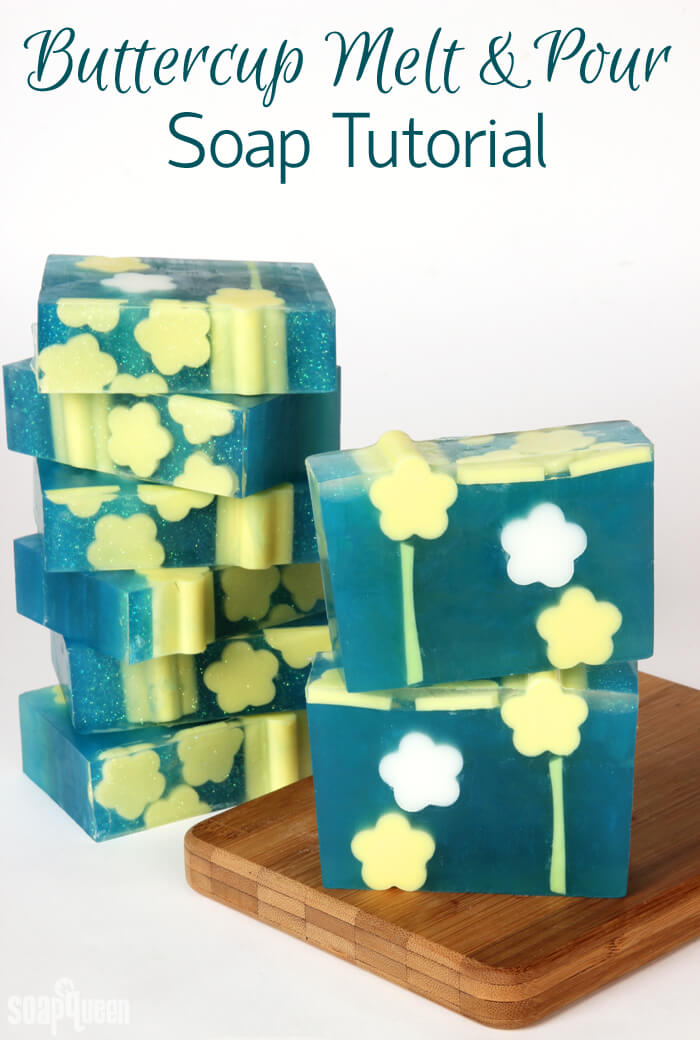
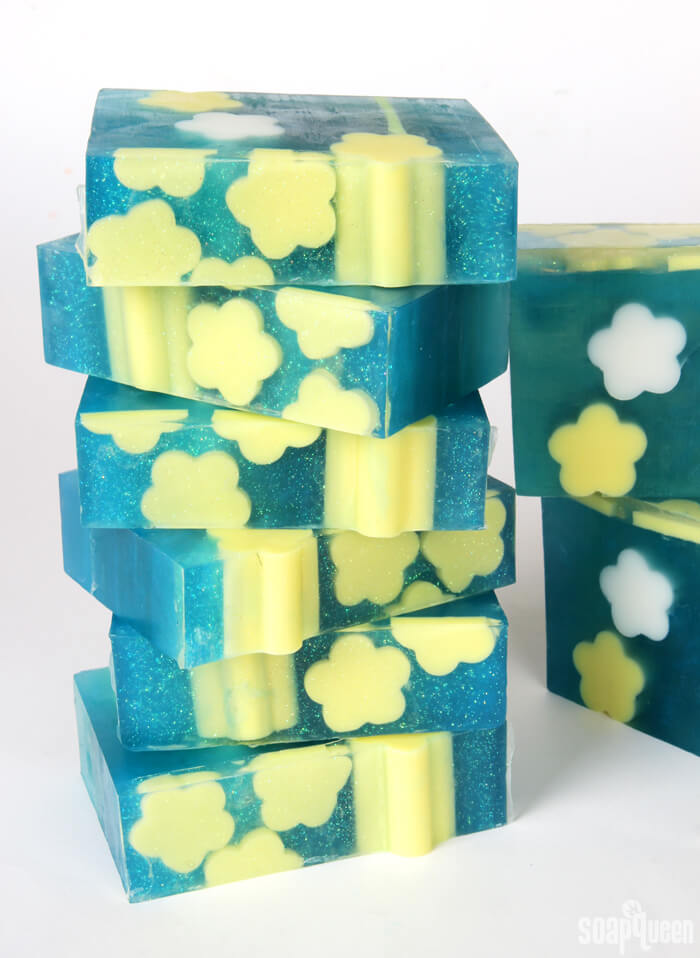
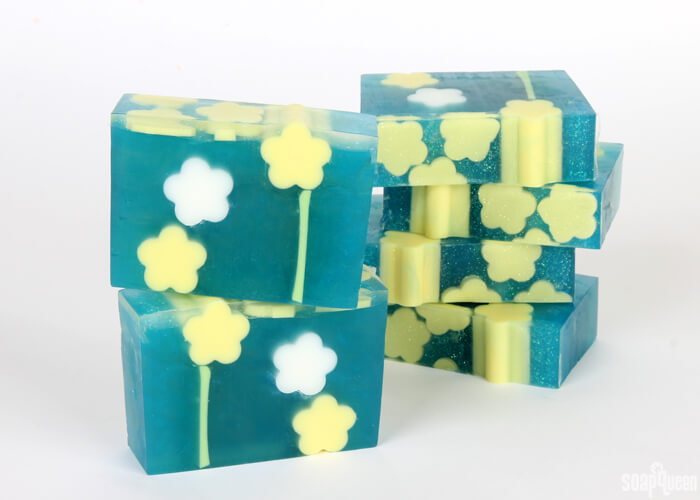
Yesterday was the first official day of summer. Thanks to the sun, my garden and flowers have been growing like crazy. The fresh blooms inspired me to create this Buttercup Melt & Pour Soap. The Mini Daisy Silicone Column Molds create flowers within the bars, and a thin strip of green soap creates a stem. The top is decorated with more yellow flowers and a touch of glitter.
This project is scented with a combination of Sunflower Fragrance Oil and Flower Child Fragrance Oil. The scent combination is a sophisticated floral blend, with notes of jasmine, bergamot and musk. Both fragrances discolor slightly to an ivory/tan. Over time, I found the blue color changed to a slightly more teal hue.
This is an advanced melt and pour project. It involves several layers that require an understanding of melt and pour temperatures. A spray bottle of 99% isopropyl alcohol is crucial for this project. Click here to get more tips for layering melt and pour soap. If you haven’t made melt and pour soap before, I would recommend getting a few simpler projects under your belt first.
What You’ll Need:
10″ Silicone Loaf Mold
3 Mini Daisy Silicone Column Molds
48 oz. Clear Melt and Pour Base
25 oz. White Melt and Pour Base
.4 oz. Sunflower Fragrance Oil
.7 oz. Flower Child Fragrance Oil
Buttercup Mica
Caribbean Blue Mica
Kermit Green Mica
Fine Iridescent Glitter
99% Isopropyl Alcohol in Spray Bottle

Click here to add everything you need for this project to your Bramble Berry shopping cart!
[sq_products]
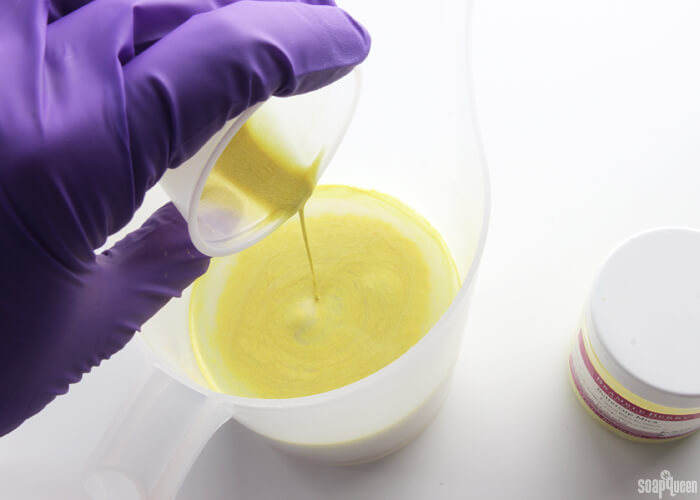
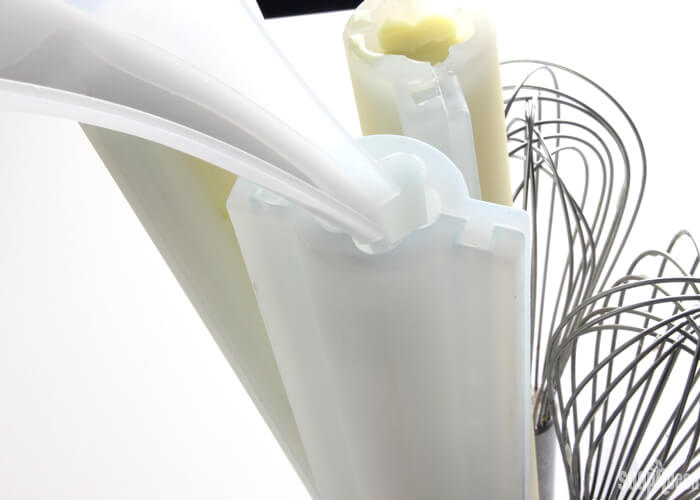
ONE: Chop and melt 15 ounces of White Melt and Pour Soap Base in the microwave using 15-20 second bursts until completely melted. In a small container, mix 1 tsp. Buttercup Mica with 1 Tbs. 99% isopropyl alcohol, stir to fully incorporate. Split off 10 ounces of the melted base into a separate container. Add all of the mica mixture to the 10 ounces of melted soap and stir to combine.
TWO: Place the Mini Daisy Silicone Column Molds into a container to position the molds upright. Pour the yellow soap in two of the three Mini Daisy Silicone Column Molds. Then, pour the remaining 5 ounces of white soap into the third Mini Daisy Silicone Column Mold. Spritz the top of the molds with alcohol to help disperse any bubbles. Allow the soap to fully cool and harden. Watch this video for more information on using the 2-part silicone molds.
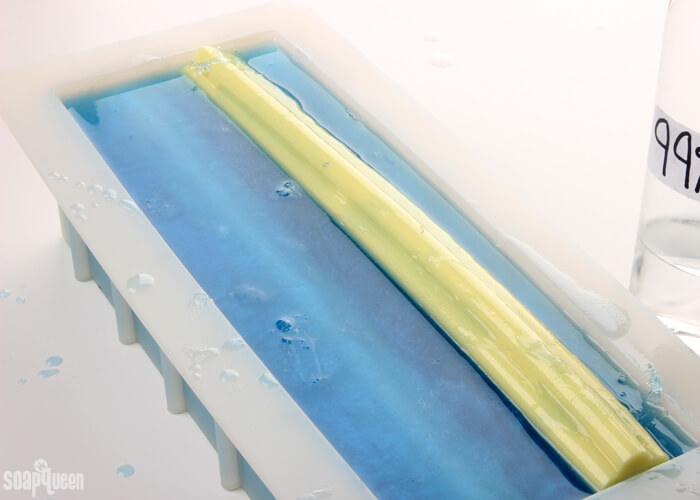
THREE: To make the stem, chop and melt 10 ounces of White Melt and Pour Soap Base in the microwave using 15 second bursts. In a small container, mix 1 tsp. Kermit Green Mica with 1 Tbs. 99% isopropyl alcohol and add the mica mixture to the melted soap. Stir to combine. Pour the green soap into the bottom of the 10″ Silicone Loaf Mold, and spritz the top with alcohol to help get rid of any bubbles. Allow the soap to fully cool and harden.
FOUR: Once fully cool, remove the green soap from the mold. Cut the thin layer in half vertically so you have two long strips. I found that my layer was a little bit thicker than I wanted, so I used a peeler to make the layer a little thinner. This step is optional, and will depend on how thick you’d like the stem of the flower to be.
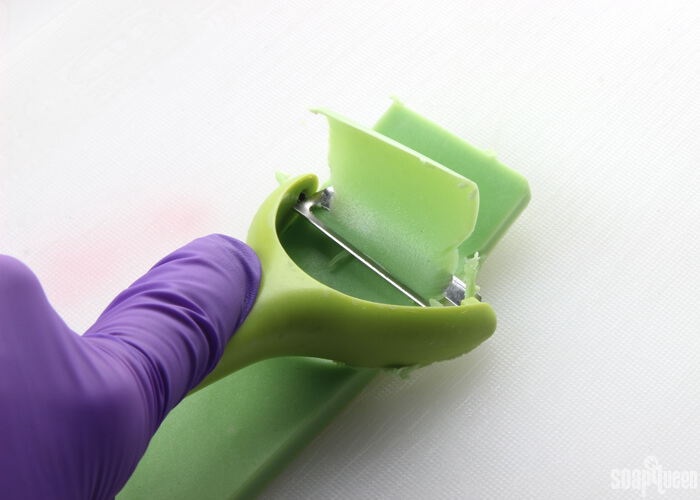
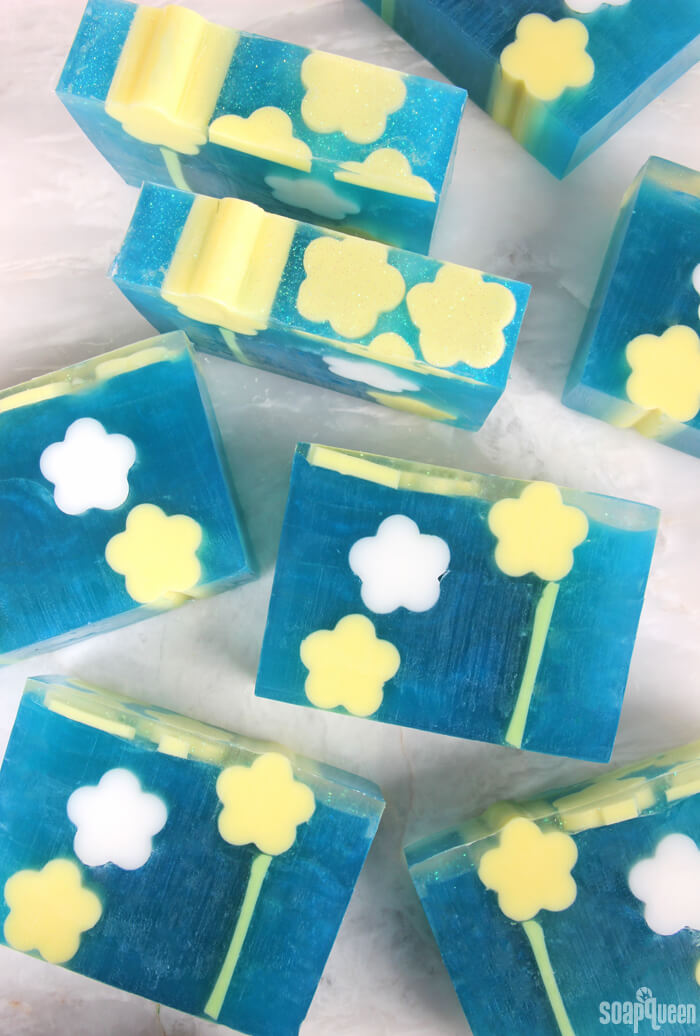
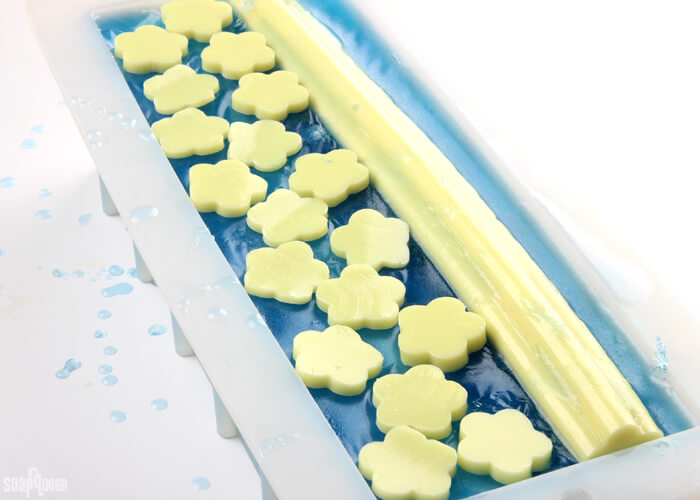
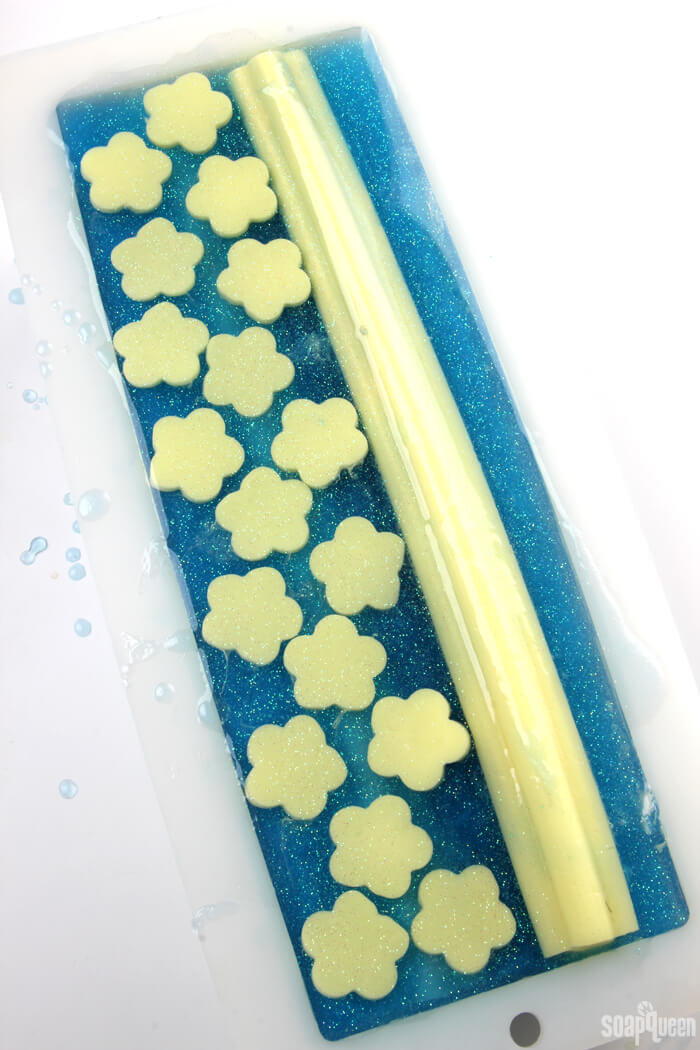
FIVE: Remove the flower embeds from the mold and trim them if necessary. I love using the Clean Up Tool for this step! Cut all three embeds to be the same length as the 10″ Silicone Column Mold. With the leftover embeds, cut them into small, thin flowers. These will go on the top of the soap at the very end.
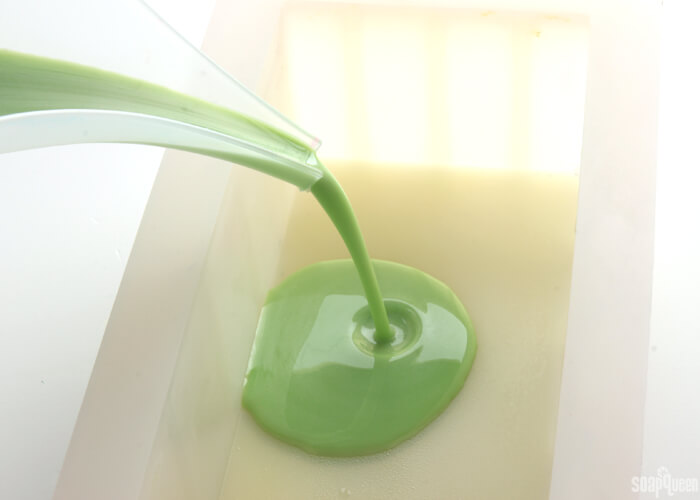
SIX: Chop and melt 40 ounces of the Clear Melt and Pour Soap in the microwave using 30-45 second bursts. Mix together 1/2 tsp. of the Carribean Blue Mica with 1/2 Tbs. of 99% isopropyl alcohol until smooth. Add the mica mixture to the melted clear soap. Stir to combine.
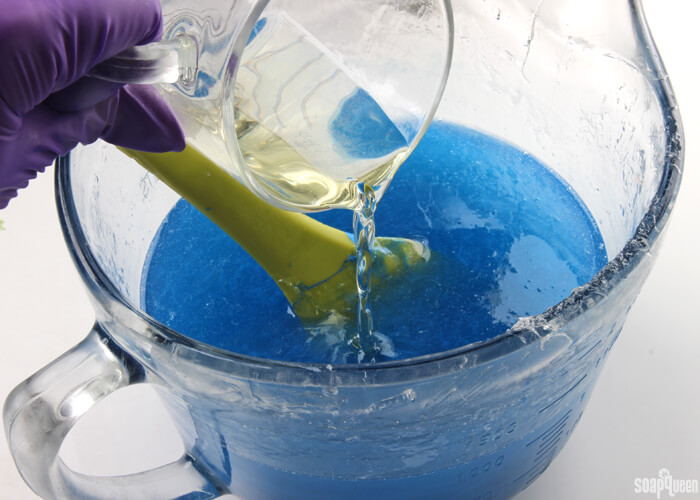
SEVEN: Mix together the Sunflower and Flower Child Fragrance Oils in a glass, fragrance safe container. Add the fragrance blend to the melted blue soap and stir to fully combine.
EIGHT: Place one of the yellow embeds into the far left corner of the mold, leaving a small amount of space between the side of the mold and the embed. Check the temperature of the blue soap. If it’s hotter than 130° F, allow it to cool to 125° F or below to prevent it from melting the yellow embed. Spritz the mold and embed with alcohol to help the embed adhere, then pour a thin layer of the blue soap into the mold until it almost covers the yellow embed. Spritz with alcohol to get rid of any bubbles.
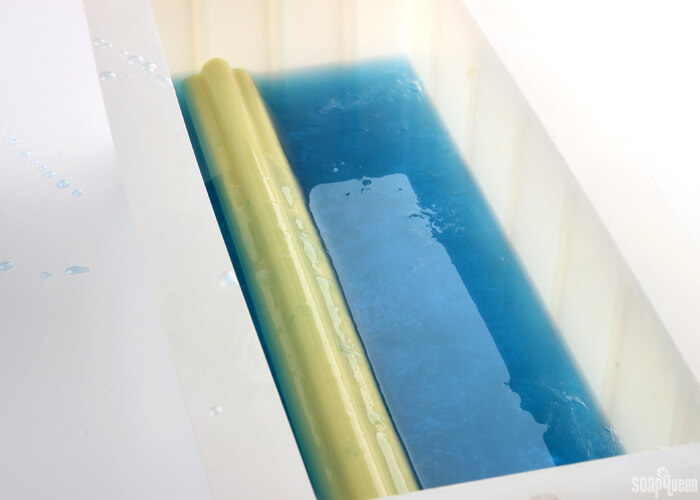
NINE: Allow the blue soap to cool slightly until it forms a skin. Then, insert one piece of green soap upright in the opposite side of the mold. You may need to hold the green soap in place for a few minutes to allow the blue soap to harden enough to stabilize the green embed.
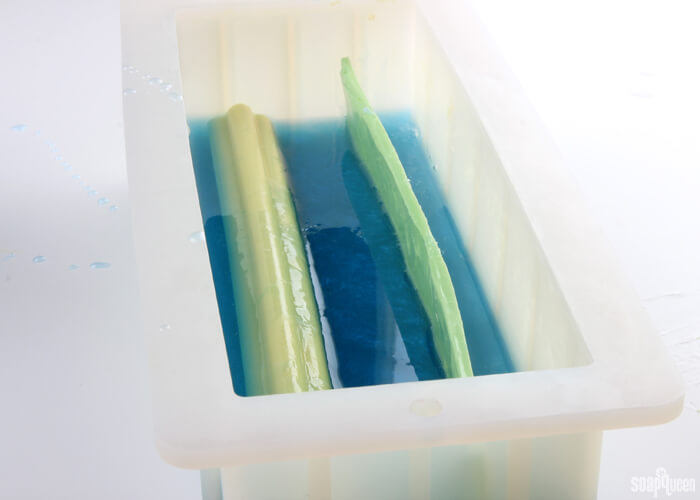
TEN: Once the green layer is stable, spritz the soap with the 99% isopropyl alcohol to help the layers stick and pour more blue soap into the mold. Continue to pour until you have covered the first yellow flower embed, and pour a little extra create a layer in between the second flower embed. Allow this soap to cool and form a skin. Once cooled slightly, spritz with alcohol and pour a small amount of blue on top, then lay the white flower embed near the center of the mold.
Allowing the blue soap to harden slightly will keep the soap from falling down into the mold. Pouring a little bit of melted soap before placing the white embed helps the white soap stay in place.
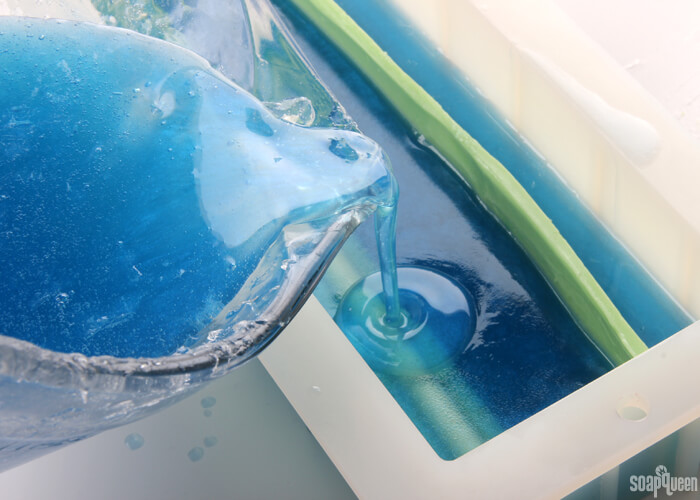
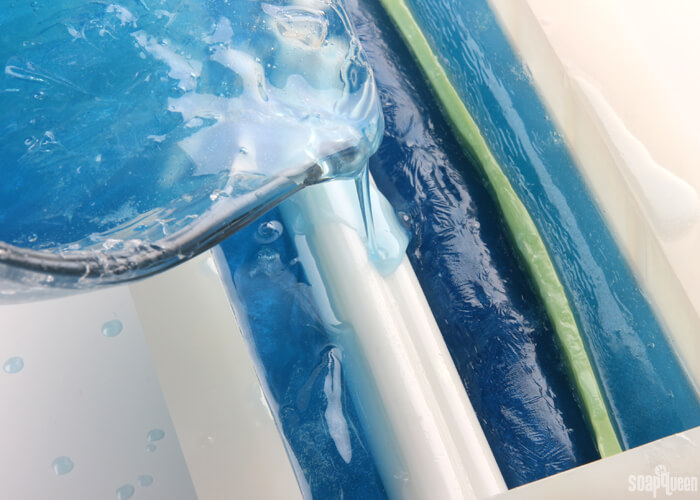
ELEVEN: Remelt the remaining blue soap in the microwave using short bursts. When it’s 130° F or below, thoroughly spritz the top with alcohol and pour the remaining blue soap over the entire mold, making sure to fill in the various areas evenly. Place the yellow flower embed directly on top of the green stem embed. Spritz the top with alcohol to disperse bubbles.
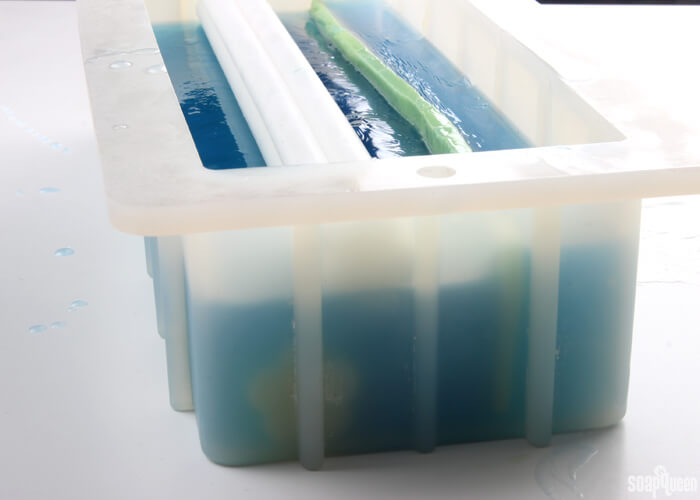
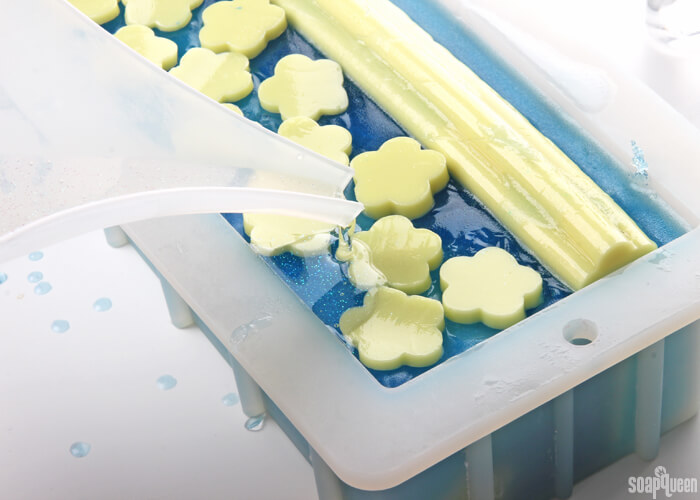
TWELVE: Once the top has cooled and formed a skin, spritz with alcohol and place the small yellow flower pieces on top. Chop and melt 8 ounces of Clear Melt and Pour Base in the microwave using 15 second bursts. Once melted, add a pinch of iridescent glitter until you’re happy with the amount of sparkle.
THIRTEEN: Spritz the soap again with alcohol, and when the clear and sparkly soap is 130° F or below, pour it on top of the entire mold. Spritz with alcohol to remove bubbles, and allow the entire loaf to fully cool and harden. This can take about 4-6 hours.
Once cooled, cut into bars. Wrap the bars in plastic wrap to help prevent glycerin dew. Learn more about storing handmade products here.
[expand title=”Click to View the Recipe”]

Buttercup Melt & Pour Soap DIY
Ingredients
- 10 ″ Silicone Loaf Mold
- 3 Mini Daisy Silicone Column Molds
- 48 oz. Clear Melt and Pour Base
- 25 oz. White Melt and Pour Base
- .4 oz. Sunflower Fragrance Oil
- .7 oz. Flower Child Fragrance Oil
- Buttercup Mica
- Caribbean Blue Mica
- Kermit Green Mica
- Fine Iridescent Glitter
- 99 % Isopropyl Alcohol in Spray Bottle
Instructions
- Chop and melt 15 ounces of White Melt and Pour Soap Base in the microwave using 15-20 second bursts until completely melted. In a small container, mix 1 tsp. Buttercup Mica with 1 Tbs. 99% isopropyl alcohol, stir to fully incorporate. Split off 10 ounces of the melted base into a separate container. Add all of the mica mixture to the 10 ounces of melted soap and stir to combine.
- Place the Mini Daisy Silicone Column Molds into a container to position the molds upright. Pour the yellow soap in two of the three Mini Daisy Silicone Column Molds. Then, pour the remaining 5 ounces of white soap into the third Mini Daisy Silicone Column Mold. Spritz the top of the molds with alcohol to help disperse any bubbles. Allow the soap to fully cool and harden.
- To make the stem, chop and melt 10 ounces of White Melt and Pour Soap Base in the microwave using 15 second bursts. In a small container, mix 1 tsp. Kermit Green Mica with 1 Tbs. 99% isopropyl alcohol and add the mica mixture to the melted soap. Stir to combine. Pour the green soap into the bottom of the 10″ Silicone Loaf Mold, and spritz the top with alcohol to help get rid of any bubbles. Allow the soap to fully cool and harden.
- Once fully cool, remove the green soap from the mold. Cut the thin layer in half vertically so you have two long strips. I found that my layer was a little bit thicker than I wanted, so I used a peeler to make the layer a little thinner. This step is optional, and will depend on how thick you'd like the stem of the flower to be.
- Remove the flower embeds from the mold and trim them if necessary. I love using the Clean Up Tool for this step! Cut all three embeds to be the same length as the 10" Silicone Column Mold. With the leftover embeds, cut them into small, thin flowers. These will go on the top of the soap at the very end.
- Chop and melt 40 ounces of the Clear Melt and Pour Soap in the microwave using 30-45 second bursts. Mix together 1/2 tsp. of the Carribean Blue Mica with 1/2 Tbs. of 99% isopropyl alcohol until smooth. Add the mica mixture to the melted clear soap. Stir to combine.
- Mix together the Sunflower and Flower Child Fragrance Oils in a glass, fragrance safe container. Add the fragrance blend to the melted blue soap and stir to fully combine.
- Place one of the yellow embeds into the far left corner of the mold, leaving a small amount of space between the side of the mold and the embed. Check the temperature of the blue soap. If it's hotter than 130° F, allow it to cool to 125° F or below to prevent it from melting the yellow embed. Spritz the mold and embed with alcohol to help the embed adhere, then pour a thin layer of the blue soap into the mold until it almost covers the yellow embed. Spritz with alcohol to get rid of any bubbles.
- Allow the blue soap to cool slightly and form a skin. Then insert one piece of green soap upright in the opposite side of the mold. You may need to hold the green soap in place for a few minutes to allow the blue soap to harden enough to stabilize the green embed.
- Once the green layer is stable, spritz the soap with the 99% isopropyl alcohol to help the layers stick and pour more blue soap into the mold. Continue to pour until you have covered the first yellow flower embed, and pour a little extra create a layer in between the second flower embed. Allow this soap to cool and form a skin. Once cooled slightly, spritz with alcohol and pour a small amount of blue on top, then lay the white flower embed near the center of the mold. Allowing the blue soap to harden slightly will keep the soap from falling down into the mold. Pouring a little bit of melted soap before placing the white embed will help the white soap “stick."
- Remelt the remaining blue soap in the microwave using short bursts. When it's 130° F or below, thoroughly spritz the top with alcohol and pour the remaining blue soap over the entire mold, making sure to fill in the various areas evenly. Place the yellow flower embed directly on top of the green stem embed. Spritz the top with alcohol to disperse bubbles.
- Once the top has cooled and formed a skin, spritz with alcohol and place the small yellow flower pieces on top. Chop and melt 8 ounces of Clear Melt and Pour Base in the microwave using 15 second bursts. Once melted, add a pinch of iridescent glitter until you’re happy with the amount of sparkle.
- Spritz the soap again with alcohol, and when the clear and sparkly soap is 130° F or below, pour it on top of the entire mold. Spritz with alcohol to remove bubbles, and allow the entire loaf to fully cool and harden. This can take about 4-6 hours. Once cooled, cut into bars. Wrap the bars in plastic wrap to help prevent glycerin dew.
[/expand]