
Delicious and full of health benefits, green tea is one of the most consumed beverages in the world. Green tea is comprised of leaves of the camellia sinensis plant. Green tea is known for its natural catechin content, with antioxidants that fight cell damage when ingested. Studies also suggest that green tea may lower cholesterol and prevent various forms of cancer. Because of its possible health benefits, green tea has become a popular ingredient for bath and beauty products.
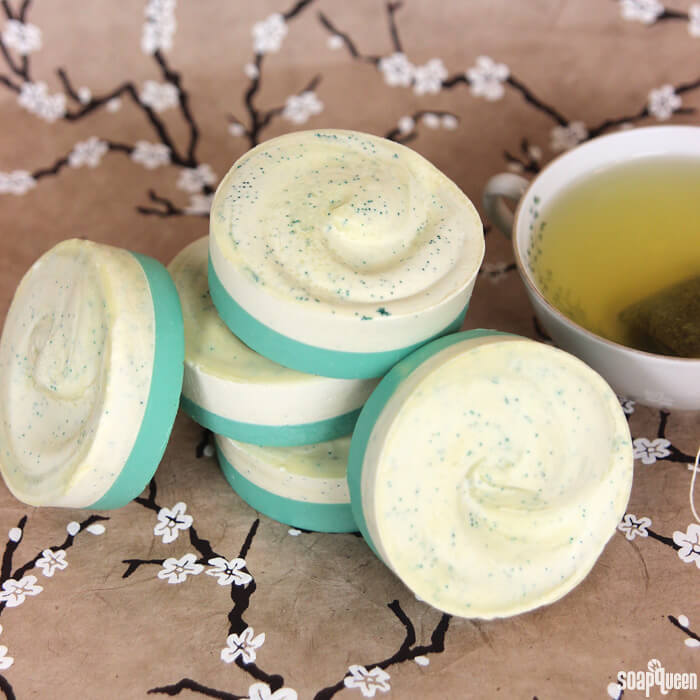
These Exfoliating Green Tea Cold Process Bars are made with green tea rather than water. In addition, green tea extract is also added to harness its skin-loving properties. Scented with Green Tea Fragrance Oil, this soap smells fresh, clean and perfect for both men and women. Half of these bars include jojoba beads, which offer gentle exfoliation.
Most cold process recipes on Soap Queen are formulated at 5% superfat. Superfat refers to the percentage of oil that is not turned into soap by the lye. Click here to see a visual representation of the saponification process, along with the concept of superfat. In my experience, I find that a 5% superfat is extremely skin-loving, while still firm and easy to unmold. Because of the extra oil in the green tea extract and colorants, I decreased the superfat to 3% in this recipe to aid in unmolding. Keep in mind that a 0% superfat is a perfectly balanced bar of soap! Less than 5% superfat is not a dangerous or bad thing. =)
What You’ll Need:
12 Bar Round Silicone Mold
1.8 oz. Avocado Butter
2.5 oz. Canola Oil
1 oz. Castor Oil
8.8 oz. Coconut Oil
5.3 oz. Green Tea Seed Oil
7 oz. Olive Oil
8.8 oz. Palm Oil
5 oz. Sodium Hydroxide Lye
11.6 oz. Distilled Water
Hydrated Chrome Green Oxide
Titanium Dioxide
Forest Green Jojoba Beads
2.5 oz. Green Tea Fragrance Oil
1 Tbs. Green Tea Extract
Optional: Green tea for the lye water

Click here to add everything you need for this project to your Bramble Berry shopping cart!
If you’ve never made Cold Process soap before, stop here! I highly recommend checking out our FREE four part SoapQueen.tv series on Cold Process Soapmaking, especially the episode on lye safety. And if you’d rather do some reading, Bramble Berry carries a wide range of books on the topic, including my newest book, Soap Crafting. You can also checkout the digital downloads for that instant gratification factor.
SAFETY FIRST: Suit up for safe handling practices! That means goggles, gloves and long sleeves. Make sure kids, pets, and other distractions and tripping hazards are out of the house or don’t have access to your soaping space. Always soap in a well-ventilated area.
COLOR PREP: To ensure that the Titanium Dioxide blends smoothly into the soap batter, we recommend micronizing it before dispersing it in oil. Please note this is an optional tip but it does help with the titanium dioxide clumping in the soap =) To micronize colorant, simply use a coffee grinder to blend the colorant to break up any clumps of color and prevent streaks of white from showing in the final soap. We like to use a coffee grinder that has a removable, stainless steel mixing area for easy cleaning. Then, disperse 1 teaspoon of the colorant into 1 tablespoon of sunflower or sweet almond oil (or any other liquid oil). Disperse 1 teaspoon Hydrated Chrome Green Oxide into 1 tablespoon lightweight liquid oil. Use a mini mixer to work out any clumps.
GREEN TEA PREP: When adding lye to an alternative liquid such as green tea, the natural sugars in the liquid will burn, causing the liquid to become a dark color. To help keep temperatures down, it’s best to chill the tea before adding the lye. First, boil distilled water to prepare the tea. Measure 11.6 of the hot water into a heat safe container, and add your green tea. Any band of green tea is fine, just make sure there are no added sugars. Allow the tea to steep and cool for about 1 hour. Remove the tea bags and place in the freezer until the liquid reaches about 40 ° F. The cooler the mixture, the lighter the color of the lye mixture will be. If you’d like, you can also freeze the green tea and add the lye to the frozen tea, similar to adding lye to milk, as shown here.
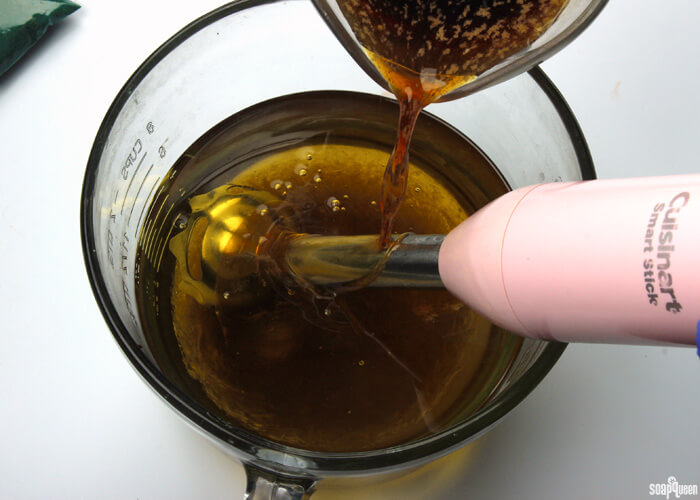
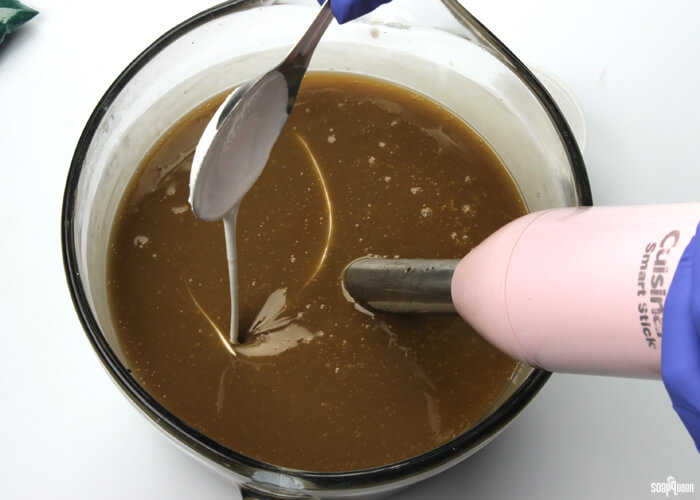
ONE: Slowly and carefully add the lye to the green tea water and gently stir until the lye has fully dissolved. The mixture will be a brown color. (Do not panic. It does harden up way lighter and that’s what the titanium dioxide is for.) Set aside to cool.

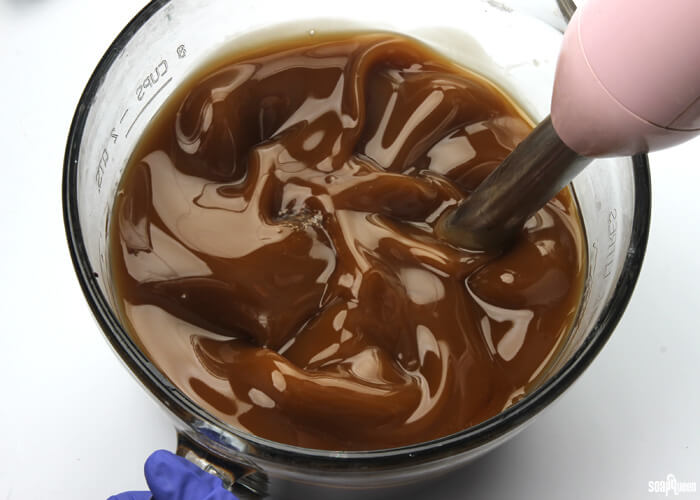
TWO: Fully melt the coconut, olive, avocado butter, canola, castor, green tea seed and palm oils (remember to fully melt then mix your entire container of palm oil before portioning). Once the lye water and the oils have cooled to 130 degrees or below (and are ideally within 10 degrees of each other), add the lye water to the oils and stick blend until thin trace. If you’d like a harder bar of soap that releases faster from the mold, you can add sodium lactate to the cooled lye water. Use 1 teaspoon of sodium lactate per pound of oils in the recipe. For this recipe, you’d add about 2 tsp. sodium lactate.
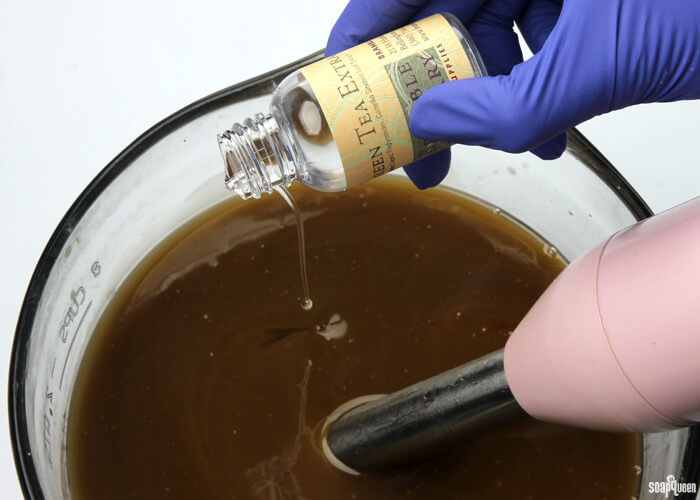
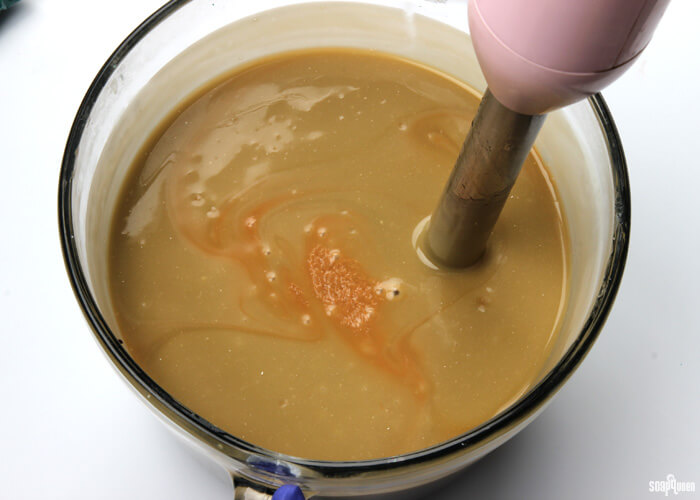
THREE: Once the batter has reached a light trace, add 1 tablespoon Green Tea Extract and stick blend to fully incorporate.
FOUR: Add 1 tablespoon dispersed Titanium Dioxide to the entire mixture. Use the stick blender to mix in the colorant, alternating between pulsing and stirring with the blender. As you stick blend, the color will become lighter but will still be a tan color. Don’t worry! The color will continue to lighten as it hardens in the mold.
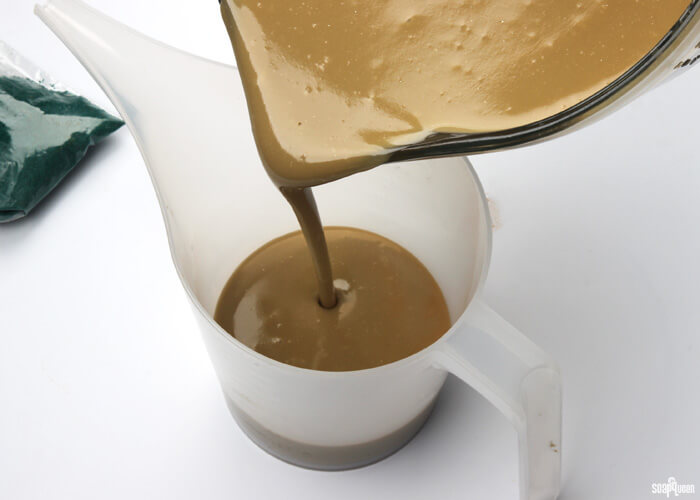
FIVE: Split the batch in half. It’s okay to eyeball it. Each container will hold about 3 cups of soap.
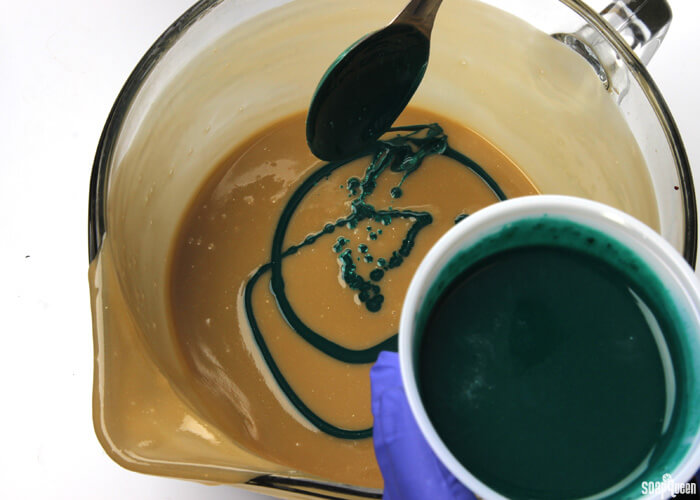
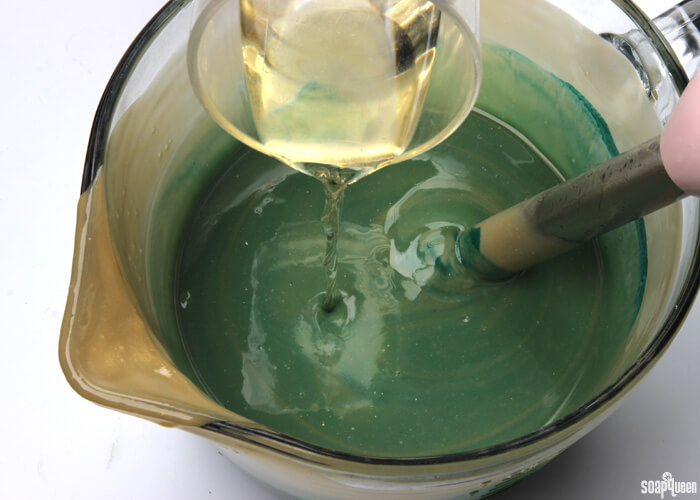
SIX: To one container, add 1 tablespoon dispersed Hydrated Chrome Green Oxide. Use a whisk to fully mix in the colorant.
SEVEN: Add half of the Green Tea Fragrance Oil into the green soap mixture, and use the stick blender to fully incorporate the fragrance oil. Continue to stick blend until the soap batter reaches a medium trace. It should be the texture of thick cake batter.
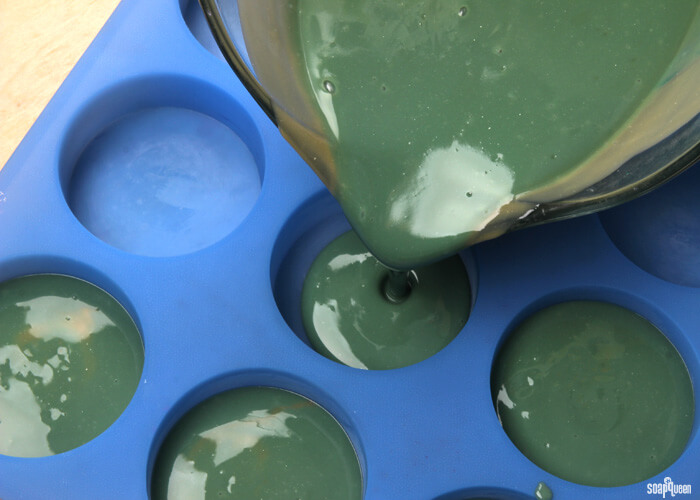
EIGHT: Place the mold onto a large cutting board to help transfer it later. Pour the green soap into the cavities, filling each about halfway. Use the cutting board to tamp the mold onto the counter to help release any air bubbles.
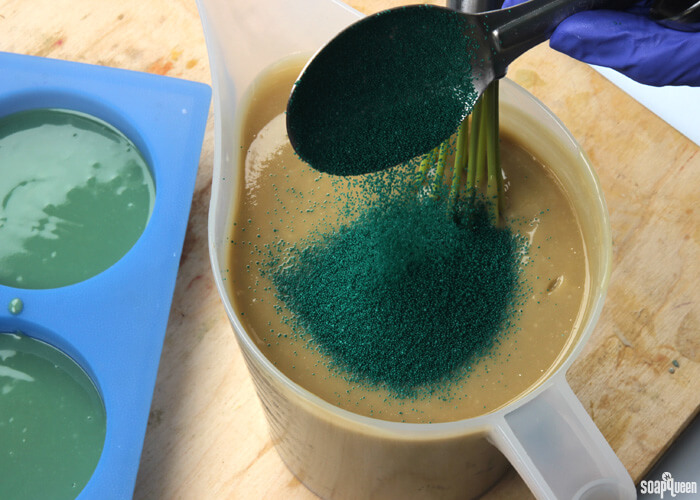
NINE: To the remaining soap, add 1 tablespoon Forest Green Jojoba Beads. Use a whisk to fully mix in the beads.
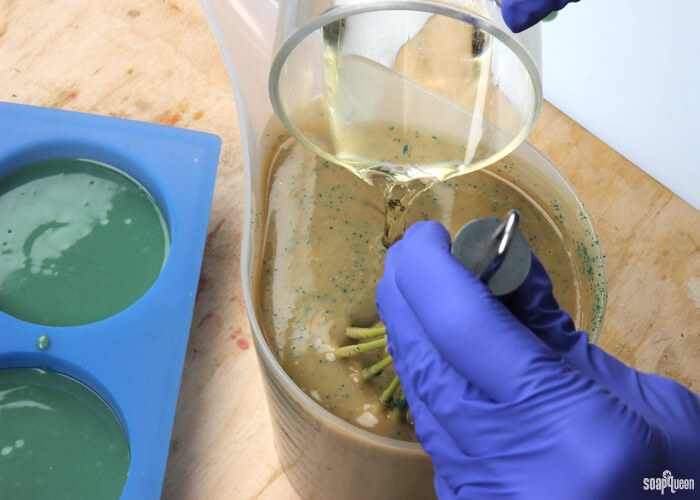
TEN: Mix in the remaining Green Tea Fragrance Oil and use a whisk to fully incorporate the fragrance.
ELEVEN: Slowly and carefully, pour the soap into each cavity, on top of the green layer. Pour gently so you do not break through the green layer below.
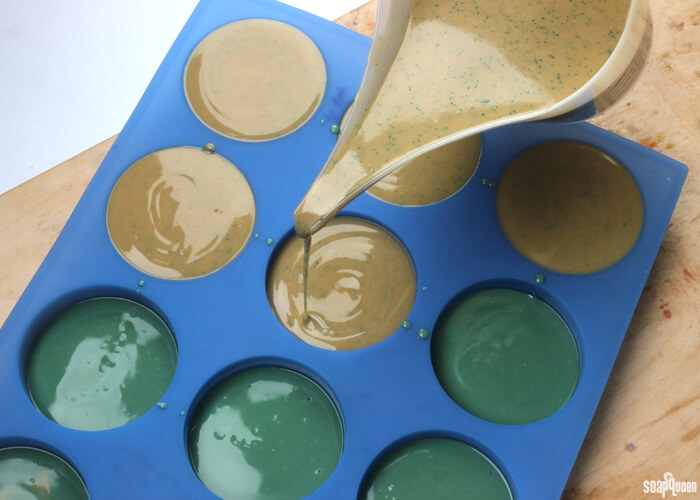
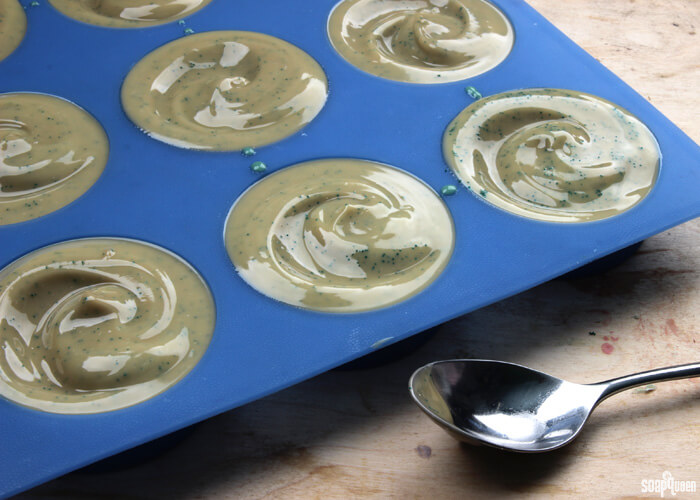
TWELVE: Allow the soap to sit in the mold for several minutes. Once the top layer has thickened, use a spoon to create a gentle swirl. Be careful to not push too far into the soap and disturb the green layer below. Once you’re happy with the swirl, spray the top of the soap with 99% isopropyl alcohol to prevent soda ash. Continue to spray the soap every 15-20 minutes for the first hour. Allow to sit in the mold for 3-4 days and watch the soap lighten up (a lot!). Gently remove the soap and allow to cure for 4-6 weeks.

Do you have a favorite alternative liquid that you use in cold process soap?

Exfoliating Green Tea Cold Process Bars
Ingredients
- 12 Bar Round Silicone Mold
- 1.8 oz. Avocado Butter
- 2.5 oz. Canola Oil
- 1 oz. Castor Oil
- 8.8 oz. Coconut Oil
- 5.3 oz. Green Tea Seed Oil
- 7 oz. Olive Oil
- 8.8 oz. Palm Oil
- 5 oz. Sodium Hydroxide Lye
- 11.6 oz. Distilled Water
- Hydrated Chrome Green Oxide
- Titanium Dioxide
- Forest Green Jojoba Beads
- 2.5 oz. Green Tea Fragrance Oil
- 1 Tbs. Green Tea Extract
- Optional: Green tea for the lye water
Instructions
SAFETY FIRST: Suit up for safe handling practices! That means goggles, gloves and long sleeves. Make sure kids, pets, and other distractions and tripping hazards are out of the house or don’t have access to your soaping space. Always soap in a well-ventilated area.
COLOR PREP: To ensure that the Titanium Dioxide blends smoothly into the soap batter, we recommend micronizing it before dispersing it in oil. Please note this is an optional tip but it does help with the titanium dioxide clumping in the soap =) To micronize colorant, simply use a coffee grinder to blend the colorant to break up any clumps of color and prevent streaks of white from showing in the final soap. We like to use a coffee grinder that has a removable, stainless steel mixing area for easy cleaning. Then, disperse 1 teaspoon of the colorant into 1 tablespoon of sunflower or sweet almond oil (or any other liquid oil). Disperse 1 teaspoon Hydrated Chrome Green Oxide into 1 tablespoon lightweight liquid oil. Use a mini mixer to work out any clumps.
GREEN TEA PREP: When adding lye to an alternative liquid such as green tea, the natural sugars in the liquid will burn causing the liquid to become a dark color. To help keep temperatures down, it’s best to chill the tea before adding the lye. First, boil distilled water to prepare the tea. Measure 11.6 of the hot water into a heat safe container, and add your green tea. Any band of green tea is fine, just make sure there are no added sugars. Allow the tea to steep and cool for about 1 hour. Remove the tea bags and place in the freezer until the liquid reaches about 40 ° F. The cooler the mixture, the lighter the color of the lye mixture will be. If you’d like, you can also freeze the green tea and add the lye to the frozen tea, similar to adding lye to milk, as shown here.
- Slowly and carefully add the lye to the green tea water and gently stir until the lye has fully dissolved. The mixture will be a brown color. Set aside to cool.
- Fully melt the coconut, olive, avocado butter, canola, castor, green tea seed and palm oils (remember to fully melt then mix your entire container of palm oil before portioning). Once the lye water and the oils have cooled to 130 degrees or below (and are ideally within 10 degrees of each other), add the lye water to the oils and stick blend until thin trace. If you’d like a harder bar of soap that releases faster from the mold, you can add sodium lactate to the cooled lye water. Use 1 teaspoon of sodium lactate per pound of oils in the recipe. For this recipe, you’d add about 2 tsp. sodium lactate.
- Once the batter has reached a light trace, add 1 tablespoon Green Tea Extract and stick blend to fully incorporate.
- Add 1 tablespoon dispersed Titanium Dioxide to the entire mixture. Use the stick blender to mix in the colorant, alternating between pulsing and stirring with the blender. As you stick blend, the color will become lighter but will still be a tan color. Don’t worry! The color will continue to lighten as it hardens in the mold.
- Split the batch in half. It’s okay to eyeball it. Each container will hold about 3 cups of soap.
- To one container, add 1 tablespoon dispersed Hydrated Chrome Green Oxide. Use a whisk to fully mix in the colorant.
- Add half of the Green Tea Fragrance Oil into the green soap mixture, and use the stick blender to fully incorporate the fragrance oil. Continue to stick blend until the soap batter reaches a medium trace. It should be the texture of thick cake batter.
- Place the mold onto a large cutting board to help transfer the mold later. Pour the green soap into the cavities, filling each about halfway. Use the cutting board to tamp the mold onto the counter to help release any air bubbles.
- To the remaining soap, add 1 tablespoon Forest Green Jojoba Beads. Use a whisk to fully mix in the beads.
- Mix in the remaining Green Tea Fragrance Oil and use a whisk to fully incorporate the fragrance.
- Slowly and carefully, pour the soap into each cavity, on top of the green layer. Pour gently so you do not break through the green layer below.
- Allow the soap to sit in the mold for several minutes. Once the top layer has thickened, use a spoon to create a gentle swirl. Be careful to not push too far into the soap and disturb the green layer below. Once you’re happy with the swirl, spray the top of the soap with 99% isopropyl alcohol to prevent soda ash. Continue to spray the soap every 15-20 minutes for the first hour. Allow to sit in the mold for 3-4 days. Gently remove the soap and allow to cure for 4-6 weeks.