• August 29, 2008
These flip flop soaps for summer are simple to make and look impressive when finished.
flip1
Here’s what you will need to make these simple yet fabulous soaps
Rubbing Alcohol Spritzer
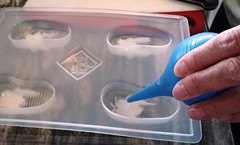
Step One: Melt a small amount of your Shea Melt and Pour in a microwave safe dish (Pyrex or a coffee mug will work). Stir in a couple drops of your fragrance oil (usage rate is .25-.5 ounces per pound of soap). Fill your dropper with the white soap base and pour it into the flower/thong part of the flip flop soap mold. Give this a spritz with alcohol to get rid of those bubbles.
lavenderdropper
Step Two: After the first layer has had a chance to solidify, melt the rest of your soap in the microwave. Add your Lavender Fragrance Oil and 1 drop of your Blue Mix LabColor. Add more color if you want a darker blue. I loved the pastel color that I got with just 1 drop. If you want a bright blue, just remember that you’ll want to use clear soap because white + blue = light baby pastel blue. Before you add your blue layer, give your first layer another spritz with alcohol to ensure that your layers will stick together. Fill the mold to the top with your beautiful blue soap and spritz once again for a smooth finish.
color1
Step Three: Let the soaps cool for about 5-6 hours before popping them out of their molds.


You may also like these

Become an email subscriber

Enter your email address below and you will receive all our new posts directly in your email inbox.

  1. Thanks so much for my order and enclosed gift. The injection tool works well and I love the Almond fragrance. Thanks again

    1. I so adore the Injection Tool as well. It really helps make detail soaping easy =)

  2. Teresa,

    I’m excited that it worked out well for you – and I would love a package (but it’s totally not necessary) =)

    A-M

  3. Thanks, Anne-Marie, and thanks again, Paula! It worked like a charm (reheating and using the syringe tool). I’m so thrilled because I was able to finish my soap experiment (and you will finally get a pkg in the mail from me, Anne-Marie!).

  4. Paula, thanks! I think I remember reading your post with that advice before but I’d forgotten. I didn’t realize you can reheat/re-melt MP soap. (Can you tell I’m a novice?)

  5. The best thing for working with small amounts of soap is to use the injection tool that comes in this really affordable kit that BB sells:
    https://www.brambleberry.com/kits.html

    You heat up a small dish of colored/scented soap, dip the injector in and squeeze out just as much soap just as fast or as slow as you want. If it starts to get thick dip the tip into hot water or just squirt the remaining soap back into your small dish and reheat, rinse out the injector with hot water, and continue.

    I always have a pot of simmering water to rinse off my tools while I’m making soap.

  6. These are so adorable and very popular! I refuse to put them away for the fall/winter! We all need a little flip~flop in our everyday lives! 🙂

  7. I know this mold very well~ they were a HUGE hit for over 240 bridal favors I created~ They were equally popular young & old…:)

  8. I have to laugh at the above posting when she says does she just not blink while making the soap. I have encountered the same problem, primarily with the white bases, especially when working with small quantities and trying to do detailed work. I have found that using a chocolate melter to help keep my soap hot while working helps but it would be nice to get other suggestions. I have gone through many a dropper as the soap gets hard before I am done.

  9. I find that when I make small quantities of MP soap, like what you did for the sandal straps, it cools off suddenly and it gets all goopy (and won’t pour properly). Any suggestions for how to avoid that or do I just make sure I don’t blink when I make small quantities and just work extremely fast? :}

    Thanks!

Comments are closed.

{"email":"Email address invalid","url":"Website address invalid","required":"Required field missing"}

The Latest from Soap Queen TV

Inspired by Gems & Crystals

All About Essential Oils

The Power of Charcoal

Create Your Own Clay Face Mask

DIY Bath Bombs

Cold Process Soap Tips & Tricks

Learn the Basics of Cold Process Soapmaking

Learn the Basics of Melt & Pour Soapmaking

Want to Start Your Own Soap Business?

Soap Business Success Stories

Soap Queen TV Favorites

Ingredient Spotlight

Disclosure

Unless stated otherwise, all images are original material and are copyrighted. If you'd like to use an image, please be a friend and credit the photo and link back to Soap Queen. Feel free to share, tweet and pin to your hearts content.