Ingredients
(NOTE: The Victorian Blossom 3D mold has been discontinued. It has been substituted with the 12 Cavity Rectangle Silicone Mold.)
Recipe Yields 1 Soap
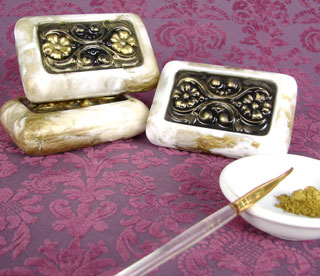
Get everything you need to make 4 bars of stunning 3D soap with the click of a button!

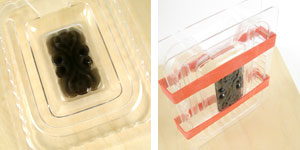
ONE: Melt one ounce of the clear soap base and add four to five drops liquid black colorant. Pour the black soap into the design of the front side of the mold. Allow to set-up completely and clean-up any drips using a clean up tool. Spritz the soap with rubbing alcohol then assemble the 3D soap mold.
(NOTE: The Victorian Blossom 3D mold has been discontinued. It has been substituted with the 12 Cavity Rectangle Silicone Mold. To achieve a Celtic design, simply paint on the design using gold mica.)
Tip: Make sure that the holes on each side of the mold are matched up (it’s easy to put one hole on the top and one on the bottom – whoops) and secure the top and the bottom of the mold with the thick rubber band.
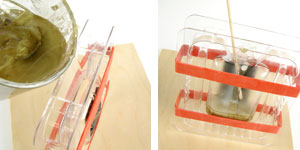
TWO: Melt the rest of the clear soap and mix in Heavy Metal Gold mica and fragrance oil (.1 oz per bar or .5 – .7 oz. for the full two pounds). In a separate container, melt the white soap base and mix in the fragrance oil.
THREE: Alternate pouring the two colors and poking the soap skin with a skewer to swirl the soap. For a full tutorial on how to swirl melt and pour, see the video on SoapQueen.TV.

FOUR: Once the soap is completely set up (4-6 hours), remove from the mold and trim the edges using a clean up tool or a non-serrated knife.
FIVE: Highlight the design by dry brushing the Heavy Metal Gold mica over the raised areas of the design. See this tutorial on the Soap Queen Blog for how to dry brush your soap.
Victorian Swirl 3D Melt & Pour Soap Tutorial
Ingredients
- 4 oz. Clear Melt & Pour soap base
- 3 oz. White Melt & Pour soap base
- Heavy Metal Gold Mica
- Liquid Black colorant
- Apricot Freesia Fragrance Oil
- 12 Cavity Rectangle Silicone Mold
Instructions
- Melt one ounce of the clear soap base and add four to five drops liquid black colorant. Pour the black soap into the design of the front side of the mold. Allow to set-up completely and clean-up any drips using a clean up tool. Spritz the soap with rubbing alcohol then assemble the 3D soap mold. Make sure that the holes on each side of the mold are matched up (it’s easy to put one hole on the top and one on the bottom – whoops) and secure the top and the bottom of the mold with the thick rubber band. (NOTE: The Victorian Blossom 3D Mold is discontinued. It has been substituted with the 12 Cavity Rectangle Silicone Mold. To achieve a Celtic design, simply paint on the design using gold mica.)
- Melt the rest of the clear soap and mix in Heavy Metal Gold mica and fragrance oil (.1 oz per bar or .5 – .7 oz. for the full two pounds). In a separate container, melt the white soap base and mix in the fragrance oil.
- Alternate pouring the two colors and poking the soap skin with a skewer to swirl the soap. For a full tutorial on how to swirl melt and pour, see the video on SoapQueen.TV.
- Once the soap is completely set up (4-6 hours), remove from the mold and trim the edges using a clean up tool or a non-serrated knife.
- Highlight the design by dry brushing the Heavy Metal Gold mica over the raised areas of the design. See this tutorial on the Soap Queen Blog for how to dry brush your soap.
Tried this recipe?Let us know how it was!